15 Create Rules to Monitor Issues

Create rules to generate incidents or alerts that allow you to monitor and maintain all your assets including vehicles, facilities, shipments, drivers, trips, equipment, ship-units, and ship items. Rules can facilitate and encourage driver accountability, track location deviations of trips and all its sub-entities, monitor condition of shipment items, monitor vehicle utilization and fuel costs.

Rules are typically applied on all entities of a specific type, such as all vehicles, all trips, its sub-entities, all shipments, facilities, or all drivers. You can also selectively apply a rule to specific vehicles or specific shipments.

Rules contain one or more conditions, which if met, generate alerts or incidents, and you are notified.

Rules can be broadly categorized into the following categories:

  • Location-Based Rules: Use location rules to monitor the geo-location of entities. For example, you can track when a vehicle leaves its assigned stop of a trip, and use the rule to generate an incident.

  • Threshold-Based Rules: Threshold rules are based on sensor or metric values. Use threshold rules to track sensor values, such as fuel levels and temperature values. For example, you can configure a threshold rule to raise an alert when the fuel levels of a vehicle goes below a threshold value.

    You can configure a threshold rule to trigger an incident based on sensor values of temperature or humidity. For example, you may want to monitor the condition of ship-items being transported in a trip.

    Threshold rules also let you track KPI values, such as the number of open incidents. For example, you may want to trigger an alert if the number of open outage incidents cross a threshold number.

  • Alert Rules: Use alert rules to respond to device alert conditions. If your sensor device supports alerts, then you can use alert rules to configure alert responses. For example, an alert rule can trigger a device action based on an alert.

  • Event-Based Rules: In this rule, you define event codes and target external subscribers to notification accounts. When the rule condition is met, the corresponding event is transmitted to the external system or to a webhook.

Use rules to trigger the following:

  • Incidents: Use incidents to report issues and notify the maintenance staff or concerned user for resolutions.

    The number of open incidents prominently appears on the metrics bar on the map view. Open incidents against an entity are also flagged under the respective entity's information page. You can access all reported incidents from the Incidents page of the Operation Center. The Organization Dashboard can lead you to the specific entities with open incidents.

  • Alerts: Use alerts to pass device-related alerts to other integrated applications or to generate messages that inform the state or condition of an entity. You can access all reported alerts from the Alerts page of the Operation Center, information page of each entity, or from the Organization Dashboard.

Create rules for an entity of an organization by one of the following ways:
  • On the Design Center, from the Organization view, use the Rules option.

  • On the Design Center, from the left navigation bar, select the entity for which you need to create a rule, and then use the Rules option.

Create a Rule

Create a rule to generate an incident or alert when a specific entity or all entities of a specific type, meets one or more conditions.

  1. Click Menu (Menu icon), and then click Design Center.
  2. Select Organization from the Design Center sub-menu.
    Alternatively, you can also select an entity from the Design Center sub-menu to create rules.
  3. Click Rules on the Organization or on the entity page.
  4. Click Create New Rule (Create New Rule icon).
  5. Enter a name for the rule in the Name field.
  6. Under Target, select one of these options from the Apply To list:

    Note:

    The Shipment business object will be deprecated in a future release. Hence it is recommended to use Trips for real-time monitoring of in-transit movements.
    • Vehicle Type: Select this option, and then select a vehicle type to apply the rule to a specific vehicle type.
    • Specific Vehicles: Select this option, and then select one or more vehicles to which the rule applies.
    • Facility: Select this option, and then select a facility to apply the rule to a specific facility. Note that a list of facilities is displayed only if your instance is integrated with Oracle Warehouse Management Cloud and you've imported facilities into your organization.
    • All Drivers: Select this option to create and apply the rule to all the drivers of the organization.
    • All Shipments: Select this option to create and apply the rule to all the shipments imported into the organization from Oracle Transportation Management Cloud.
    • Specific Shipments: Select this option, and then select a shipment to apply the rule to a specific shipment. Note that a list of shipments is displayed only if you have integrated with Oracle Transportation Management Cloud and shipments got imported into your organization.
    • All Trips: Select this option to apply the rule to all the trips of your organization.
    • All Equipment: Select this option to apply the rule to all the equipment of your organization.
    • All Ship Units: Select this option to apply the rule to all the ship-units of your organization.
    • All Ship Items: Select this option to apply the rule to all the ship-items of your organization.
  7. Select the rule condition(s) in the Condition area. Select one of the following values for Source:
    • Alert: Select this option to specify a device alert that triggers the rule and then select a Message Format from a list. For example, a speed violation event may generate an alert.
    • Location: Select this option to generate a notification when a vehicle enters or leaves a geofence. Select Entered or Exited and then select a geo-fence from the list. To create a new geofence, see Create a New Geofence.
    • Attribute: Select a sensor attribute in the Name field and corresponding values in the Comparator and Value fields. For example, the engine coolant temperature reaching a critical value may trigger the rule.
    • Metric: Select a system-defined metric or a user-defined metric in the Name field. Enter or select values for the Comparator and Value fields.
  8. (Optional) To provide additional conditions, click Add and repeat the previous step for all the conditions.
  9. Select these options in the Fulfillment area:
    • All Conditions Apply: Select this option to trigger the rule when all of the conditions are met.
    • Any Conditions Apply: Select this option to trigger the rule when at least one of the conditions is met.
    • Incident: Select this option to generate an incident when the rule is triggered.
    • Alert: Select this option to generate a server alert when the rule is triggered. Server alerts use predefined alert types. For example, you can generate a speed violation alert for an over-speeding vehicle.
  10. If you selected Incident in the Fulfillment area, complete these fields in the Incident Details area:
    • Summary: Enter a summary about the incident.
    • Description: Enter an optional description for the incident.
    • Type: Select the incident type: Maintenance or Warning.
    • Priority: Select a priority for the incident: Low, Medium, or High.
    • Tags: Enter optional tags for the incident. You can use tags to search for incidents on the Incidents dashboard.
    • Creation Event Code: A specific event code that is sent to an external system when an incident is generated. See Transmit Exception Events to External Systems. The event codes are recognized and interpreted by the external systems.
    • Resolution Event Code: A specific event code that is sent to an external system when the incident is resolved.
  11. If you selected Alert in the Fulfillment area, complete these fields in the Alert Details area:
    • Summary: Enter a summary about the alert.
    • Severity: Select an optional severity for the alert.
    • Type: Select a predefined alert type for generating the alert.
    • Suppression (minutes): Select the time in minutes to suppress consecutive alerts for the same rule.
  12. (Optional) If you selected Alert in the Fulfillment area, select the data to include with the alert notification:
    • Source Attributes: Select this option to include the source attributes with the alert message.
    • Context Information: Select this option to include context information with the alert message.
    • Message Payload: Select this option to include the message that generated the rule with the alert message.
    • Creation Event Code: A specific event code that is sent to an external system when an alert is generated. See Transmit Exception Events to External Systems.
  13. (Optional) Select subscriber(s) in the Subscribers list in the Notification Subscription area.
    When you add one or more subscribers, an email, SMS notification or an HTTP notification is sent when an alert or incident is generated.
  14. Optionally specify a weekly or monthly schedule during which the rule is in force.
    A rule is active at all times, by default. You can change this behavior to choose a custom schedule for the rule.
    1. Under Rule Schedule, select Custom.
    2. Select Repeat Weekly to create a weekly schedule. Alternatively, select Repeat Monthly to create a monthly schedule.
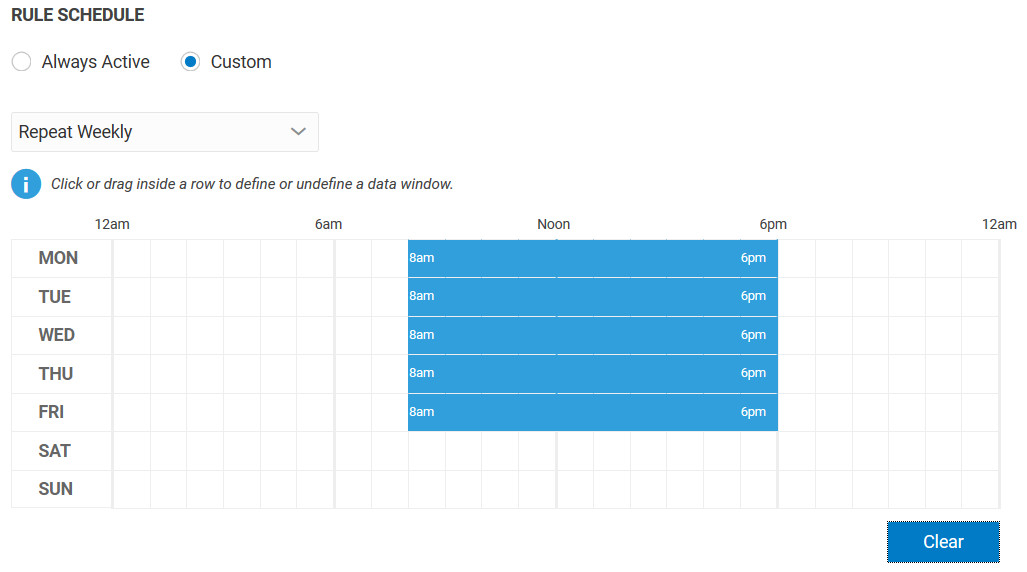
    3. Click or drag inside the rows to select a data window.
      You can click an incorrectly selected cell to deselect it. Alternatively, click Clear to start afresh.
    The following example shows a weekly schedule for a rule that it is active from 8:00 a.m. to 6:00 p.m. on weekdays.
    Rule Schedule

  15. Click Save.
  16. Click Back to return to the Rules list.

Rules Usage Examples

Review a few scenarios for creating rules that generates incidents or alerts.

Typically, you apply rules on all entities of a specific type, such as all vehicles, all trips, its sub-entities, all shipments, facilities, or all drivers. Alternatively, you can selectively apply a rule to specific vehicles or specific shipments. In the following examples, let's assume that the required vehicle types, vehicles, and trips have been configured in the application and you are familiar with the steps to Create a Rule.

Monitor Vehicles

The following examples show you how to use sensor attributes and metrics to keep track of vehicles' performance.

Example 15-1 Detect over-usage of fuel by vehicles

Scenario: As an administrator, you should receive alerts when any vehicle consumes unusual amount of fuel, which can help you monitor fuel efficiency and performance of vehicles.

Solution: Create a rule on the vehicle type, use the ora_obd2_total_fuel_usedsensor attribute to check the fuel usage to a value, and raise an alert if the condition is met.
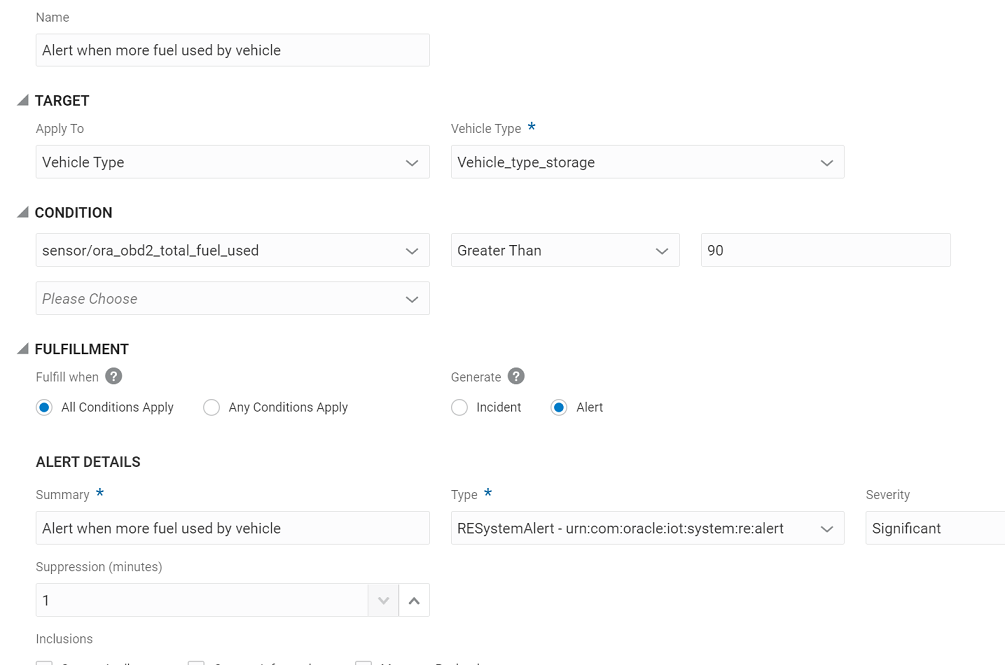
Create rule UI to detect fuel overuse using alerts

Example 15-2 Detect vehicles that are inactive

Scenario: As an administrator, you should have a list of vehicles that have been inactive over a period of time.

Solution: Create a rule on the vehicle type, use the inactive_duration system-defined metric to check the duration of inactivity with a value, and raise an incident if the condition is met.
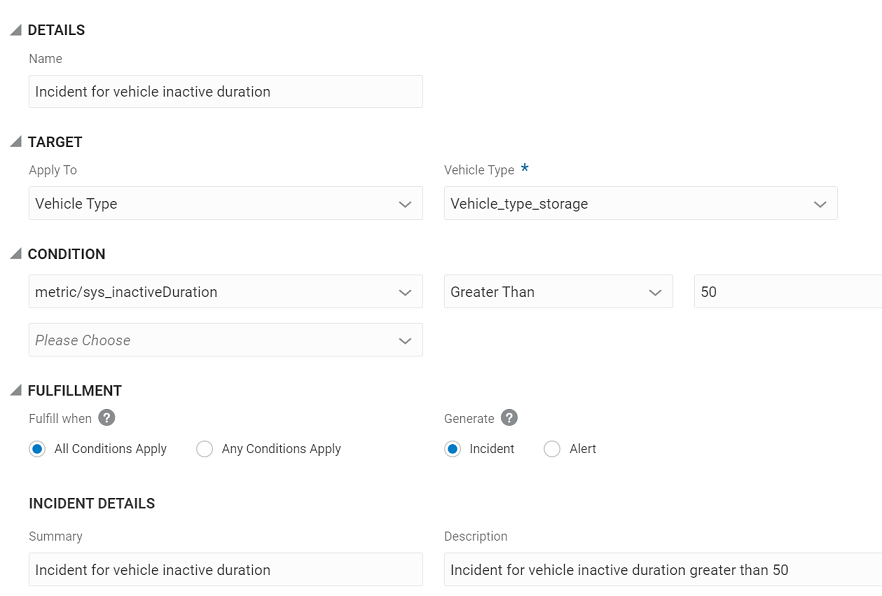
Create rule UI to detect inactive vehicles by raising incidents

Monitor Trips

The following examples show you how to use system-defined metrics in rules to get notified about trips.

Example 15-3 Monitor distance covered by a trip

Scenario: As an administrator, you should be able to identify those trips that cover unusual distances.

Solution: Create a rule on trips, use the sys_distanceTravelled system-defined metric to check the total distance traveled, and raise an incident if the condition is met.
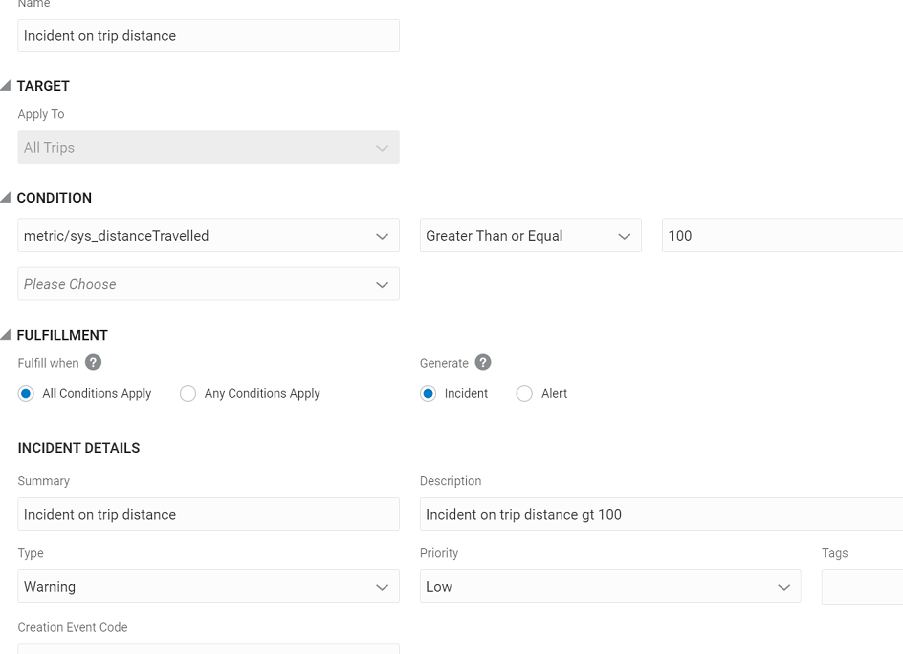
Create rule UI to check the distance covered by a trip

Example 15-4 Monitor duration elapsed in a trip

Scenario: As an administrator, you should be aware of those trips whose duration have exceeded a specific time threshold.

Solution: Create a rule on trips, use thesys_elapsedDurationSeconds system-defined metric to define a condition, and raise an alert if the condition is met.
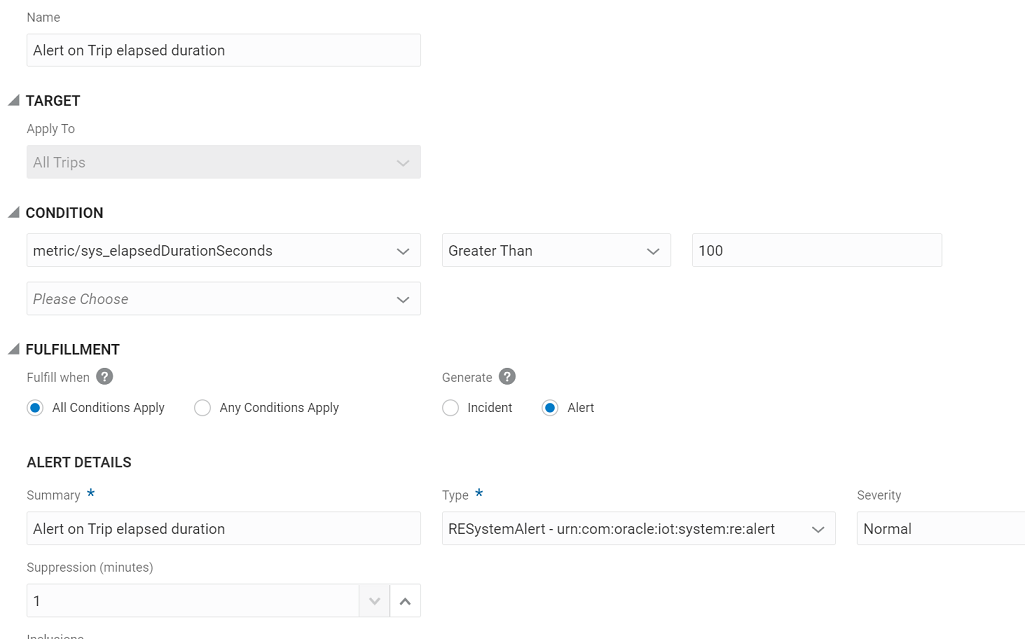
Create rule UI to track the time elapsed in a trip

Use Contextual Parameters in Incident Messages

When creating rules, you can use dynamic contextual parameters in the incident details. You can also use contextual parameters in string message values of your incident messages. The incident messages with contextual information are also sent as email notification to the subscribed users.

Contextual parameters can include variables, such as entity names, sensor values, metric values, and location coordinates of the entity. These variables are dynamically resolved each time the rule is triggered.

The following incident fields can include dynamic contextual parameters:

  • Summary
  • Description

Here's an example of the rule configuration screen containing dynamic contextual parameters in the Summary and Description fields:


Summary reads "Temperature for ${vehicle.name} is high." Description reads "Temperature for ${vehicle.name} is high. The current temperature is ${event.sensor.temp}."

And here's an actual Incident created by the preceding rule:

Summary reads "Temperature for Engine101 is high.". Description reads "Temperature for Engine101 is high. The current temperature is 240.997."

The following contextual parameters can dynamically retrieve entity, sensor, metric, rule, and location related information:

Note:

The Shipment business object will be deprecated in a future release. Hence it is recommended to use Trips for real-time monitoring of in-transit movements.
Parameter Type Parameter Name
Vehicle
  • ${vehicle.id}
  • ${vehicle.name}
  • ${vehicle.registrationNumber}
  • ${vehicle.vin}
  • ${vehicle.typeName}
  • ${vehicle.lastReportedTime}
  • ${vehicle.trip.name}
  • ${vehicle.driver.name}
Driver
  • ${driver.id}
  • ${driver.name}
  • ${driver.trip.name}
  • ${driver.vehicle.name}
Facility
  • ${facility.id}
  • ${facility.name}
  • ${facility.code}
Shipment
  • ${shipment.id}
  • ${shipment.name}
  • ${shipment.externalId} ${shipment.domain}
  • ${shipment.vehicle.name}
  • ${shipment.driver.name}
Trip
  • ${trip.id}
  • ${trip.name}
  • ${trip.externalId}
  • ${trip.domain}
  • ${trip.vehicle.name}
  • ${trip.driver.name}
Equipment
  • ${equipment.id}
  • ${equipment.tripEquipmentRef}
  • ${equipment.trip.name}
ShipUnit
  • ${shipunit.id}
  • ${shipunit.shipUnitNumber}
  • ${shipunit.trip.name}
  • ${shipunit.shipUnitKey}
  • ${shipunit.shipUnitType}
ShipUnit
  • ${shipitem.id}
  • ${shipitem.shipItemNumber}
  • ${shipitem.trip.name}
  • ${shipitem.shipItemKey}
Rule ${rule.id}

The following examples describe the usage of the parameters:

  • Vehicle Parameters

    • ${vehilce.name}: Retrieves the name of the asset for which the incident is generated.

      For example: The entity ${vehicle.name} has low fuel.

      May translate to:

      The asset RedTruck has low fuel.

    • ${vehicle.id}: Retrieves the ID (GUID) of the asset for which the incident is generated.

  • Sensor Parameters

    • ${event.sensor.attributeName}: Retrieves the value of the specified sensor attribute name.

      For example: The entity ${vehicle.name} has low fuel level: ${event.sensor.fuel}%.

      May translate to:

      The entity Truck1 has low fuel level: 10%.

      Here, fuel is a sensor attribute for the truck asset.

  • Metric Parameters: You can use metric-related parameters only if the rule condition uses the metric.

    • ${event.metric.name}: Retrieves the name of the metric that triggered the rule.

    • ${event.metric.value}: Retrieves the value of the metric that triggered the rule.

      For example: ${event.metric.name} for ${vehicle.name} is High: It is ${event.metric.value}.

      May translate to:

      Average Temperature for Engine1 is High: It is 150.

  • Rule Parameter

    ${rule.id}: Retrieves the ID (GUID) of the rule for which the incident is generated.

  • Location Parameters: You can use these contextual parameters only in location-based rules.

    • ${event.location.deviceId}: Retrieves the Device ID of the asset device.

    • ${event.location.latitude}: Retrieves the latitude co-ordinates of the device.

    • ${event.location.longitude}: Retrieves the longitude co-ordinates of the device.

    • ${event.location.altitude}: Retrieves the altitude reading of the device.

      For example: The entity ${vehicle.name} has exited its designated location. The entity's co-ordinates are: ${event.location.longitude} ${event.location.latitude}.

      May translate to:

      The vehicle Truck21 has exited its designated location. The vehicle's co-ordinates are: -122 37.

Edit a Rule

Edit a rule to change the assets the rule applies to and the rules for generating the incident or alert report.

  1. Click Menu (Menu icon), and then click Design Center.
  2. Select Organization from the Design Center sub-menu.
  3. Click Rules.
  4. Select a rule in the Rules list.
    You can also search for an asset type.
  5. Click the Edit (Edit Icon) icon.
  6. Edit the rule name.
  7. Edit the options in the Apply To area.
  8. Edit the settings in the Condition area.
  9. Edit the settings in the Fulfillment area.
  10. Click Save.
  11. Click Back to return to the Rules list.

Duplicate a Rule

Duplicate a rule to quickly copy the settings of an existing rule to a new rule.

  1. Click Menu (Menu icon), and then click Design Center.
  2. Select Organization from the Design Center sub-menu.
  3. Click Rules.
  4. Select a rule in the Rules list.
    You can also search for an asset type.
  5. Click the Duplicate (Duplicate icon) icon.
  6. Enter a name for the rule in the Name field and then modify the other rule settings including the apply to, condition, type, create incident, and create alert values.
  7. Click Save.

Delete a Rule

Delete a rule when it is no longer required.

  1. Click Menu (Menu icon), and then click Design Center.
  2. Select Organization from the Design Center sub-menu.
  3. Click Rules.
  4. Select a rule in the Rules list.
    You can also search for a rule.
  5. Click the Delete (Delete icon) icon.
  6. Click Yes.

Activate or Deactivate a Rule

Activate an existing rule to generate incidents or alerts when the rule criteria are met. Deactivate a rule to stop rule evaluation.

  1. Click Menu (Menu icon), and then click Design Center.
  2. To see all rules in the organization, select Organization from the Design Center sub-menu.
    Alternatively, for vehicle-based rules, you can select Vehicle Types from the Design Center sub-menu.
    For trip-based rules, you can select Trips from the Design Center sub-menu.
  3. Click Rules on the Organization, Vehicle Types, or Trips page.
  4. Select a rule in the Rules list.
  5. Select one on these options:
    1. To deactivate a rule, clear the Enabled checkbox.
    2. To re-enable a rule, select the Enabled checkbox.