Use External Storage Options for Long-Term Data Availability and Analysis

You can choose to use one of the external storage options, namely Oracle Autonomous Database or OCI Object Storage, to safely and cost-effectively store your IoT sensor and analytics data for long-term persistence.

The application can use your external storage to store raw or aggregated sensor attribute data, and data related to analytics artifacts, such as metrics, anomalies, predictions, and trends. You can also store your rule incidents and warnings. You can use the historical data for visualization and analysis in external and third party applications.

You can use the rich querying functionality in Oracle Autonomous Database, or chart and analyze the stored data in external applications, such as Oracle Analytics Cloud. For example, you can use analyses, projects, and dashboards in Analytics Cloud to find the answers that you need from key IoT data displayed in graphical formats. You can use applications such as Oracle Visual Builder to create dashboards and mashups.
Use OCI Object Storage to Store Historical IoT Data

The Oracle Cloud Infrastructure (OCI) Object Storage service is an internet-scale, high-performance storage platform that offers reliable and cost-efficient data durability. If you have a subscription for OCI Object Storage, you can use it to store your IoT sensor and analytics data for long-term persistence.

You can learn more about OCI Object Storage here:

Use the following steps to add and configure your external OCI Object Storage:

  1. Add an Oracle Cloud Account
  2. Connect to an OCI Object Storage Instance
  3. Add and Configure Your External OCI Object Storage Integration

Add an Oracle Cloud Account

Use the Settings > Integrations page in your IoT application to configure an Oracle Cloud account. This Oracle Cloud account is used when specifying integration settings, such as OCI Object Storage settings.

  1. In your IoT application, click Menu (Menu icon), and then click Settings.
  2. Click Integrations.
  3. Click Add Add icon to add a new integration.
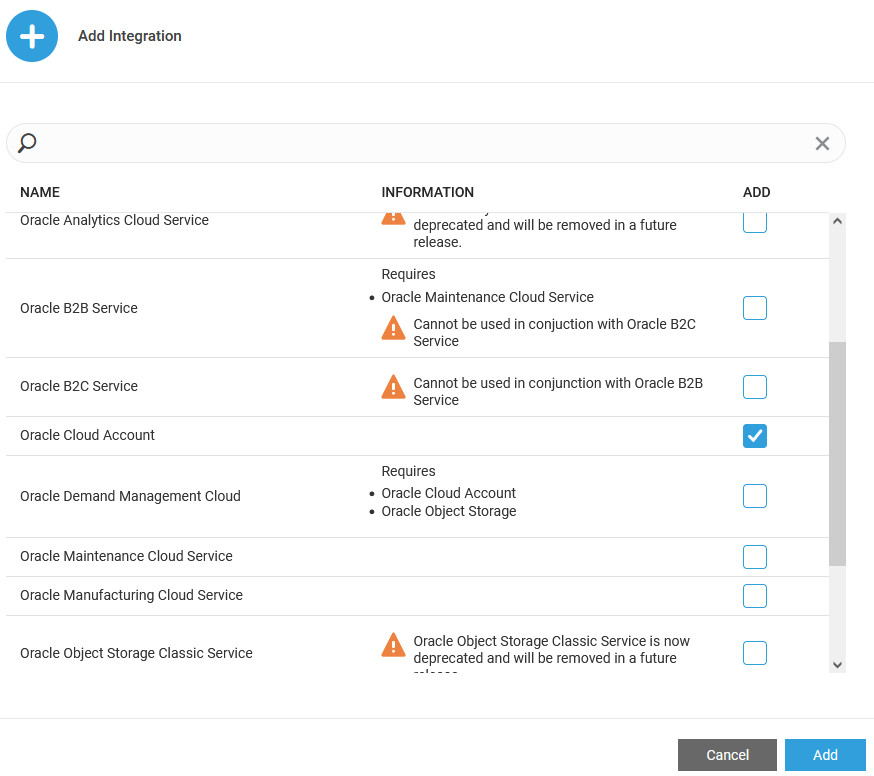
  4. In the Add Integration dialog, select Oracle Cloud Account and click Add.
    Tip: You can also search for an integration name in the list.

    Add Integration dialog with Oracle Cloud Account selected

    Oracle Cloud Account integration gets added to the Integrations page.
  5. Under Oracle Cloud Account, add your cloud account details:
    1. Enter your Tenant OCID.
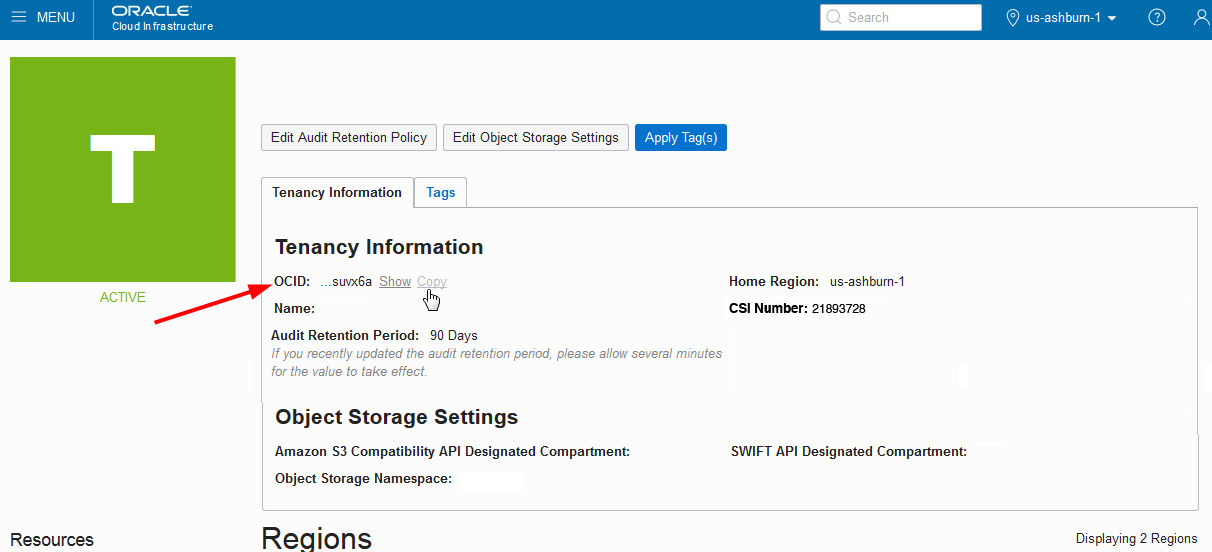
      The tenancy details are available from the Oracle Cloud Infrastructure Console. You need to log in to your Oracle Cloud Infrastructure Console. From the Profile menu, click Tenancy: <YourTenancyName>.
      The tenancy OCID is shown under Tenancy Information. Click Copy to copy it to your clipboard.

      Tenant OCID

      Paste this value under Tenant OCID in your IoT application.
    2. Enter the User OCID.
      The user details are available from the Oracle Cloud Infrastructure Console. You need to log in to your Oracle Cloud Infrastructure Console. From the Profile menu, click User Settings.

      The user OCID is shown under User Information. Click Copy to copy it to your clipboard.

      Paste this value under User OCID in your IoT application.
    3. Under Public Key, click Generate.
    4. Click Close.
  6. Set the public key in OCI Object Storage.
    1. On the Settings>Integration page of your IoT application, under Oracle Cloud Account, click Copy against Public Key to copy the public key that you generated earlier.
    2. Log in to your Oracle Cloud Infrastructure Console.
    3. Under the Profile menu, click User Settings.
    4. Click API Keys under Resources.
    5. Click Add Public Key.
      Note: If three public keys are already listed under API Keys, you have to first delete one public key. An OCI Object Storage service user can't have more than three public keys.
    6. Select Paste Public Keys and paste the key that you copied from your IoT application.
    7. Click Add.
      The fingerprint for the added public key appears under API Keys. The fingerprint should be the same as that displayed on the Settings page of your IoT application.

Connect to an OCI Object Storage Instance

Use the Integrations page in your IoT application to configure OCI Object Storage connection details and to enable Object Storage.

Before configuring the OCI Object Storage connection, you should have already added your Oracle Cloud account on the Settings page.
  1. In your IoT application, click Menu (Menu icon), and then click Settings.
  2. Click Integrations.
  3. Click Add Add icon to add a new integration.
  4. In the Add Integration dialog, select Oracle Object Storage Service and click Add.
    Tip: You can also search for an integration name in the list.
    Oracle Object Storage integration gets added to the Integrations page.
  5. On the Integrations page, under Object Storage Service, click Connect.
  6. In the Oracle Object Storage dialog, provide your object storage connection details.
    1. Enter the Storage URL for your OCI Object Storage.
      For example, https://objectstorage.us-phoenix-1.oraclecloud.com.
    2. Enter the object storage Namespace for your tenancy.
      You can find the object storage namespace in your Oracle Cloud Infrastructure Console. You need to log in to your Oracle Cloud Infrastructure Console. From the Profile menu, click Tenancy: <YourTenancyName>.
    3. Enter the Default Bucket name that stores the data.
      The bucket name must already exist in your OCI Object Storage instance.
    4. Click Verify Connectivity to verify the connection details and bucket name.
    5. Click Save to save the OCI Object Storage connection details.
  7. To enable the connection on the Integrations page, click Edit Configuration under Oracle Object Storage.
  8. Toggle the Integration Status switch to ON, and click Save.

Add and Configure Your External OCI Object Storage Integration

To start storing IoT historical data in your OCI Object Storage, add and configure a new integration for External Data Storage (Oracle Object Storage).

Note:

You should have already added an Oracle Cloud account and specified the connection settings for your OCI Object Storage instance.

  1. In your IoT application, click Menu (Menu icon), and then click Settings.
  2. Click Integrations.
  3. Click Add Add icon to add a new integration.
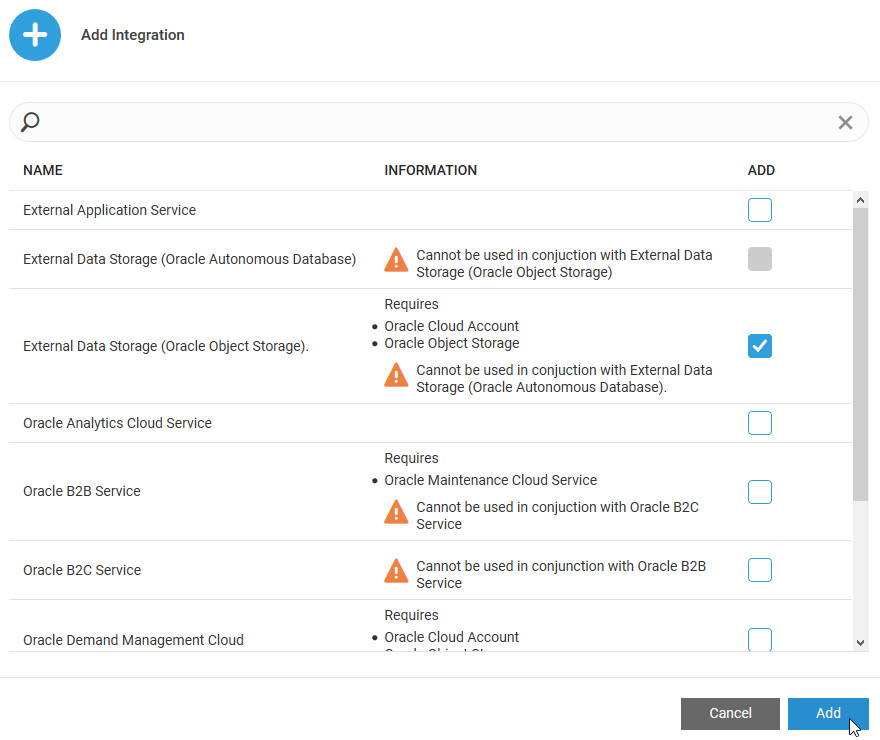
  4. In the Add Integration dialog, select External Data Storage (Oracle Object Storage) and click Add.
    Tip: You can also search for an integration name in the list.

    Add Integration Dialog (described in Steps)

    Note:

    You can only have one external data storage integration at a time. So, you cannot add both Oracle Autonomous Database and Oracle Object Storage integrations at the same time. If you need to switch from Oracle Autonomous Database integration to Oracle Object Storage, you should first remove the Oracle Autonomous Database integration from the Integrations page.
    The External Data Storage (Oracle Object Storage) integration gets added to the Integrations page.
  5. On the Integrations page, under External Data Storage (Oracle Object Storage), click Edit Configuration.
    1. Optionally enter a File Prefix.
      Your IoT application prefixes the specified File Prefix to the file names that it stores in OCI Object Storage. This helps with easy identification of files.
    2. The Default Bucket is pre-populated with the bucket that you have used in your Object Storage connection settings.
    3. Optionally change the Export Interval if you want your application to write more frequently to OCI Object Storage.
      The default data export interval is 4 Hours.
    4. Select the IoT data that you wish to store externally:
      • Attributes: You can choose to export all raw sensor attribute data. Alternatively, you can choose to export only aggregated attribute data, which exports aggregates, such as Average, Maximum, and Minimum values of your attribute values. Under Attributes Granularity Level, select Aggregated to export only aggregated attribute data. Under Attributes Granularity Level Interval , specify the aggregation interval. This determines the frequency at which the aggregated values are calculated.

        If you select None (raw data), then all raw sensor data is exported.

      • Metrics: Select to export metric data corresponding to system metrics and computed metrics.

      • Anomalies: Select to export anomaly data.

      • Predictions: Select to export prediction data.

      • Trends: Select to export data related to trends.

      • Incidents: Select to export your rule incidents.
      • Warnings:Select to export your rule warnings.
    5. Toggle the Integration Status switch to Enabled.
  6. Click Save to save your configuration settings.

Use Oracle Autonomous Database to Store Historical IoT Data

Oracle Autonomous Database runs on Oracle Cloud Infrastructure and provides workload-optimized cloud services for transaction processing and data warehousing. If you have a subscription for Oracle Autonomous Database, you can use it to store your IoT sensor and analytics data for long-term persistence.

You can choose either an Oracle Autonomous Transaction Processing database , or an Oracle Autonomous Data Warehouse database to externally store your IoT data.

Use the following steps to add and configure your external Oracle Autonomous Database storage:

  1. Add an Oracle Autonomous Database Integration
  2. Enable and Configure the Oracle Autonomous Database Integration

Add an Oracle Autonomous Database Integration

To start storing IoT historical data in an Oracle Autonomous Database, add and configure a new integration for External Data Storage (Oracle Autonomous Database).

  1. In your IoT application, click Menu (Menu icon), and then click Settings.
  2. Click Integrations.
  3. Click Add Add icon to add a new integration.
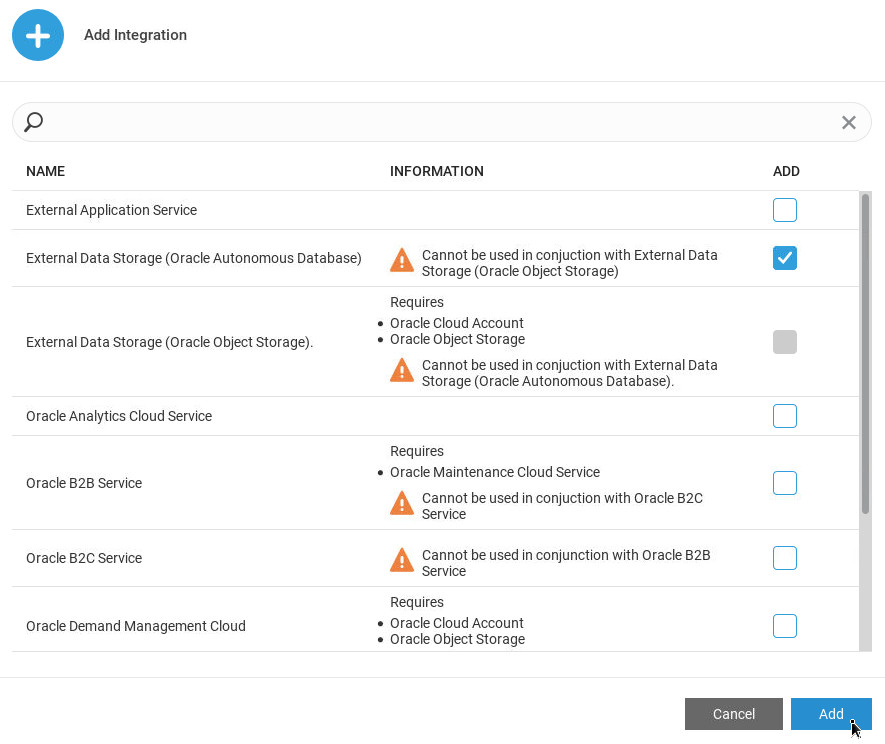
  4. In the Add Integration dialog, select External Data Storage (Oracle Autonomous Database) and click Add.
    Tip: You can also search for an integration name in the list.

    Add Integration Dialog (described in Steps)

    Note:

    You can only have one external data storage integration at a time. So, you cannot add both Oracle Autonomous Database and Oracle Object Storage integrations at the same time. If you need to switch from Oracle Object Storage integration to Oracle Autonomous Database, you should first remove the Oracle Object Storage integration from the Integrations page.
    The External Data Storage (Oracle Autonomous Database) integration gets added to the Integrations page.
  5. On the Integrations page, under External Data Storage (Oracle Autonomous Database), click Connect to specify the connection details.
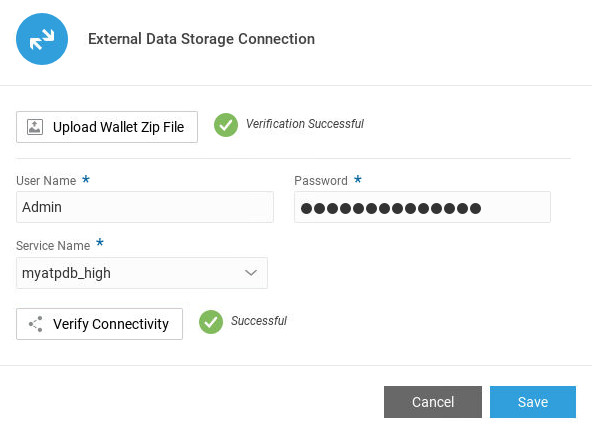
    1. In the External Data Storage Connection dialog, click Upload Wallet Zip File to upload the wallet required to securely connect to your database.
      Oracle client credentials (wallet files) are downloaded from Oracle Autonomous Database by a service administrator. If you are not the database administrator, your administrator should provide you with the client credentials. The wallet file for the ATP/ADW database can be downloaded from the ATP/ADW service console.
      After you upload the wallet file, the application verifies the wallet and prompts you for the database login credentials.
    2. Enter the User Name and Password used to log into the database.
    3. Select the Service Name for the database.
      The list of service name options is retrieved from the wallet that you uploaded earlier.
    4. Click Verify Connectivity to verify connectivity to your Oracle Autonomous Database instance.

      External Data Storage Connection Dialog (Described in Steps).

      The Save button is enabled after successful verification of the connection credentials.
  6. Click Save to save your Oracle Autonomous Database connection settings.

Enable and Configure the Oracle Autonomous Database Integration

To start storing IoT historical data in your Oracle Autonomous Database, enable and configure the integration for External Data Storage (Oracle Autonomous Database).

  1. In your IoT application, click Menu (Menu icon), and then click Settings.
  2. Click Integrations.
  3. Under External Data Storage (Oracle Autonomous Database), click Edit Configuration.
    1. Optionally enter a Table Prefix.
      Your IoT application prefixes the specified Table Prefix to the table names that it creates in Oracle Autonomous Database. This helps with easy identification of tables.
    2. Optionally change the Export Interval if you want your application to write more frequently to Oracle Autonomous Database.
      The default data export interval is 4 Hours.
    3. Select the IoT data that you wish to store externally:
      • Attributes: You can choose to export all raw sensor attribute data. Alternatively, you can choose to export only aggregated attribute data, which exports aggregates, such as Average, Maximum, and Minimum values of your attribute values. Under Attributes Granularity Level, select Aggregated to export only aggregated attribute data. Under Attributes Granularity Level Interval , specify the aggregation interval. This determines the frequency at which the aggregated values are calculated.

        If you select None (raw data), then all raw sensor data is exported.

      • Metrics: Select to export metric data corresponding to system metrics and computed metrics.

      • Anomalies: Select to export anomaly data.

      • Predictions: Select to export prediction data.

      • Trends: Select to export data related to trends.

      • Incidents: Select to export your rule incidents.
      • Warnings:Select to export your rule warnings.
    4. Toggle the Integration Status switch to Enabled.
  4. Click Save to save your configuration settings.

Use Oracle Analytics Cloud to Chart and Analyze Externally Stored Data

You can chart and analyze the stored data in external applications, such as Oracle Analytics Cloud. For example, you can use analyses, projects, and dashboards in Analytics Cloud to find the answers that you need from key IoT data displayed in graphical formats.