6 Register and Activate Devices

The administrator can register/provision a user mobile device using the QR code, or by sharing the automatic provisioning link.

You can also choose to register a device, or batch of devices, from the Oracle Internet of Things Cloud Service management console.

Provision a User Device Using QR Code or Automatic Link

Use the Oracle IoT Connected Worker Mobile application to provision the user device.

Note:

The steps in the following sections use the Android application. The Connected Worker mobile app is now also available for the iOS platform. The steps for the iOS platform are similar.

An Oracle IoT Connected Worker Cloud Service administrator can help with the automated provisioning of your mobile device.

If the user is at the same location as the administrator, then scan the provisioning QR Code with the user's mobile device. If the user is at a remote location, share the automatic provisioning link with the user.

  1. Log in to Oracle IoT Connected Worker Cloud Service using an administrator account.
    The Oracle IoT Connected Worker Cloud Service URL is https://hostname/cw, where hostname is the host name of your Oracle Internet of Things Cloud Service instance.
  2. Click Menu Menu icon and then click Design Center.
    Make sure that the User Management tab is selected.
  3. Click Provision Device Provision Device Icon against the user name for whom you are provisioning the device.
    The Provision Dialog that appears contains the following:
    • QR Code: This is a one-click session-specific provisioning link that the user can scan with the user's device.
    • Send Email: Lets the administrator send the provisioning link to a user's registered email address.
    • Copy Link: Lets the administrator copy the device provisioning link to share it with the user.
  4. If the user is at the same location as the administrator, then scan the QR Code with the user's mobile device.
    1. Tap the link returned by the QR code.
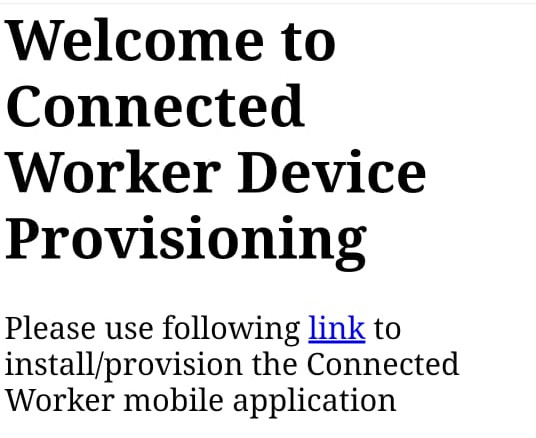
      The following message appears in your mobile browser window prompting you to provision the device:

      A prompt to click the provision device link.

    2. Tap the link in the prompt to provision the device.
      The device is provisioned using the IoT Connected Worker Service application on your mobile device. If you do not have the Oracle IoT Connected Worker Mobile application on your device, you are taken to Google Play to install the application before the device is provisioned.
    3. Open the Oracle IoT Connected Worker Mobile Application and then read and agree to the legal terms.
    4. Enter the user name for the Oracle IoT Connected Worker Cloud Service user account in the Username field.
    5. Enter the password for the Oracle IoT Connected Worker Cloud Service user account in the Password field.
    6. Tap the Login (Login icon) icon.
  5. If the user is at a remote location, share the provisioning link using the Send Email or Copy Link options.
    The following steps are performed by the user on the user's mobile device:
    1. Look for the mail with the following subject: "IoT Connected Worker Device Provisioning".
      Alternatively, if the link was shared using a different channel, find the link on your mobile device.
    2. Tap the link contained in the mail, or the shared link, to provision the device.

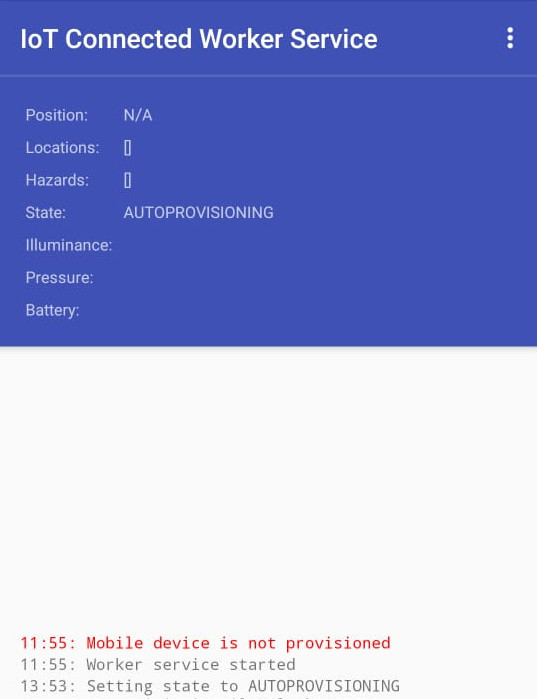
      Auto Provisioning Using IoT Connected Worker Service

      The device is provisioned using the IoT Connected Worker Service application on your mobile device. If you do not have the Oracle IoT Connected Worker Mobile application on your device, you are taken to Google Play to install the application before the device is provisioned.
    3. Open the Oracle IoT Connected Worker Mobile Application and then read and agree to the legal terms.
    4. Enter the user name for the Oracle IoT Connected Worker Cloud Service user account in the Username field.
    5. Enter the password for the Oracle IoT Connected Worker Cloud Service user account in the Password field.
    6. Tap the Login (Login icon) icon.

Manually Provision the Oracle IoT Connected Worker Mobile Device

An Oracle IoT Connected Worker Cloud Service administrator can also use a provisioning file and password to securely provision a user's device.

Note:

If you have previously installed the Oracle IoT Connected Worker mobile application, open the application and then complete steps 4 to 6 of this procedure. You cannot open the application if you have not registered the mobile device, downloaded the provisioning file to the mobile device, and provisioned the mobile device. See Register a Single Device Using the Management Console.
  1. Register your mobile device and download the provisioning file to the mobile device. See Register a Single Device Using the Management Console.
  2. Install the Oracle IoT Connected Worker Mobile and IoT Connected Worker Service applications:
    1. Open an internet browser on your mobile Android device.
    2. Browse to Google Play.
    3. Search for Oracle IoT Connected Worker.
    4. Install the Oracle IoT Connected Worker Mobile Application on your mobile device.
  3. Provision the device on which the Oracle IoT Connected Worker Mobile Application is installed:
    1. Open the IoT Connected Worker Service application on your mobile device.
    2. Tap Menu Menu icon and then Settings.
    3. Tap Provision Mobile Device.
    4. Tap Select Provisioning File, browse to the location of the provisioning file you downloaded in step 1, and then tap the provisioning file.
    5. Enter the provisioning file password and then tap OK.
  4. Open the Oracle IoT Connected Worker Mobile Application and then read and agree to the legal terms.
  5. Enter the user name for the Oracle IoT Connected Worker Cloud Service user account in the Username field.
  6. Enter the password for the Oracle IoT Connected Worker Cloud Service user account in the Password field.
  7. Tap the Login (Login icon) icon.

Register a Single Device Using the Management Console

To communicate with Oracle Internet of Things Cloud Service, every device that is connected to Oracle Internet of Things Cloud Service must be registered and then activated. All devices are registered as a Directly Connected Device (DCD). During activation, the device indicates support for indirect enrollment. A device indicating indirect enrollment capability is automatically changed from DCD to gateway.

  1. On your mobile device, open a web browser and browse to the URL of your Oracle Internet of Things Cloud Service instance. Typically, the URL is https://hostname/ui.
  2. Enter your user name and password and then click Sign In.
  3. Click the Menu (Menu icon) icon next to the Oracle Internet of Things Cloud Service title on the Management Console.
  4. Click Devices.
  5. Click Registration.
  6. Click Register Single Device in the right pane.
  7. Enter worker-device- and then a unique activation name in the Activation ID field. For example, worker-device-mymobiledevice.
  8. (Optional) Complete the remaining fields.

    Note:

    If you leave the Activation Secret field blank, a value is auto-generated and displayed when the device registration is confirmed. You can enter your own Activation Secret value. Any additional information, such as Name, Description, and Metadata are optional, but can be useful as search criteria when managing your registered devices.
  9. Click Register.
  10. Enter a password in the File Protection Password field to encrypt the provisioning file that contains the configuration and credentials to activate your device.
  11. Enter the password again in the Confirm Password field.
  12. Download the provisioning file:
    1. Click Download Provisioning File.
    2. Click Save File.
    3. Click OK.
    4. Browse to a location to save the provisioning file.
    5. Click Save.
  13. Click Finish.

Register a Batch of Devices Using the Management Console

Registering a batch of devices reduces the time required to register multiple devices. You create a comma-separated values (CSV) file to define the settings for each device. You upload the CSV file to Oracle Internet of Things Cloud Service.

To view the information that you should include in the CSV file, see About CSV Batch Registration File Properties.
  1. Open a web browser and browse to the URL of your Oracle Internet of Things Cloud Service instance. Typically, the URL is https://hostname/ui.
  2. Click the Menu (Menu icon) icon adjacent to the Oracle Internet of Things Cloud Service title on the Management Console.
  3. Click Devices.
  4. Click Registration.
  5. Select one of these options:
    • Click Download CSV template to download a CSV template that you can complete.

      Note:

      The CSV file contains the mandatory and optional property values for each device. If a value is not provided for the optional properties, insert a comma to indicate that a value is not provided. In the last line of the sample CSV file, a comma indicates that property values are not provided for ActivationId and Activation Secret
    • Click Batch Registration to upload an existing CSV file.
  6. Click Browse and browse to the CSV file that contains the registration information for the devices you are registering.
  7. Click Next when the CSV registration file is successfully uploaded.
    If the Review page contains a warning (A yellow triangle with an exclamation point. This icon is used if there is at least one device in the CSV file that is already registered) icon, select one of these options:
    • Update - Choose this option if you want to update the information for an existing registered device. The registered device has the same manufacturer, model and serial number as one of the devices listed in the CSV registration file.
    • Ignore - Choose this option if you do not want to include the device in the current registration process.
  8. Click one of these options:
    • Next: Click to proceed to register the items in the CSV registration file that have been identified as being viable candidates for registration.

    • Cancel: Click to discontinue the batch registration process.

  9. Enter a password in the File Protection Password field to encrypt the provisioning file that contains the configuration and credentials to activate your device.
  10. Enter the password again in the Confirm Password field.
  11. Download the provisioning file:
    1. Click Download Provisioning File.
    2. Click Save File.
    3. Click OK.
    4. Browse to a location to save the provisioning file.
    5. Click Save.
  12. Click Finish.

About CSV Batch Registration File Properties

The following table provides descriptions of the properties that appear in the Comma Separated Values (CSV) file used to register a batch of devices with Oracle Internet of Things Cloud Service. Mandatory and optional values are described in the table and are listed in the order they are expected to appear in the CSV file.

To register a batch of devices with Oracle Internet of Things Cloud Service, see Register a Batch of Devices Using the Management Console.

Property Required / Optional Description

Name

Optional

The String data type assigned to the registered device. This value can be modified after device registration.

Manufacturer

Required

The manufacturer of the device.

Model Number

Required

The model number of the device

Serial Number

Required

The serial number of the device.

Activation ID

Optional

A Device Unique Identifier (UID) that is required for device activation. If a value is not specified, an auto-generated value is assigned to the device after a successful registration. The value cannot be changed after the device is successfully registered.

Activation Secret

Optional

The Activation Secret (also known as Shared Secret) value required to activate your device. If a value is not specified, an auto-generated string value is assigned to the device after a successful registration. This value is available after a successful registration. This value can be modified before you modify your device.

Latitude

Optional

The decimal notation of the latitude of the device’s position. For example: -43.5723 [World Geodetic System 1984]. If you specify the latitude, then you must also specify the longitude.

Longitude

Optional

The decimal notation of the longitude of the device’s position. For example: , e.g. -43.5723 [World Geodetic System 1984]. If you specify the longitude, then you must also specify the latitude.

Altitude

Optional

The decimal notation of the altitude of the device’s position, in meters above sea level.

Accuracy

Optional

The accuracy of the device’s position in meters. This must be a positive number or zero. An accuracy value can only be specified if the latitude and longitude are provided.

Metadata

Optional

Key/value pairs that are listed in successive columns. There must be an even number of columns containing keys and values. If there is an odd number of columns, an error message is returned.

Associate a Device with a User

Associate a device with a user to identify the device that is assigned to them. Associating devices lets you track sensor data for workers appearing in the map view. Associating devices also lets you create employee rules.

  1. Click Menu Menu iconand then click Design Center .
  2. Click the Device Association Device Association icon tab.
  3. Select Tracking to attach tracking devices. Alternately, select Sensor to attach sensor devices.

    Select between tracking and sensor devices.

  4. Click Create New Add icon.
  5. Select the user from the User list.
  6. Under Devices, select one or more devices.
  7. Click Create to add the device associations for the selected user.
  8. (Optional) Click Edit Edit iconto assign an additional device or to remove an assigned device. When you remove all assigned devices, the user is removed from the Device Association dashboard.