Creating destinations
Learn more by watching the video!
Oracle Audience Segmentation allows you to export data and segments by running export jobs and campaign jobs. Before setting up an export job or campaign in Oracle Audience Segmentation, you will need to create the destination, which includes all the details of where the data will be exported to.
Note: To create the destination, you will need to provide your own Secure FTP site to enable the data transfer. Oracle Audience Segmentation does not provide Secure FTP sites.
Create a destination
To create a destination:
-
Click the Oracle icon
 in the bottom-right corner to open the navigation menu.
- Select Destinations.
- In the top-right corner, click Create destination.
Step 1: Define destination details
The job details section allows you to define the type of destination and how it will display in Oracle Audience Segmentation.
Enter the information for the destination.

- Type: Use the drop-down list to select the destination type: Responsys , Eloqua, Secure FTP, or CX Sales. Based on your selection, additional fields need to be configured.
- Name: Enter a name. The name must be 1 or more characters, up to a maximum of 50. Other than underscores (_) and hyphens (-), special characters are not allowed. The first character cannot be a space. You can use characters from all languages supported in the language settings.
-
Destination ID: The unique system identifier for your destination. You can't change this value after you create the destination.
- If the destination name uses English characters, the destination ID field is auto-populated from the destination name you enter. You can change this value before the destination is created.
- If the destination name uses characters from another language supported in the language settings, the Destination ID field will be left blank. You will need to enter a name using English characters.
- Description: Enter a description. This field is optional, but it is highly recommended to add descriptions for any entity created. This helps all other users get additional context when using and navigating Oracle Audience Segmentation. The description can have a maximum of 512 characters with no restrictions on characters used. You can use characters from all languages supported in the language settings.
Step 2: Configure destination
Important: When defining the authentication settings, make sure that one of the approved algorithms below is used to access the destination. If one of these algorithms is not used, Oracle Audience Segmentation will not be able to successfully connect to the destination.
| Algorithm type | Algorithm |
|---|---|
| Cipher | aes256-ctr |
| Cipher | aes192-ctr |
| Cipher | aes128-ctr |
Based on the destination type selected, you will have to complete specific details for the destination.
To create a Secure FTP destination, refer to the steps below.
For other types of destinations, refer to the respective help topics:
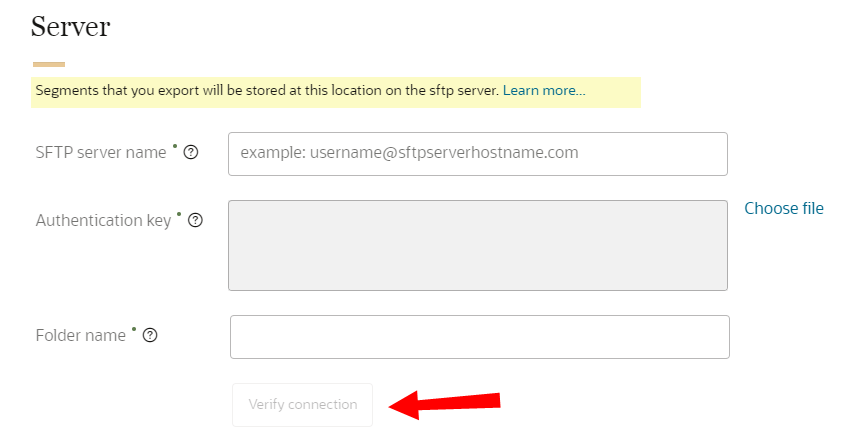
Server
Segments that you export will be stored at this location on the SFTP server.
- SFTP server name: Enter the hostname for your organization's SFTP server. This field requires a user name and host name, formatted as username@sftpserverhostname.com. You have the option of using a custom port by adding it to the end of the server name. For example, if you want to configure a connection to port 999, you would enter username@sftpserverhostname.com:999.
- Authentication key: Select the file that has the authentication key needed to access the SFTP server. Oracle Audience Segmentation will process the file and display the authentication key.
- Oracle Audience Segmentation only supports private authentication keys in RSA format. You can't upload a public authentication keys.
- To create an RSA authentication key, learn how to Generate SSH Keys in PEM Format to Connect to a Public or On-Premises sFTP Server from the Using the FTP Adapter with Oracle Integration Help Center.
- Folder name: Enter the path name to the folder on the SFTP server where Oracle Audience Segmentation should export files to. You can use characters from all languages supported in the language settings.
Once you enter all the details, click Verify connection to ensure that Oracle Audience Segmentation can access the server.
If there are connection issues, it could be for one of the following reasons:
- An incorrect SFTP server name.
- An incorrect authentication key.
- An incorrect Folder name.
If you still encounter connection issues, contact your IT administrator for further investigation.
Files
The files details section defines the format of the destination files.

- File name: Enter the file name and extension to use for the exported files. A timestamp and file number will be added as a suffix identifying when the file was created. The timestamp will be in the format yyyy-MM-dd-HH-mm-ss-SSS. You can use characters from all languages supported in the language settings.
- Format: The format of the exported file must be in CSV format. Fields in the exported file will be separated by commas.
- Date format: The date format of the exported file must be yyyy-MM-dd-hh-mm-ss-SSS. A timestamp with this format will be added as a suffix to the exported file.
- Compression format: Select a compression format: g-zip, PGP, or none. If you select none, the exported file will be uncompressed and in csv format. If you select PGP, you will need to provide an encryption key. You can change this selection when configuring the export job or campaign that will use this destination.
- Encryption key: Select the file that has the encryption key for the PGP compression format. You can change the encryption key or add a new one when configuring the export job or campaign that will use this destination.
Example: If you enter the file name as Export_file_01, a timestamp will be added as a suffix and the file will be named Export_file_01_2021-05-12-12-56-12-926_0.csv. The timestamp is 2021-05-12-12-56-12-926. The "0" indicates it is the first exported file with the same timestamp.
The following encryption keys are supported.
| Key type | Bit lengths |
|---|---|
| RSA (RSA cryptosystem) |
2048 |
| 3072 | |
| 4096 |
Step 3: Save and publish the new destination
When finished defining the destination, scroll to the top of the page and click Save or Save and close.
Once you create the destination, you will need to publish the changes.