Importing contacts or accounts
Using the data import tool, you can make the following types of updates to your database:
- Add contacts or accounts
- Update email addresses
- Identify contacts with hard bouncebacks
- Unsubscribe contacts
- Delete contacts or accounts
- SMS Opt In/Out
Important: This feature is only available if your organization has purchased SMS services. Please contact your account manager for additional information and pricing.
Note: To use the import tool you must place your import file on an SSH File Transfer Protocol (SFTP) server. You can set up SSH keys to authenticate to the SFTP server. Learn more about contact data Oracle Eloqua retains and restores when you delete contacts.
Before you begin:
- Date values can not include milliseconds. If milliseconds are included in the date value, that date value is ignored and not imported. For example, "2020-08-03 18:01:00.437000000" would be ignored and not imported, whereas "2020-08-03 18:01:00" would be successfully imported.
- Date values must be formatted YYYY-MM-DD. For example, "2020-08-03" is August 3, 2020, whereas "2020-03-08" is March 8, 2020.
- Oracle Eloqua uses Rebex SFTP for connecting to SFTP server. Please refer to the following Rebex documentation for a list of supported security algorithms.
- Create your upload file (.txt, .csv, .xls, .xlsx) and place it on your SFTP server. The upload file should only contain the contacts or accounts that you want to update or delete.
Note: Uploads to Oracle Eloqua from an SFTP server cannot exceed 5 GB.
- Separate fields in a .csv or .txt file using a comma (,), pipe (|), or semi-colon (;).
- Format CSV files according to the RFC 4180 specification. For more information on the RFC 4180 specification, see https://tools.ietf.org/html/rfc4180.
- The first row of the file must be column headings. Oracle Eloqua will attempt to map the headings to existing contact or account fields.
- If you are adding or updating contacts or accounts, make sure that you can map the data in your import file to contact fields in Oracle Eloqua. Use similar naming conventions in your import file to make this mapping easier.
- Make sure that contacts in your import file have a unique identifier (such as an email address).
- There is a hard limit of 10,000 contacts in a sandbox. New contacts will be rejected when the sandbox contact limit is reached, while existing contacts will still be updated.
To import contacts or accounts:
- Navigate to Audience
 > Tools, then click Data Export and Import.
 - On the Data Import tab, click Add
 , then click New Contact Import or New Account Import.
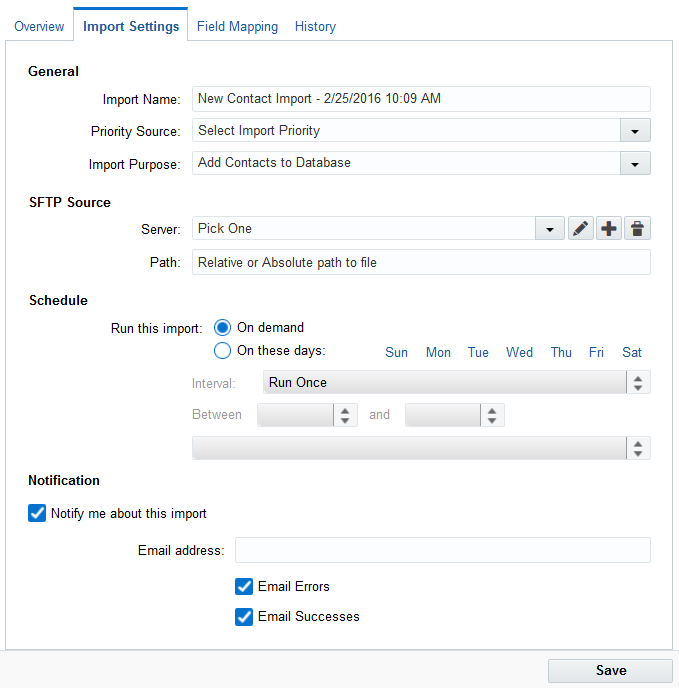
- On the Import Settings tab, configure the settings.
- To change the priority of the upload use the Priority Source drop-down list. Data priority specifies the order in which Oracle Eloqua evaluates sources of contact data and determines whether to update contact data in the database. See this knowledge base article for more information.
- Click the purpose of the import from the Import Purpose drop-down list. For example, adding or deleting contacts.
- Click the server from the Server drop-down list or click Add to add the SFTP server information. Complete the information about the server:
- Name: A descriptive name for your SFTP server.
- Server URL: The fully qualified URL for your SFTP server.
- Port: The port for your SFTP server.
- Username: The user name to log on to the SFTP server and access the import file. This user must have administrative access.
- Authentication Method: The authentication method for the user, either Password or SSH key. If you want to use SSH keys, you must set them up first.
- Click Test Connection to ensure the information you entered is correct.
- Specify where the import file is on the SFTP server in the Path text box (either a relative path or absolute path).
- To run the import on demand, click the On demand option.
- To schedule the import to run on a regular basis, click On these days and specify the schedule.
- To receive an email notification about the success or failure of the import, click the Notify me about this import and configure the notification settings. If you do not set up a notification email, you can use the History tab to view the results of the import.
- Click the Field Mapping tab to map the columns in the import file to contact or account fields. If you need to update a mapping, double-click the row.
- Make sure you map all the data in your upload file to the applicable contact or account field.
- Also, make sure that you select when you want the fields to update using the All Fields Update Type drop-down list. For example, update the field if it is blank or not blank. Using Set to default will use the default configuration for each field. If a specific field should be updated differently than the rest, you can double-click the field and configure the update type for that specific field.
- Click Save.
After you finish: To import now, click the Overview tab and click Run now. Otherwise, the import will run according to the schedule you specified on the Import Settings tab. If you have unexpected results after an import (for example, fields not updating as expected), see this troubleshooting information for more help.
Important: Data imports via SFTP or manual upload are subject to a 30-minute timeout.
Exporting contacts or accounts
Viewing the results of data imports or exports
Knowledge Base: SFTP Import Error - "Your Username or Password Is Invalid for the Hostname Provided"