Using Eloqua with the HIPAA add-on
As of January 2021, HIPAA clients will have the Authenticated Portal enabled as part of their HIPAA solution. The HIPAA app, which is comparable to Authenticated Portals, is only available to customers enabled for the HIPAA solution before January 2021. The Authenticated Portals offers greater flexibility, personalization, and reporting capabilities for our HIPAA customers.
Warning: Do not delete the HIPAA category or the ePHI label. These components are required for any user in your organization who requires access to protected data.
Marketing secure content to contacts
This section describes how to send marketing emails (containing ePHI data) to contacts that have subscribed to HIPAA Communications.
Since emails containing ePHI data are not delivered, your campaign must send a second email that informs the contact that there is a message waiting for them in their secure message center.
-
ePHI Email: This is the email containing
Note: This email must be linked to a HIPAA email group (that is, one with UseSecureChannel = True and Require Opt In = True.
-
Notification Email: Informs contacts that a message (that is, the ePHI email) is available for them in their secure portal
Note: This notification email must be linked to an email group with UseSecureChannel = False so it can be successfully delivered.
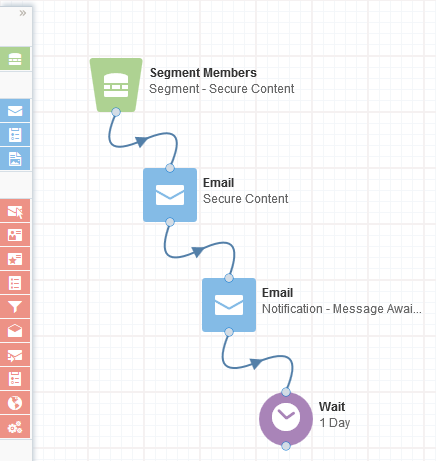
Example Campaign
The following campaign is a common example of how a marketing user would deliver secure content:
-
Segment Members (Contact List): This is the list of contacts that will receive email.
-
Email (Secure Content): This is the email containing secure content. These emails must be a member of a HIPAAemail group so the email is not delivered directly to the contact via email.
- Email (Notification – Message Awaiting): This email notifies the contact that a message is awaiting in their secure message center. This email typically contains a link to the login page so users can login and view the secure content.
Reporting with the HIPAA add-on enabled
Oracle Eloqua provides reporting in two ways: through operational reports directly or through Classic Insight.
For full reporting privileges, a user must be a member of the ePHI Security Group, which grants them access to ePHI data.
Using Operational Reports
Note: You must be a member of the ePHI Security Group to run contact level reports. If you attempt to run an operational report from a campaign and no data is returned, it is either because no activity has occurred (the campaign has not yet been activated), or you are not a member of the ePHI Security Group.
To run an operational report for a campaign:
- Navigate to Orchestration, then select Campaigns.
- Open a campaign, either by selecting it from your Recently Accessed or Favorite campaigns, or search for the campaign by typing its name in the search field in the top-left corner.
- Click Actions
 > Operational Reports. A list of the available operational reports is displayed in a flyout menu.
 - Click the name of the operational report you wish to view.
Using Classic Insight Reports
When the add-on is enabled, Classic Insight reports are filtered so they do not include any contact or account information. The user can still see high-level reports such as the number of people who have opened an email. However, an error is displayed if the user attempts to view a report that contains contact or account information.
Note: If you have created a custom report prior to your HIPAA installation that contains contact metrics, the report will fail to run as all HIPAA Contact Data is hidden in Classic Insight.
When creating custom reports, some filters are disabled in order to protect contact information. For example, a user will be unable to create custom reports that includes data such as FirstName and LastName.
The only reports that can be run on a HIPAA campaign from within Classic Insight are the same Operational Reports as shown in the preceding section. There are no reports or dashboards for contacts in Classic Insight for any user, even if you are a member of the ePHI Security Group.
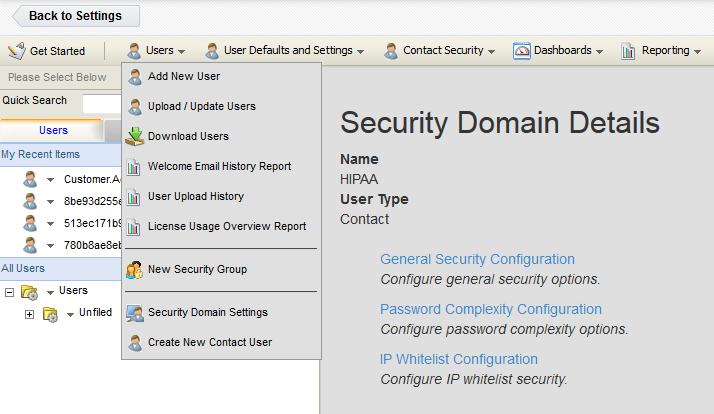
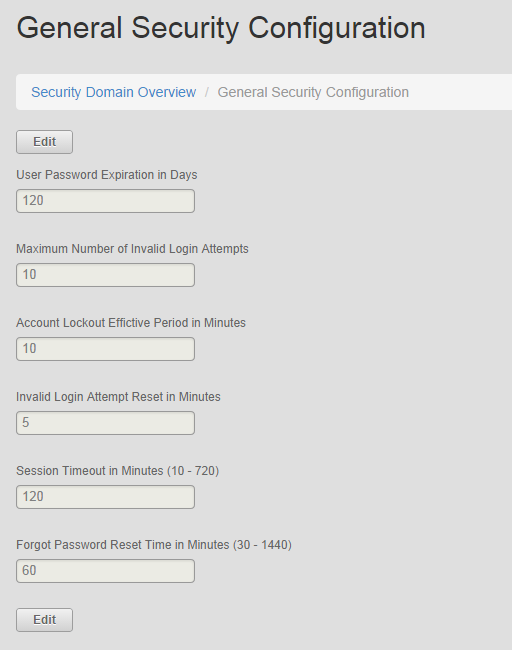
Configuring password restrictions
When the add-on is first enabled, the HIPAA Security Domain is enabled and used for site-level access.
You can configure password restrictions using the Password Complexity Configuration located at Settings  > Users > Users > Security Domain Settings > HIPAA.
Data protection
Using the ePHI label, customer data is protected from users who do not have this security permission granted to them. This rule applies to all users except system administrators.
ePHI permissions can be granted at the user level from Settings > Setup > Users > UserSecurity.
HIPAA Security groups
One of the roles of a customer administrator in any Eloqua instance is to manage security groups. Security group membership defines what actions users can perform, such as creating, modifying, and viewing data.
In the case of the HIPAA add-on, being a member of the customer administrator security group allows you to create assets but does not inherently provide the ability to view data submitted securely by contacts through form submissions from their HIPAA emails. In order to view that ePHI data, users must also be a member of the new security group called ePHI.
To add an Eloqua User to the ePHI Security Group:
-
Log in to Eloqua as a Customer Administrator.
-
Click Settings
. - Click Users in the Users and Security section.
-
Click the down-arrow next to the name of the User you wish to assign permissions to the ePHI Security Group.
-
Click Edit User Settings.
-
On the right-hand pane, scroll to the Security Groups section. Select ePHI from the list of All Security Groups on the left and click the > arrow to move it to the Selected Security Groups column.
-
Click Save. The User is now a member of the ePHI Security Group and can see and report on data submitted by contacts.
To confirm ePHI access rights are assigned to a user:
-
Log in to Eloqua as the User to which you want to confirm access rights.
-
Navigate to Audience, then click Contacts.
-
In the Search field, type the name of a contact in your contact database and press Enter.
-
If you are certain that the contact exists, the contact record should be listed in the search results, and you should be able to open the contact record.
-
If the contact record exists but no results are returned, it means that you have either mistyped the name or you do not have membership in the ePHI Security Group. If you try to add a contact that you do not see in the contact list as a result of not having ePHI Security Group membership, an error is displayed stating the email address is already in use. However, you cannot open the record to view the information unless a Customer Administrator adds you to the ePHI Security Group.
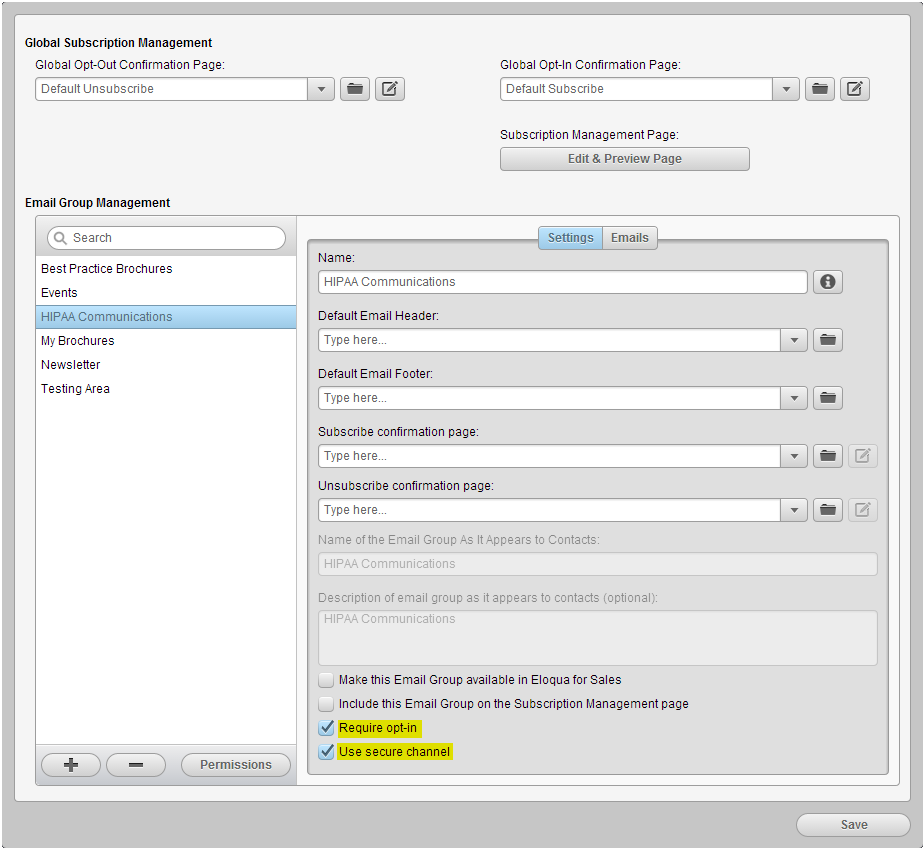
HIPAA Email Groups
After the add-on is installed, a new group called HIPAA Communications is automatically created.
All emails in Eloqua must be associated with an email group. However, emails that contain ePHI data must be associated with a HIPAA email group. The HIPAA email groups (example: HIPAA Communications) are similar to other email groups but always have the following enabled attributes:
-
UseSecureChannel = True
-
Require Opt In = True