Updating event registrations using form processing steps
After you have created and edited an event in Eloqua, you can create a form, then add and configure form processing steps that will automatically update registrant information. Once configured, the Update Event Registration and Cancel Event Registration steps use the field values provided by a contact to create, update, or cancel their registration.
To update an event registration using form processing steps:
-
Navigate to Assets
 , then click Forms.
 - Open an existing form, or create a new one.
-
Click Processing in the upper-right corner.

-
Click the
 button in the left panel. The list of available processing steps is displays as a pop-up.
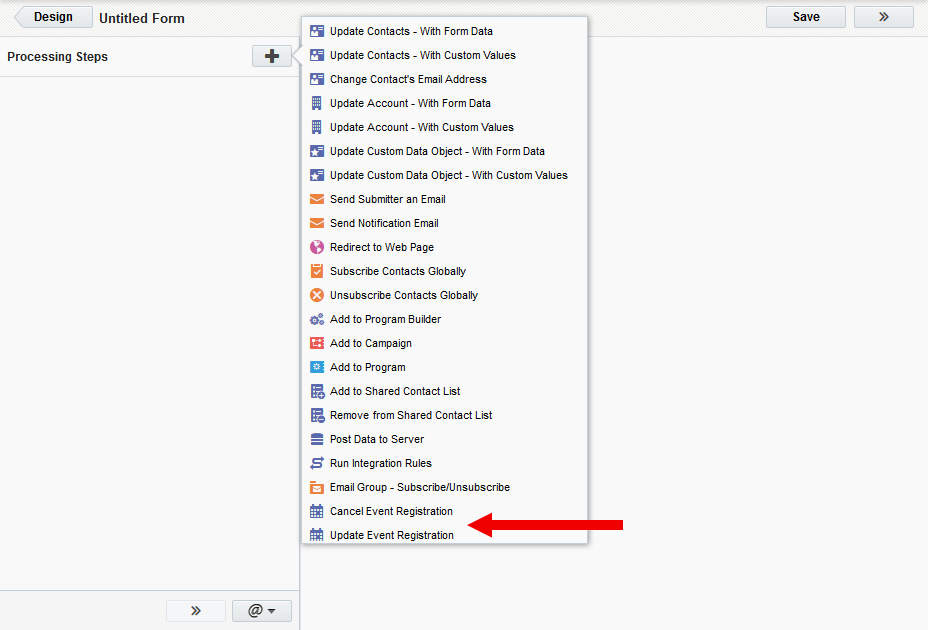
Two event-related steps are at the bottom of the list: Update Event Registration and Cancel Event Registration.
-
Double-click Update Event Registration.
-
Select the event from the Choose an Event drop-down list. If the fields from your form are not automatically mapped to the corresponding fields in your database, double-click the field and select a target from the drop-down list.
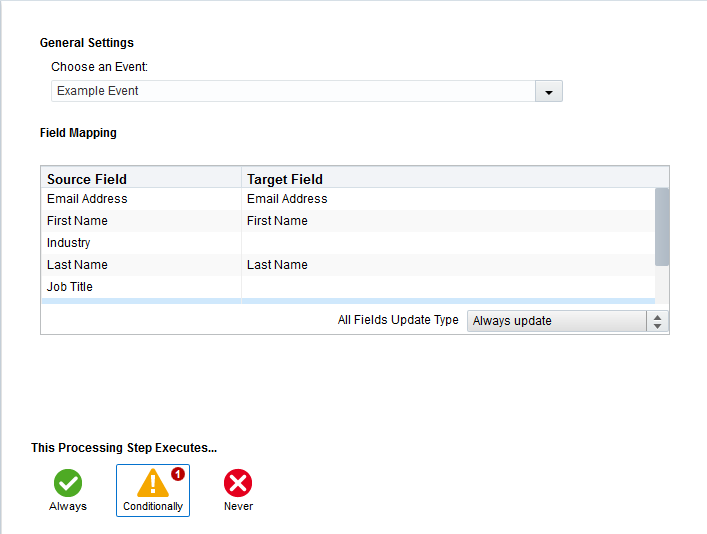
- Set the All Fields Update Type rule for when to update these fields: Custom or Always update.
-
Select a condition in the This Processing Step Executes... section. Your options are:
- Always: The step always executes when the form is submitted. This is the default setting.
- Conditionally: The step executes only when certain conditions are met. When you click Conditionally, the Conditions Editor opens. Double-click a field on the left panel, then configure the field criteria in the right panel, then click close.
- Never: The processing step will not execute.
-
(Optional) Alternatively, you can also select and configure the Cancel Event Registration processing step. You have a few different options for when a form submission will cancel a contact's event registration:
- Always use the same event: Select an event that will always be used for cancellation.
- Use a picklist to select the event: Specify a form field containing a value that will be referenced in the identified lookup table. The lookup table's returning value must be the event ID number.
- Use the value of a form field to select the event: Specify a form field that contains the event ID number.
- Advanced Settings: Select a field from the drop-down list to use as the key field override.
- Click Save when you are finished.
If you configured the Update Event Registration step: Once a contact submits a form, their registration will be created for the selected event. If the contact has already registered for the event, and they resubmit the form with different information in the form fields, their information will be updated. This is useful in cases where a contact enters the wrong information, but only realizes this after their first submission.
If you configured the Cancel Event Registration step: Once a contact submits a form, their registration status for the selected event will be marked as Canceled.