Editing an event
After creating an event file, use the Event editor page to configure and enable the event.
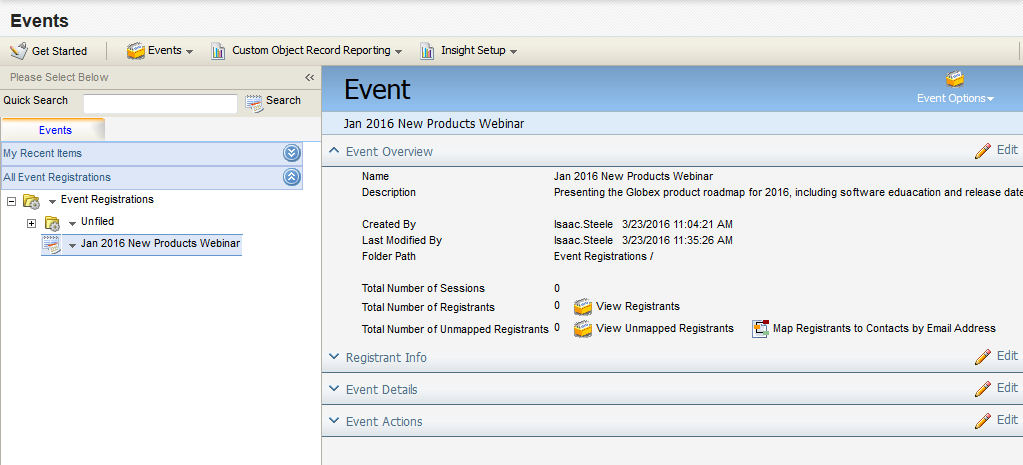
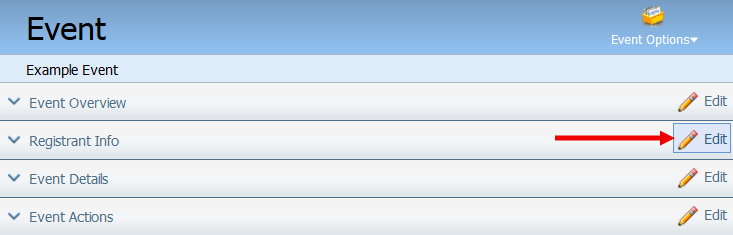
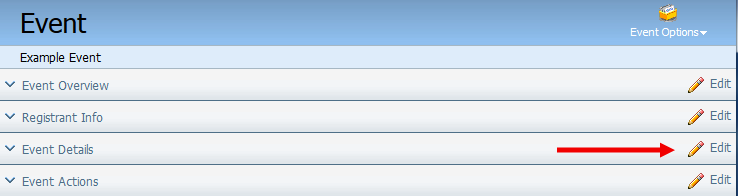
You can edit an event by opening the event, then clicking Edit next to any of the main four sections of an event:
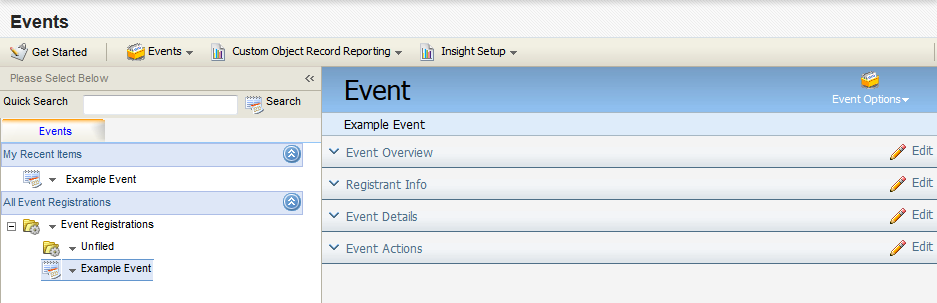
- Event Overview: You can edit the name or description of the event.
- Registrant Info: Edit Registrant information fields created from linked forms and manage the linked forms (select or edit them, or control the field mappings).
- Event Details: Select the number of sessions for the event and manage standard and header fields used to provide details (such as Date, Time, Location), along with custom header fields, for the entire event.
- Event Actions: Manage waiting list options, automatic service disable options (for a specified date), and standard and advanced automated processing actions (such as sending registration, waiting list, reminder and thank-you emails) related to the Event.
You can also manage the registrants and other marketing objects and attributes associated with the event from the Event Options menu on the Event page.
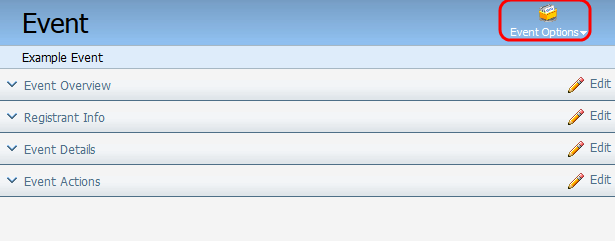
This allows you to manually enter new registrants, upload lists of registrants, view all registrants, or search for specified registrants. You can also associate the event with a specified marketing campaign, create an ICS calendar file which registrants can use to put the event in their email client calendar, or view custom object links for the event.
Note: If the field background on a page or in a dialog box is blue after you have entered a value, then that field value has not yet been saved. Click Save to save these field values.
Editing the Name or Description (Event Overview)
You can change the name and description of an existing event for your own reference.
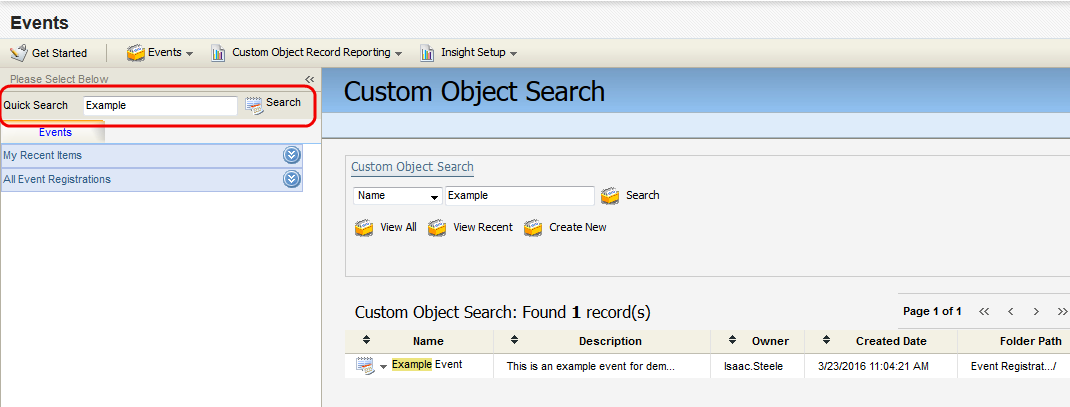
To edit the name and description of an event:
-
In the classic UI, navigate to Orchestration > Tools > Events. In the Redwood experience, navigate to Orchestration > Events.
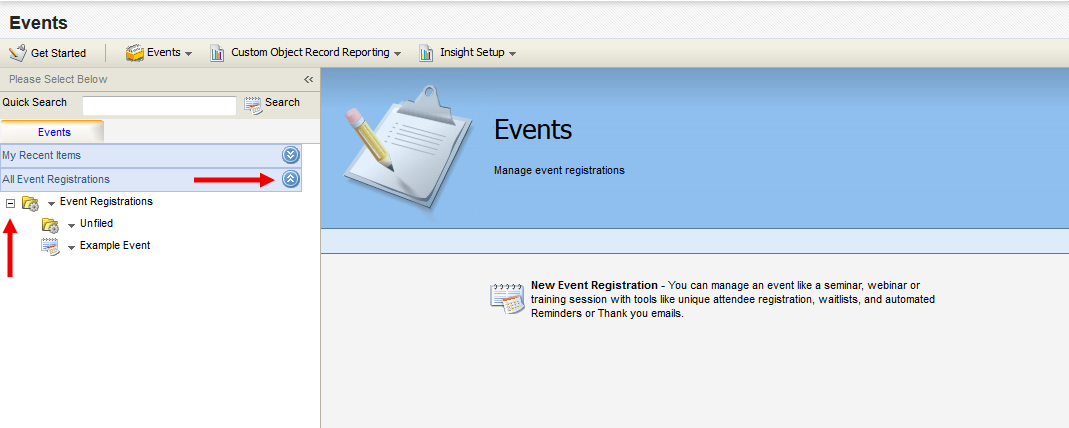
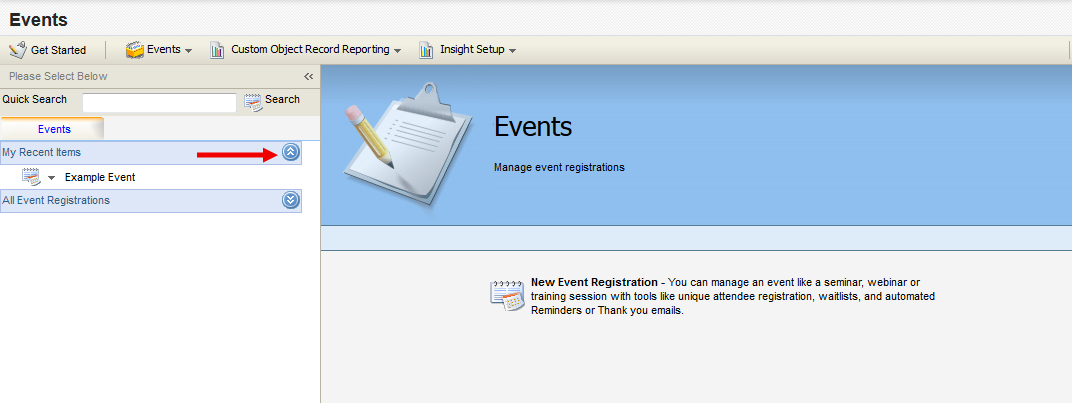
- Locate the event you want to modify under the Events tab on the left panel. You have three options to achieve this:
- Expand the All Event Registrations drop-down. If needed, click the + symbol next to a folder in order to navigate into that folder.
- Expand the My Recent Items drop-down to access a list of recently created or accessed events available to you.
- Type the first few letters of the event into the Quick Search field, then press Enter.
- Expand the All Event Registrations drop-down. If needed, click the + symbol next to a folder in order to navigate into that folder.
- Click the event name to open the Event configuration page on the right panel.
- Click Edit next to the Event Overview heading.

- Type a new name into the Name field.
- (Optional) Type a new description into the Description field.
- Click Save and Close.
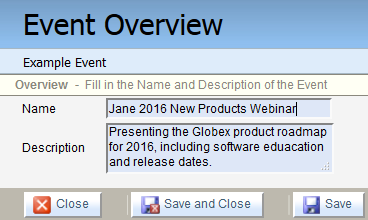
The revised information is saved. The event appears in the folder directory under the new name.
Configuring an Event (Registrant Info)
Change Registrant fields and other information in the Registrant Info dialog box.
Accessing the Registrant Info Dialog Box
To access the Registrant Info dialog box:
-
In the classic UI, navigate to Orchestration > Tools > Events. In the Redwood experience, navigate to Orchestration > Events.
- Locate the event registration you want to modify under the Events tab on the left panel. You have three options to achieve this:
- Expand the All Event Registrations drop-down. If needed, click the + symbol next to a folder in order to navigate into that folder.
- Expand the My Recent Items drop-down to access a list of recently created or accessed events available to you.
- Type the first few letters of the event into the Quick Search field, then press Enter.
- Expand the All Event Registrations drop-down. If needed, click the + symbol next to a folder in order to navigate into that folder.
- Click the event name to open the Event configuration page on the right panel.
- Click Edit next to the Registrant Info heading.
The Registrant Info dialog box opens.
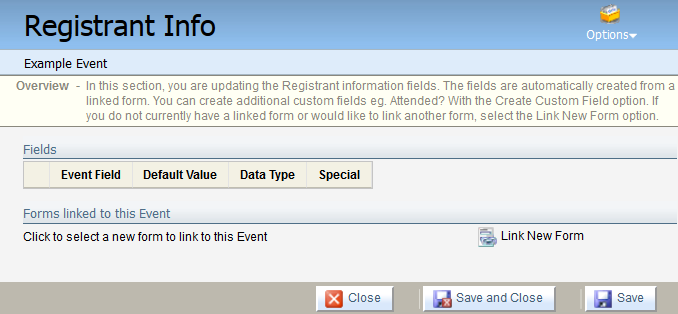
Managing registrant fields
You can manage registrant information fields (create, edit, move, or delete Custom or Special fields) from the Registrant Info dialog box.
Managing custom fields
If Auto Mapping is selected when you link to a form, then fields are mapped into the registrant fields from the form fields. But you can add your own fields from the Registrant Info dialog box. For example, you may want to add an Attended? field to track whether a registrant actually attended the event, and then you can send the correct follow-up email: Thank-You for Attending or We Missed You.
To create a custom registrant information field:
-
In the classic UI, navigate to Orchestration > Tools > Events. In the Redwood experience, navigate to Orchestration > Events.
- Open an existing event, or create a new one.
- Click Edit next to the Registrant Info heading.
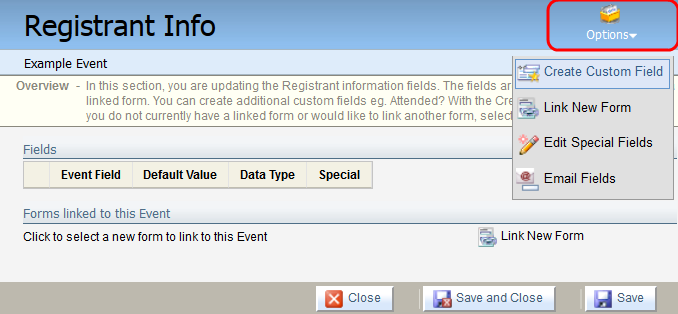
- Click Options in the Registrant Info dialog box, then click Create Custom Field.
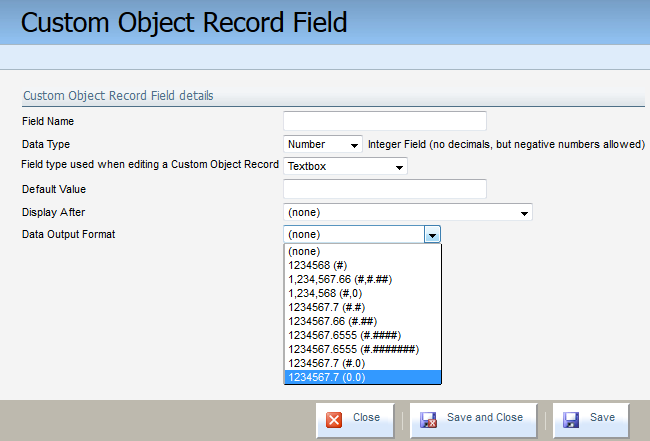
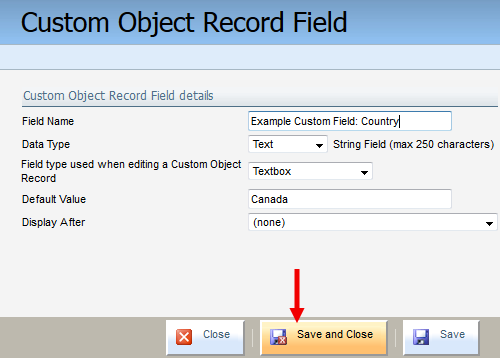
- Configure the Custom Object Record Field dialog box:
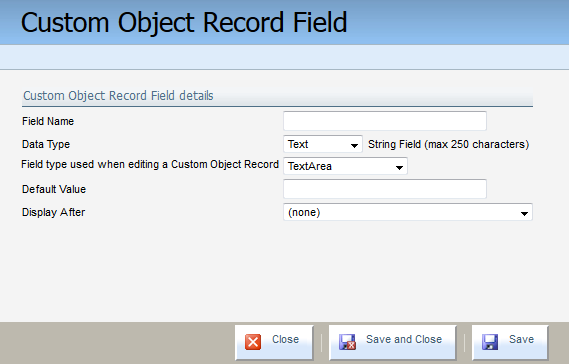
- Provide a name in the Field Name field.
- Select the field Data Type from the drop-down. Your options are:
- Number: An integer field. Positive and negative numbers are allowed. Whole numbers only (no decimals). If you select a Number data type, then you can also select the Data Output Format.
- Text: A text string field. Maximum 250 characters.
- Large Text: A large text string field. Maximum 4000 characters. Useful when wanting more elaborate input from a registrant, such as a short description of an attendee's experiences at a recent conference.
- Date / Time: A standard date field. The date format is
MM/DD/YYYY. If you select a Date / Time data type, then you can also select the Data Output Format.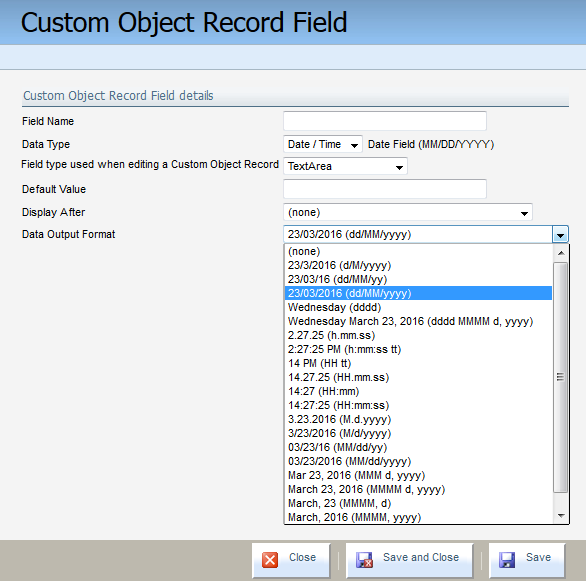
- Numeric: A decimal field. Maximum of up to 4 decimal places. If you select a Numeric data type, then you can also select the Data Output Format.
- Number: An integer field. Positive and negative numbers are allowed. Whole numbers only (no decimals). If you select a Number data type, then you can also select the Data Output Format.
Select the custom field type from the Field type used when editing a Custom Object Record drop-down. Your options are:
- Textbox: A standard text field.
- TextArea: A larger text field, typically reserved for Large Text descriptions.
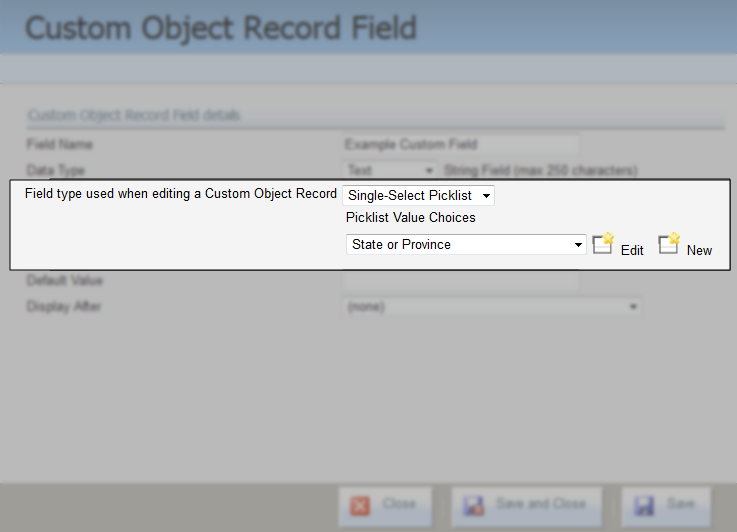
- Single-Select Picklist: A drop-down picklist. Registrants will select one option from a pre-configured list of options. Selecting Single-Select Picklist enables you to select from a list of picklists currently existing in your Eloqua application.
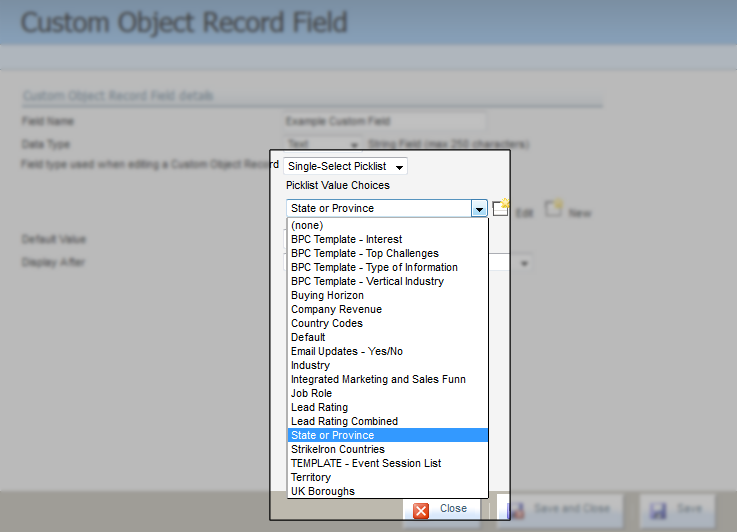
You can create the picklist in Eloqua, configure from what choices a registrant will select, then select that picklist here.
Note: If you select a picklist as the field type, you can also create a new picklist or edit an existing one by clicking Edit or New within the Custom Object Record Field dialog box.
Editing a currently existing picklist will affect that particular file and any other assets using that picklist. You will require adequate picklist security permissions in order to edit an existing file. - Checkbox: A standard check box which can be either checked or not checked. This allows registrants to make quick binary choices. If you select Checkbox, you will have to fill in two values: Value for checked and Value for unchecked.
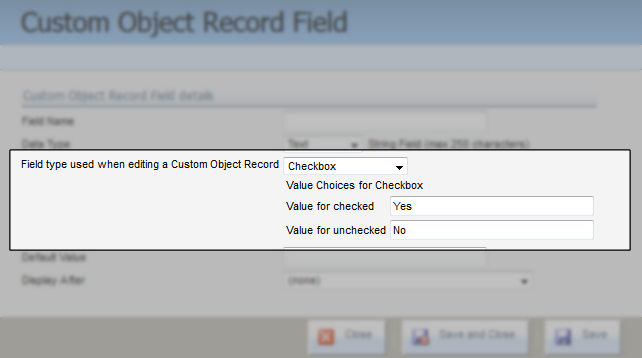
Example: The check box may return a value of Yes when checked, and No when it is not checked.
- Enter a default value into the Default Value field, if one is required for your purposes.
Example: If you are creating an event for which most registrants are in the same city, you may want to enter a default city name. Default values makes the registration process quicker for registrants for whom that default value applies, but still allows other registrants to change the value if needed.
- Select a value to Display After in the form field.
- Click Save and Close when you a finished configuring the custom field.
The new custom field appears in the Fields area of the Registrant Info dialog box.

To edit a registration information field:
-
In the classic UI, navigate to Orchestration > Tools > Events. In the Redwood experience, navigate to Orchestration > Events.
- Open an existing event, or create a new one.
- Click Edit next to the Registrant Info heading.
- Locate the field you want to edit, then open it through one of two ways:
- Click the form name.
- Click the drop-down arrow next to the form name, then click Edit Custom Object Record Field.
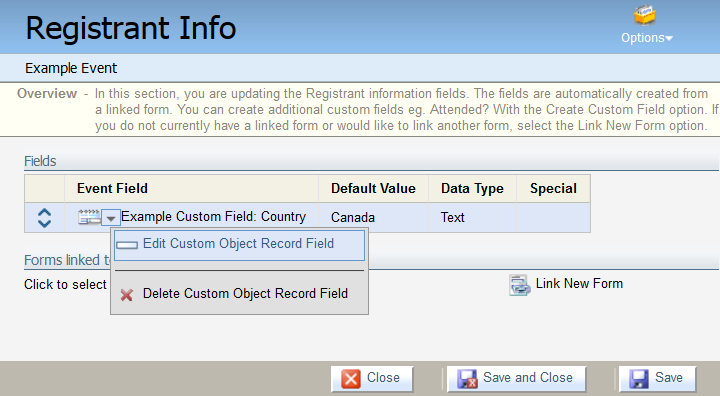
- Make edits to the field as needed.
Note: Once a field has been created, you cannot change the Data Type. If you need to change the Data Type, you will have to delete the field, then choose a different Data Type while creating a replacement field.
- Click Save and Close when you a finished.
The edited field appears with its new parameters in the Fields area of the Registrant Info dialog box.
To delete a field:
-
In the classic UI, navigate to Orchestration > Tools > Events. In the Redwood experience, navigate to Orchestration > Events.
- Open an existing event.
- Click Edit next to the Registrant Info heading.
- Locate the field you want to delete, click the drop-down arrow next to the field name, then click Delete Custom Object Record Field.
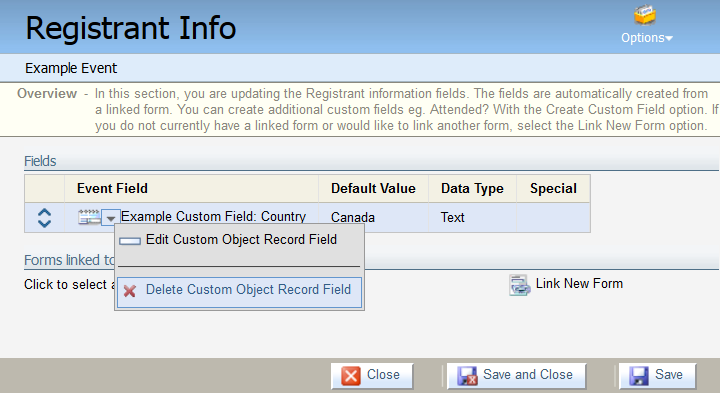
- Click OK to confirm the deletion.
The field is permanently removed from the Registrant Info dialog box.
To move fields on the event registration form:
- Navigate to Orchestration
 > Tools, then click Events.
- Open an existing event, or create a new one.
- Click Edit next to the Registrant Info heading.
- Click the Up and Down arrows to move the corresponding fields to a different position on the list.
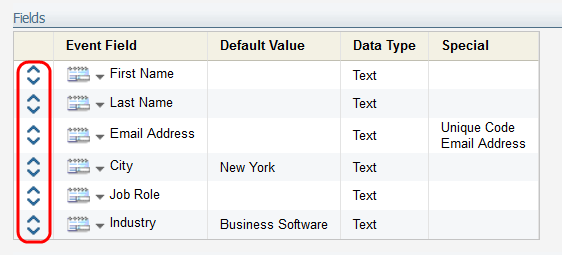
- Click Save and Close when you are finished.
The fields are repositioned on the list in the event registration.
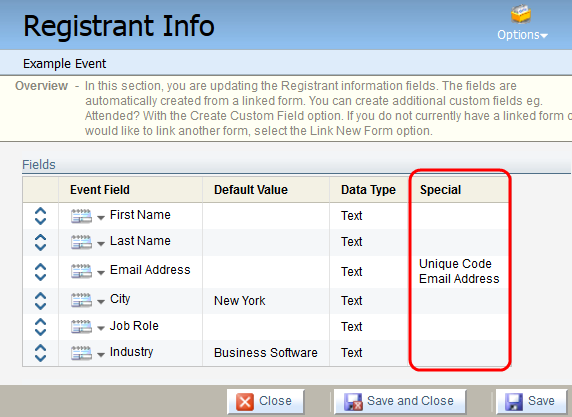
Managing Special Fields
There are two active Special fields in event registration forms:
- Email Address Field: locates which field contains the registrant's email address information.
- Unique Eloqua Identifier (Code): uniquely identifies the record, and is usually (but not always) the Email Address field. The Unique Code field prevents duplication of registrants based on this field. In other words, no two registrants can contain the same email address.
The event fields identified as Email Address and Unique Code fields are displayed in the Special column of the Fields area in the Registrant Info dialog box.
To set up or edit special fields for the Email Address and Unique Code:
-
In the classic UI, navigate to Orchestration > Tools > Events. In the Redwood experience, navigate to Orchestration > Events.
- Open an existing event, or create a new one.
- Click Edit next to the Registrant Info heading.
- Click Options, then click Edit Special Fields.
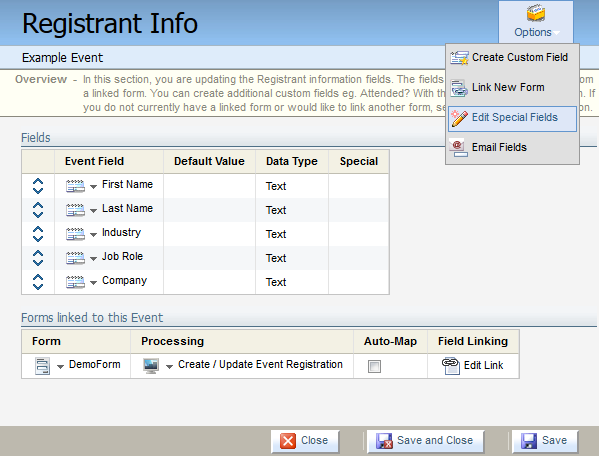
The Edit Special Fields window opens.
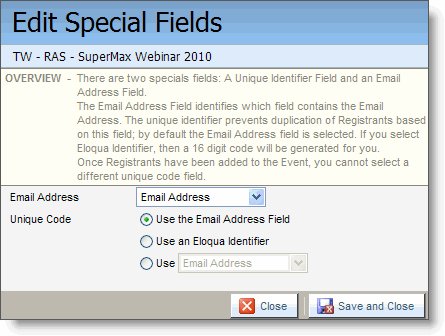
- Select an Email Address field from the picklist to identify which field contains the email address information. Usually, the picklist is already set to Email Address as the default; you only need to change it if the system incorrectly identified the email address field or if it has a different name.
-
The Unique Code field prevents duplication of registrants based on this field. Select one of the following Unique Code options:
- Use the Email Address Field: Prevents duplication of registrant records based on the unique email address. If there is a duplicate email address, the later submissions will not be added to the list of Registrants.
- Use an Eloqua Identifier: Automatically generates a unique 16-digit alphanumerical code for each Registrant record (for example, DELQA00000000407).
- Use...: Select a field from the picklist to act as the unique code. You might want to do this, for example, if you want to allow multiple registrant records that include the same email address.
- Click Save and Close when you are finished.
Note: Once Registrants have been added to the event, you cannot select a different Unique Code field. You would otherwise need to recreate your event.
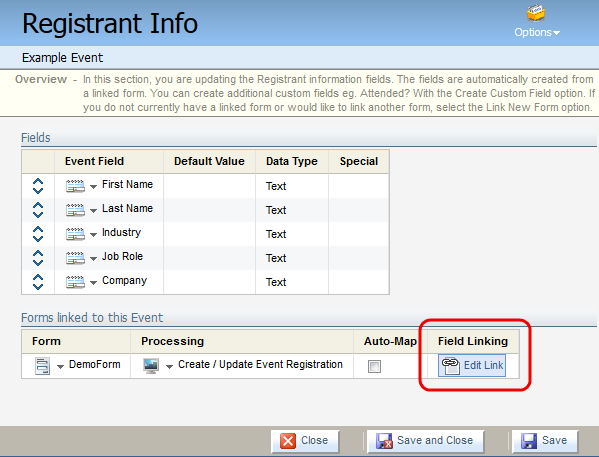
Managing Linked Forms
You can manage registrant information fields (create, edit, move, or delete custom/special fields) from the Registrant Info dialog box. An event can be linked to multiple forms, if required. They are linked by the form processing steps Create/Update Registrations or Cancel Registrations.
To link to a new form:
-
In the classic UI, navigate to Orchestration > Tools > Events. In the Redwood experience, navigate to Orchestration > Events.
- Open an existing event, or create a new one.
- Click Edit next to the Registrant Info heading.
- Click Options, then click Link New Form.
The Link New Form configuration window opens.
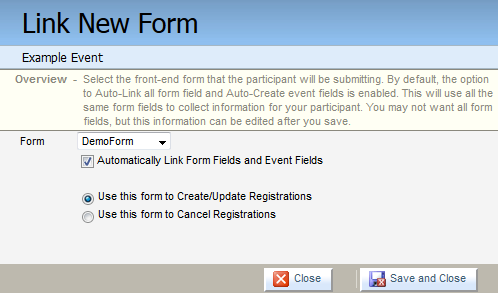
- Select the form that the participant will be submitting from the Form drop-down. By default, the option to Automatically Link Form Fields... is selected. AutoLink will automatically link and create the same fields in your Event as they exist in the selected Form. You may not want all the forms fields, but you can edit this information later.
- Select to use this form to Create/Update Registrations (using a registration or update information form) or Cancel Registrations (using a registration cancellation form). You must select one of these options.
- Click Save and Close.
If the form you have linked to had additional fields (besides what was shown in fields before), they are now added in the Registrant Info dialog box to the fields displayed.
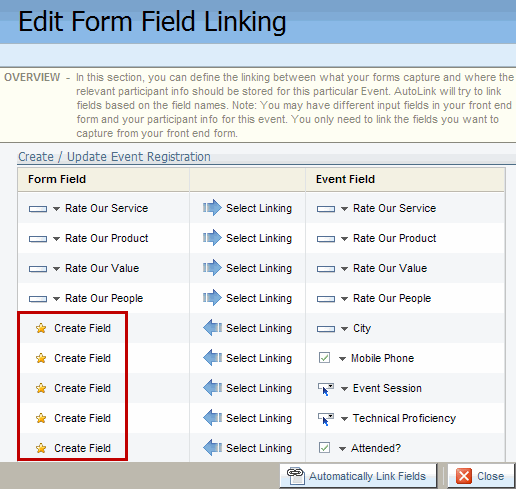
Click Edit Link beside the form to review the fields and where the information is coming from. If there is a missing required field in either the form or the event, you can click Create Field to add that linked field.
Note: Although the option is provided to create or edit the front-end Form field, best practices are to make changes/updates from the Forms area. You will be able to view all the Forms fields and details.
To edit a link to a form:
-
In the classic UI, navigate to Orchestration > Tools > Events. In the Redwood experience, navigate to Orchestration > Events.
- Open an existing event, or create a new one.
- Click Edit next to the Registrant Info heading.
- Click Edit Link in the Field Linking column of a form linked to this event.
- Click Select Linking to change the mapping between the Form Field and the Event Field.
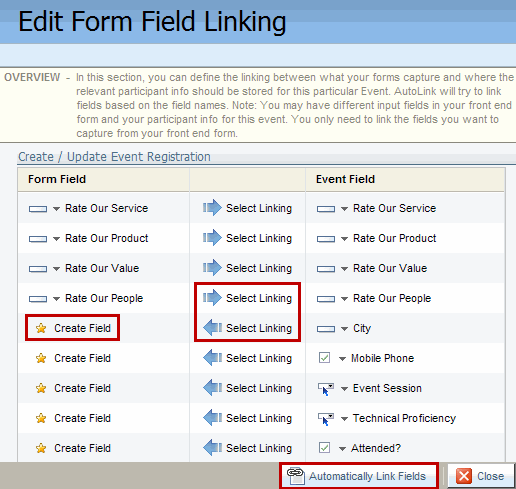
- Click OK on the confirmation dialog box.
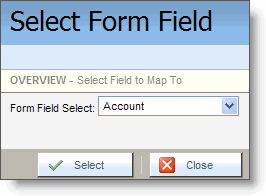
- Click either the Event Field or Form Field (depending on the direction of the link) to map to and click Select, then click Close.
In the Edit Form Field Linking dialog box, if Create Field is shown in the Form Field or Event Field column, then there is no field to link to. In this case, you can either click Select Linking and select an existing field to map to or click Create Field to create a new field of the same name to map to.
When you are finished configuring your fields, click Automatically Link Fields and Close. The fields are added as configured to the Fields list in the Registrant Info dialog box.
Defining event details
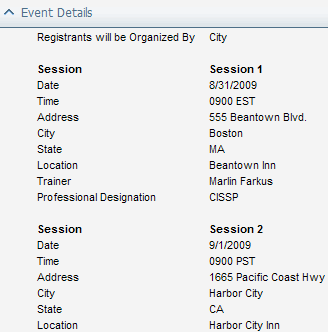
The Event Details section is used to define header fields which hold event-specific information such as date, location, trainer/presenter, whether meals are provided, and so forth. These fields apply to the entire event (for example, Date). You can add standard header fields such as "Address" or "Speaker/Trainer" or create your own. These fields can also be used to create email custom fields that can be inserted into emails.
In addition, if the event has multiple sessions, details can be set per session and automatically linked to the registrants information.
Managing Header Fields
Uses for event headers include:
- To populate emails: For example, if it's Training Session 1, then select Speaker X and Boardroom Y.
- For automated event actions: For example, the registrant is in Session 2 on Day Y, so send a reminder email five days before Day Y.
To set up event details for a single event:
-
In the classic UI, navigate to Orchestration > Tools > Events. In the Redwood experience, navigate to Orchestration > Events.
- Open an existing event, or create a new one.
- Click Edit next to the Event Details heading.
The Event Details configuration window opens.
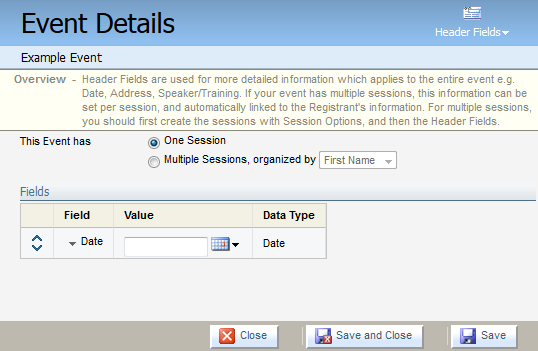
- Select One Session.
- Select a value for the default Date field.
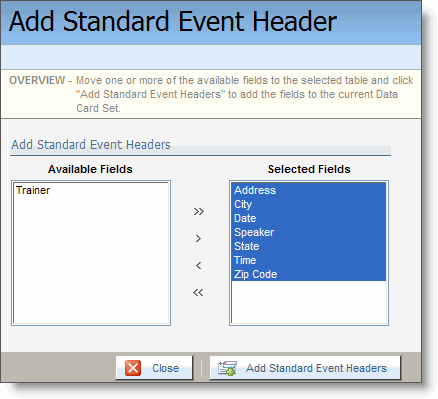
- Click Header Fields, then click Add Standard Event Headers to add any additional standard event headers.
- In the Add Standard Event Header dialog box, select the Headers you want to add in the Available Fields list, then click the right-hand arrow (>) to move them to the Selected Fields list. Click Add Standard Event Headers to add them to the event details, then click Close to close the dialog box.
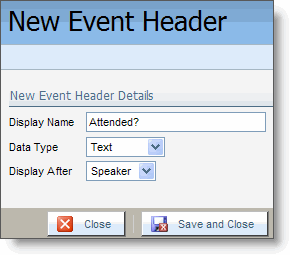
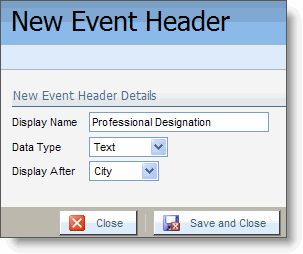
- (Optional) You can add a custom header. For example, to track whether a Registrant actually Attended? the event. Add additional custom headers as required by selecting Header Fields > Create Custom Header. In the New Event Header dialog box, give the Header a Display Name, a Data Type (Text, Number, Large Text (up to 2,000 characters) or Date), and Display After to select where you want it to appear in the Event Details. Then click Save and Close.
All of the added header fields are shown in the Event Details. Move the fields into the correct order using the up and down arrows, then enter or select values for the fields as required. Finally, click Save and Close.
To set up event details for multiple events:
- Navigate to Orchestration > Tools, then click Events.
- Open an existing event, or create a new one.
- Click Edit next to the Event Details heading.
The Event Details configuration window opens.
- Select Multiple Sessions. Also select the ...organized by value from the picklist. For example, you may be organizing your Event sessions based on the City in which each occurs.
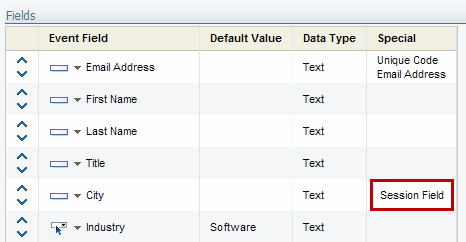
- Click Save when you are finished. The value you select as the distinguishing field for different Event Sessions must contain a unique value for each different Session. For example, if you are differentiating Sessions by City, then there cannot be two Sessions for the same Event in the same City. The same applies if you use a Date (there cannot be two Sessions on the same date) or Venue (there cannot be two Sessions at the same facility). If you do not have any fields with a unique value for each Session, you may want to create a separate Session Code field. The field used to identify each Session is shown in the list of fields as the Session Field.
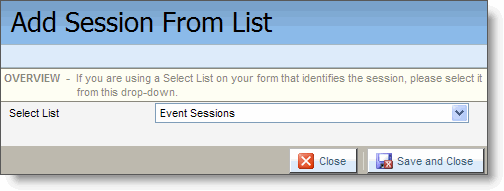
- Click Add Sessions from a list—The Add Session from List dialog box opens. Choose a Select List from the picklist to select a list of Value Choices for different sessions. Click Save and Close. For more information about Value Choices, see Setting Up Value Choices.
or:
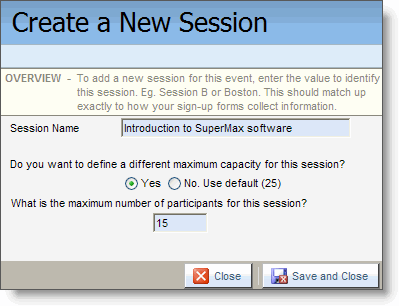
Click Create a Session—The Create Session dialog box opens. Enter the Session Name. Use the default for the maximum capacity for the Session (with No selected, there are a maximum of 25 registrants for the Session) or set your own limit (select Yes, then enter the maximum number of participants). Then click Save and Close.
- If you are organizing the sessions using a picklist that allows registrants to select the session they want to attend, then you will see a dialog box asking if you want to add the new session to existing sessions in the picklist that registrants will see. Click OK to add the new session to the picklist.
- To add standard headers to the event, select Header Fields > Add Standard Event Header(s). In the dialog box, select items you want to add in the Available Fields list, then click the right arrow (>) to move them to the Selected Fields list. Click Add Standard Event Headers, then Close, to add the selected headers.

- To add additional, custom Headers, on the Header Fields menu, click Create Custom Header. In the New Event Header dialog box, type in the Display Name, select a Data Type, choose the Display After value to control where you want the custom header displayed, and click Save and Close.
- Repeat for any additional fields you require (for example, login information or other information required by users to access a webinar Event). The header fields are added in the Event Details dialog box one field at a time.

Fill in or select the values required for all fields.
- Click Save in the
Event Details dialog box, then Close. Updated details are shown in the Event Details section of the main Events page.
To edit an existing session:
-
In the classic UI, navigate to Orchestration > Tools > Events. In the Redwood experience, navigate to Orchestration > Events.
- Open an existing event, or create a new one.
- Click Edit next to the Event Details heading.
The Event Details configuration window opens.
- Under the List of Sessions area, click the drop-down arrow next to a session name, then click Edit Session.
- In the Edit Session dialog box, enter a new Session Name. .
Note: The new Session Name should be consistent with the name your form uses to collect registrant information.
To remove a session:
-
In the classic UI, navigate to Orchestration > Tools > Events. In the Redwood experience, navigate to Orchestration > Events.
- Open an existing event, or create a new one.
- Click Edit next to the Event Details heading.
The Event Details configuration window opens.
- Under the List of Sessions area, click the drop-down arrow next to a session name, then click Remove Session.
The session is removed from the event.
Configuring automated action events
Once you have set up the Event Details, you can take care of automated Event Actions such as sending reminders at specified intervals before the event. When someone submits a form, the processing steps associated with these event actions are triggered.
Actions are triggered by custom object records and other criteria that you specify. You can enable Standard or Advanced actions that will automatically take place for your event like:
- Email to be sent upon registration.
- Define a waiting list and email to be sent.
- Reminder email to registrant.
- Email notification to trainer when someone registers or event is full.
- Post-Event Thank you email.
Event actions run on a service which runs every 15 minutes, and monitors the update/creation of the custom object records within the event. You can define a number of scenarios that will automatically trigger one or more actions.
Processing Steps Used with Event Actions
Notes:
- The processing step "order" is hard-coded and cannot be revised.
- Processing steps execution is based on Always, Never, Condition or Data Lookup criteria.
- It is better to use processing steps in the custom object records instead of in form submission so that the custom object records condition can be used to trigger actions.
The processing steps are as follows:
- Add to Contact Group: Adds individual to a defined group (email address required).
- Add to Step in Program Builder: Adds individual to an Eloqua program.
- Change Contact's Email Address: Updates the Eloqua contact records with a new email address and maintains past history from old email address.
- Email Notification: Sends HTML/plain text email with form data to an email address.
- Remove from Contact Group: Removes individual from a contact group in Eloqua.
- Run Integration Rules: Run external calls to sync your Eloqua instance with your CRM integration, if applicable.
- Save to Contact Table: Saves all Form submission data to the contact table and automatically deduplicates by email address.
- Send Batch Email: Sends a specific email to a defined list of custom object records. Note: This cannot have conditional parameters.
- Send Email: Sends a pre-loaded HTML or plain text email to the Form submission lead.
- Subscribe at Site Level: Subscribes the individual to the entire client database.
- Subscribe to Email Group: Subscribes the individual contact to emails in a specific email group folder.
- Unsubscribe at Site Level: Unsubscribes the individual from the entire client database.
- Unsubscribe from Email Group: Unsubscribes the individual from a specific email group folder.
- Update Existing Record or Data Object: Updates information into Eloqua contacts, prospects or companies.
Standard event scenarios
There are usually five standard event scenarios:
New Registration: This scenario cannot be edited.
- Processing steps executed when the custom object records acquires "Registered" status.
- Should use the "Send Email" feature with "condition" set to send confirmation email, instead of via the forms function (as the forms function can only send confirmation that form was submitted, not an email based on a custom object record).
Waiting List: This scenario cannot be edited.
- When enabled, it will check for new custom object records on waiting list or process the waiting list if a spot opens up.
- For example, there is a 10-person maximum in a training seminar. The 11th person is added to a waiting list until a free space opens up.
- For example, there is a 10-person maximum in a training seminar with 5 people on the waiting list. Someone calls to cancel, the custom object record is deleted. The next person on waiting list is added. If someone is manually changed to "Waitlist" status, they will move to the end of the waiting list.
- The system can tell you that a registrant is on a waiting list, but not which number they are on the waiting list. You cannot change the waiting list order, but you can override the waitlist by changing the custom object record status.
1 Week Reminder: This scenario can be edited, or so may appear under a different name in existing event actions.
- When enabled, it will run 1 week before the event (or session) takes place. However, you can also customize this reminder to be sent a specified number of days before the event or on a specified date.
- For example, you can specify a email to be sent to registrants for session X when it is 1 week before event date. You can specify a different email to waiting lists for session X to try to select another Session.
1 Day Reminder: This scenario can be edited, or so may appear under a different name in existing Event Actions.
- When enabled, it will run 1 day before the event (or session) takes place. However, you can also customize this reminder to be sent a specified number of days before the event or on a specified date.
- For example: If a participant is registered and it is one day before the event with no additional conditions, then execute the two processing steps:
- Send an Email to the Trainer that the Event is 1 day away.
- Send an Email Batch to Registrants with 1 day reminder.
5 Day Post Event: This ccenario can be edited, or so may appear under a different name in existing event actions. This scenario may also appear under the Advanced tab instead.
- When enabled, it will run 5 days after the Event (or session) takes place. However, you can also customize this reminder to be sent a specified number of days after the Event or on a specified date.
-
If participant is registered, it is exactly 5 days after the Event, and there are no other conditions, then execute the two conditional Processing Steps:
- Send an Email to Registrants who attended ("Thank You for Attending").
- Send a different Email to non-attendees ("Sorry You Could Not Attend").
Advanced event scenarios
There are usually four advanced event scenarios:
Modified Registration
- When enabled, it will check on 15 minute intervals for any modifications to registrations.
Incomplete Registration
- Note: Most of the time, this will be caught by web Form validation.
- When enabled, it will check for any new registrations that are incomplete. A registration set as "Incomplete" is not part of registration or waiting lists as it does not meet the criteria.
- Mandatory fields may not have caught this (prior to Form validation) or if someone was manually added via a custom object record (for example, the information is filled in manually by the Call Center, not forwarded through a Form submission).
Event Cancellation
- When enabled, it will check for any registration cancellations.
- This is defined by the status of "Cancelled".
- This status can be manually changed or it can be from the Forms Processing Step "Cancel Registration."
Add New Reminder or Post Event
- You can customize and add additional scenarios.
- Tip: Use this for any test services you might create.
Adding Automated Event Actions
The following section shows how to add and automate event actions to carry out particular functions related to an event. The steps shown are based on setting up actions for a webinar event.
To add automated event actions (a webinar example):
-
In the classic UI, navigate to Orchestration > Tools > Events. In the Redwood experience, navigate to Orchestration > Events.
- Open an existing event, or create a new one.
-
Click Edit next to the Event Actions heading.

The Event Actions configuration window opens.

-
(Optional) Configure information in the Waiting List area, if needed.

You may want to limit the number of participants due to technical or management considerations. To do this:
- Select Yes for the Does this event have limited seating? option.
- Provide the maximum participant capacity number.
- Type the email address for the event administrator, speaker, or trainer in to the Event is full field. This will send the notification that the event is filled up to the person or persons in charge of the event. You can enter multiple addresses by separating each address with a semi-colon.
- Enter the email title into the Subject Line field. Use a brief, meaningful title that indicates which event this is, and that it is full.
- (Optional) Select the Automatically disable services check box, then specify a specific date and time. This option disables all the automated event actions associated with this event. This check box is deselected by default.
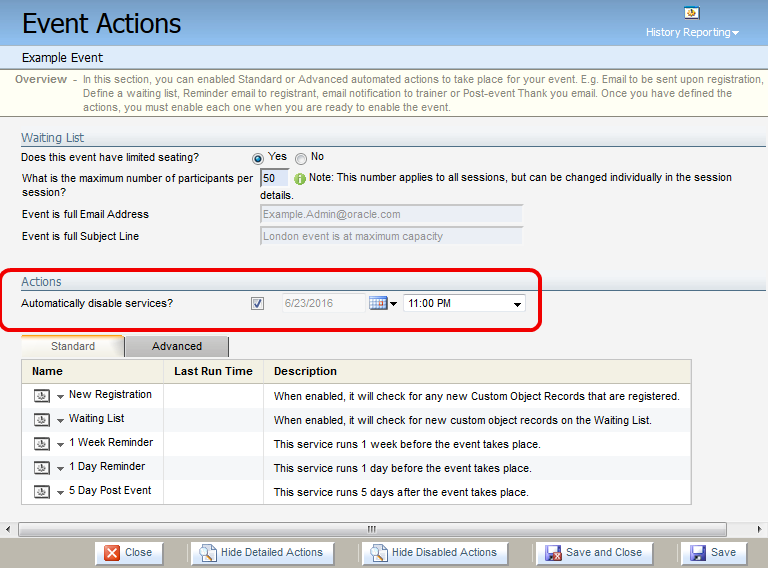
- Click either of the Standard and Advanced tabs, and configure the event actions listed. You can Enable an action (to make it run automatically), Add Processing Steps, or Edit Action Details (in some cases) using the menu.
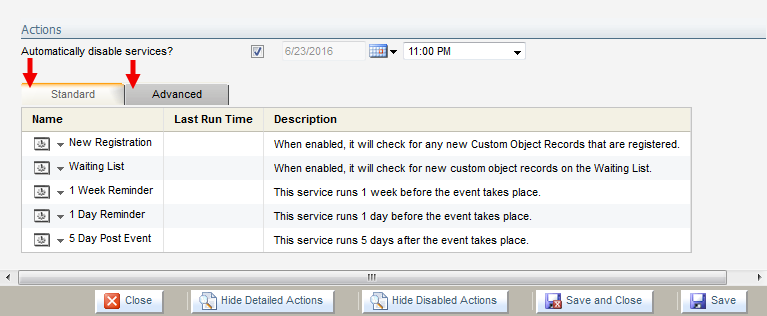
Standard actions that are associated with an event include continuous registration, setup for the waiting list, reminders, and a post-event follow-up email. Advanced actions include things like dealing with modified or incomplete registrations, or cancellations of events. You can add reminder emails from both tabs.
- If you are using the New Registration action (to process registrations for the event), then you can add the Email Notification processing step to notify the event owner or administrator of any newly submitted form. To do this:
- Click the drop-down arrow next to New Registration, then select Add Processing Steps.
The Add Processing Step configuration window then opens.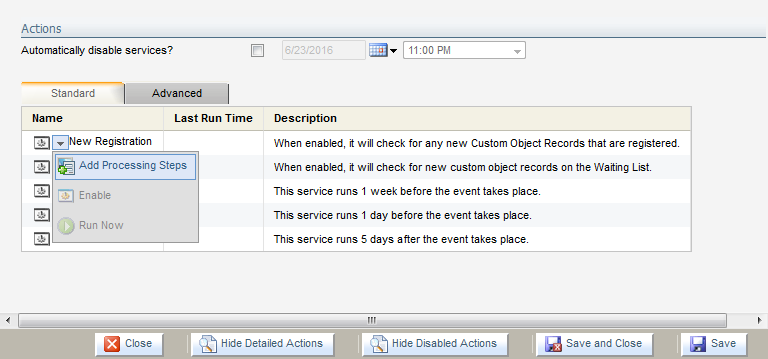
- Select the single processing step option, then select Email Notification from the Step drop-down.
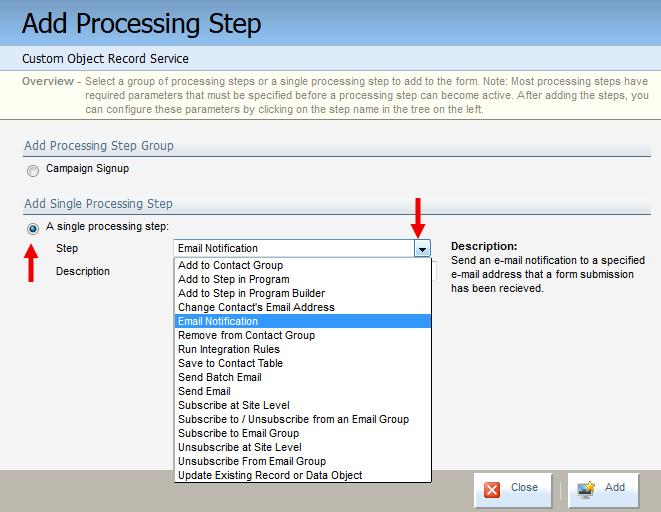
- (Optional) Add a brief, meaningful description of the processing step for future reference. For example, "Registration confirmation email."
- Click Add. The Edit Processing Step configuration window then opens.
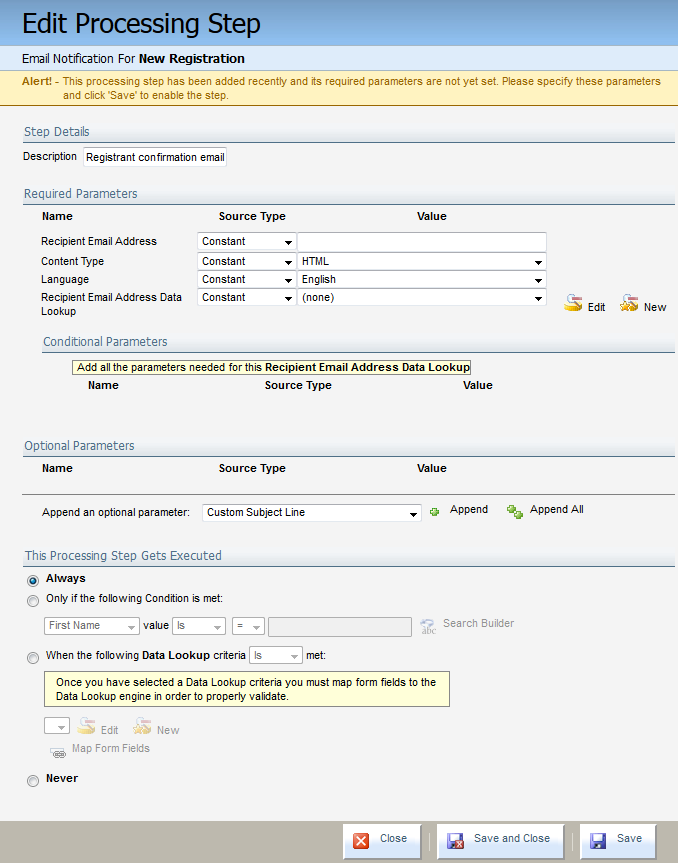
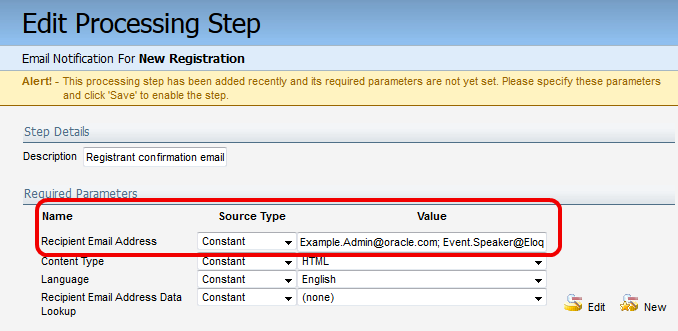
- Set the Source Type for the Recipient Email Address to Constant, then type the email address of the event administrator into the adjacent Value field. You can enter multiple addresses by separating each address with a semi-colon.
- Configure the remaining required and optional parameters as needed, then click Save and Close.
The Edit Processing Step dialog box closes and the step is added in the Actions table of the Event Actions window. The person or persons in charge of your event will receive an email notifying them of every successful registration.
- Click the drop-down arrow next to New Registration, then select Add Processing Steps.
- As a best practice, you can also add an additional processing step for the New Registration action so that each new registrant will receive an email when they successfully register for the event. To do this:
- Click the drop-down arrow next to New Registration, then select Add Processing Steps. The Add Processing Step configuration window then opens.
- Select the single processing step option, then select Send Email or Send Batch Email from the Step drop-down.
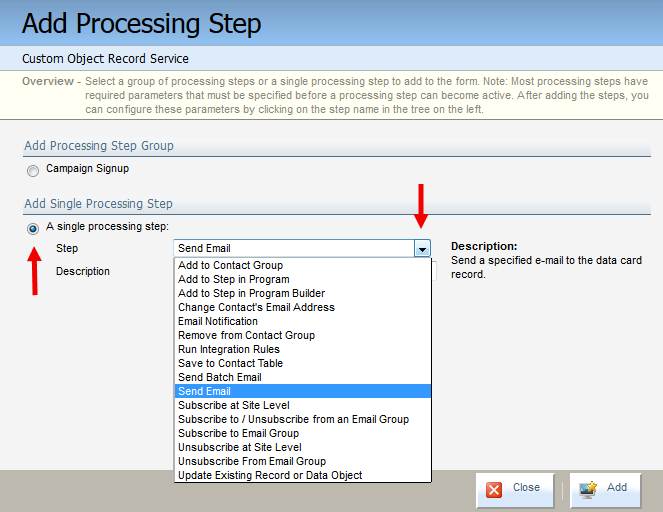
- (Optional) Add a brief, meaningful description of the processing step for future reference. For example, "Successful registration email."
- Click Add. The Edit Processing Step configuration window then opens.
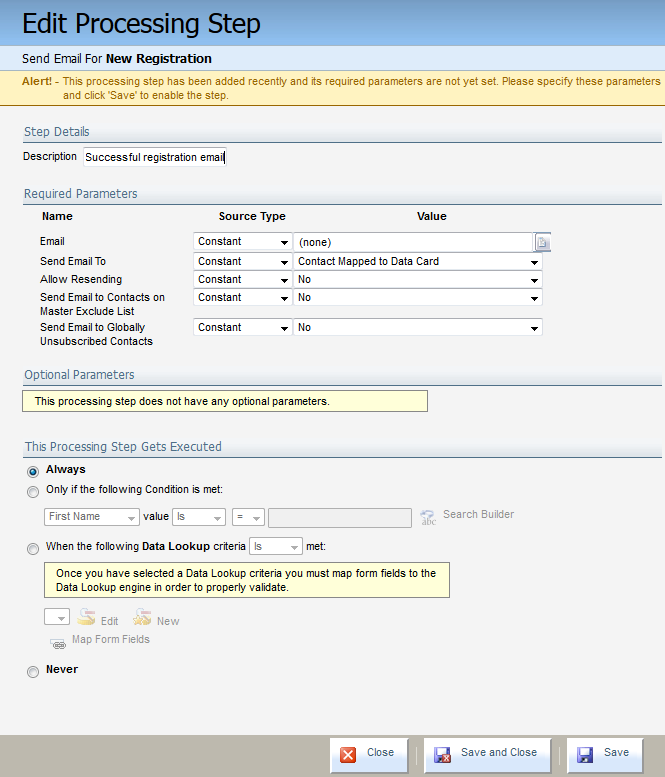
- Edit the Required Parameters:
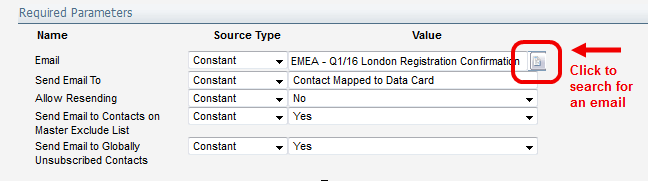
- Email: Click the search button, then locate your email from your currently existing assets. If you do not have one ready, then you will need to create a new email.
- Send Email To: Select Contact Mapped to Data Card from the Value drop-down. This will ensure that the email is sent to the address provided by the contact when they register for the event.
- Allow Resending: Select either Yes or No from the Value drop-down. The default value is No.
- Send Email to Contacts on Master Exclude List: Select either Yes or No from the Value drop-down. The default value is No.
- Send Email to Globally Unsubscribed Contacts: Select either Yes or No from the Value drop-down. The default value is No.
Tip: There may be cases where you have contacts that have opted out of subscription for emails as part of your campaign efforts, but they have nonetheless signed up for your events. In this case, emails sent as part of a processing step can be set to override any contact's subscription status so those contacts do not miss any useful information.
In order for contacts to receive any emails in relation to an event for which they have registered, select Yes for both the Send Email to Contacts on Master Exclude List and Send Email to globally Unsubscribed Contacts options. This will ensure that your contacts receive emails for the event regardless of their current subscriptions status in your Eloqua database.Note: The Send Email to Contacts on Master Exclude List and Send Email to globally Unsubscribed Contacts options are only available to you if you are a administrator or user in a security group that has the corresponding action permissions enabled. If you do not see these options, then you will need to request permissions from your administrator.
- Select the Always option in the This Processing Step Gets Executed section. This is the default selection.
- Click Save.
- For a 1 Day Reminder Email, you can Add Processing Step such as Send Batch Email to send a reminder email to all registrants one day before the event. Give it a Description, select an email (such as a brochure or newsletter), and set the Send Email To field.
- Click Save and Close. You can also use this reminder to send other details about the event, such as login details for a webinar.
- (Optional) Click 1 Day Reminder and verify that the Date is mapped to the correct date (one day before the event). Also ensure that you are sending the appropriate reminder email to Registered Contacts or Registrants only. When you are finished reviewing the settings, click Save and Close.
- To send a Thank-you email after the Event, click the Advanced tab, then click 5 Day Post Event.
- In the Event Action dialog box, click Add Processing Steps, select Send Batch Email and click Add to add to this event action.
- Click Save to save the processing step, then click 5 Day Post Event to open the Event Action dialog box again.
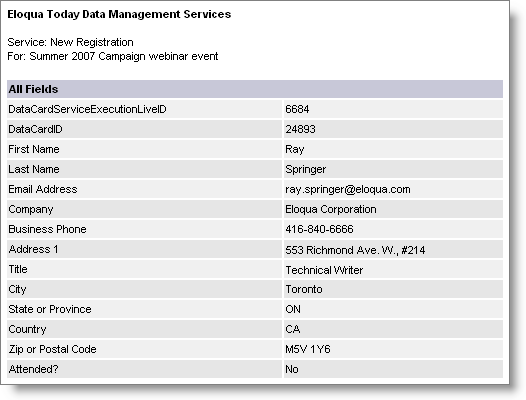
- Set Action Conditions so that only registrants who meet particular criteria receive a specific email. For example, the Attended? field, used to track people who attended the event, is set manually by the event administrator for each attendee as the basis for the Send Batch Email processing step
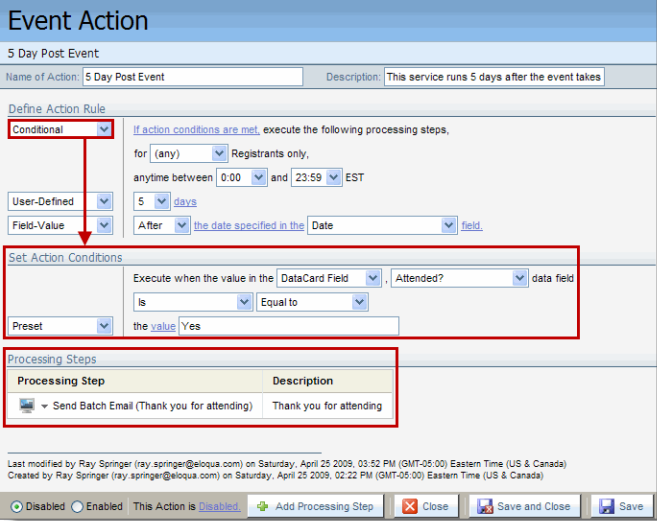
- Click Save and Close.
Enabling the event
When you are done with Event Actions modifications, Enable services from the menus and they will run automatically. The final list of Event Actions is shown in the Event Actions dialog box and in the Event Actions section of the Event page.

Note: When you Enable an Event Action, a "lightning bolt" is added to the icon for the Event in the Tree View.

Testing Event Registration
When everything else is done, you can test registration for your event.
To test event registration:
- Expand the Event Actions section of the main Event summary page.
- Add an email notification processing step to the New Registrations if not already done (covered in the Additional event actions section above).
- Ensure that the New Registration event is set to Enable. If not, click Enable.
- Fill out the registration form that you have set up.
Or
On the Event Options menu, select New Registrant. Then, submit one registration via the Custom Object Record dialog box. Fill in the Participant Info using your own email address and other information, then click Save and Close. - Wait approximately 15 to 20 minutes.
You will receive an Eloqua Notification System email showing the new registration.
Enabling the event
When you are ready to run your event, click Edit next to the Event Actions heading, and Enable all the services that you have configured. To test services without having to enable or wait for up to 15 minutes for the next events processing cycle, click Run Now.