Creating a webinar
To create a webinar, you will need to have an email, forms and custom object records.
For this sample webinar, we're going to review the following components and parameters:
- The following emails should be created before continuing with this article as they will be referenced.
- Registration confirmation email.
- 1 day reminder email.
- Follow-up thank you email.
- An Oracle Eloqua form that is posted on a website where recipients register for the event.
- Create an event using custom object records where:
- Individuals cannot submit more than one registration, because the unique identifier is the email address.
- A confirmation email with webinar event details to be sent upon registration.
- A reminder email is to be sent 24 hours before with webinar Details.
- There is a waiting list in case the event is oversubscribed.
- A follow-up email sent to all registrants who attended.
- Test the email by registering a test contact.
Step 1: Create Form
The first step to creating a webinar event in Oracle Eloqua is to create a registration form to send to invitees.
In the example below, the form is named: TW - RAS - Webinar Event Summer 2010.

Step 2: Create the Event and Event Name
Once you have created the basic form, you can create and edit an event.

Learn more about creating events in the event editor.

Step 3: Define registrant data to Collect
Once you've established the event, you can define the registrant data you want to collect for your event.
Note the four menu areas on the Event page in the right panel. These sections can be expanded by clicking the drop-down arrow to the left of each name. Each section also as editing options to the right of each name:
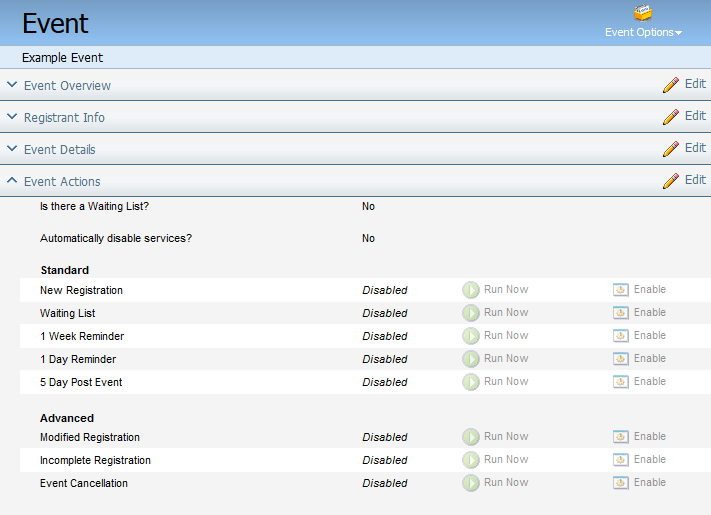
- Event Overview: Includes the name of the event, a description (if one was provided during creation), the user who created the event, date and time for when the event was created and last modified, the total number of sessions (if applicable), and the total number of registrants for the event.
- Registrant Information: A list of registrant fields for the event, such as First Name, Last Name, and Company. Also shows a field that is used as the unique code and email a address for a registrant's record.
- Event Details: Details of the event such as the date and how registrants are signed up for sessions.
- Event Actions: Actions that occur while the event is being processed. You can Enable an action using the button on the right, or click Run Now to run a one-off test.
To define registrant data (in the custom object record):
- On the Event summary page, click Edit next to Registrant Info.

The Registrant Info dialog box opens. You will see the form created earlier on this page in the forms linked to this event section.

- To map the form fields to the event, click Edit Link.
- In the dialog box that opens, click Create Field next to every field that you want to map from the form to the event. Then click Close. The mapped fields appear in the Registrant Info dialog box.

- To set the Email Address as the default Unique Code field (to prevent registrants from registering for more than one session), select Options > Edit Special Fields. Select the Email Address field in the first picklist, then use the Email Address Field as the Unique Code.
Note that you can do any of the following for this setting:
- Choose the Email Address field, which is the default, allowing registrants to only register once with the same email address.
- Select the Eloqua Identifier to allow registrants to register multiple times using the same email address.
- Select any of the other custom object record fields from the drop-down to use as a unique identifier.
- Click Save and Close.
- (Optional) Add additional fields useful for event tracking. Create an Attended? field to track a value indicating if an invitee attended the webinar.
- Click Options , then click Create Custom Field.
- For the Attended? field, select Text as the Data Type and Checkbox as the Field type used.... Fill in Yes for Value for checked, No for Value for unchecked, and a Default Value of No , as most invitees will likely not attend.
- Finally, choose a field to Display After, then click Save and Close. The Attended? field is now shown in the Registrant Info dialog box in the Fields.
Step 4: Define your event details (Header Fields)
Once the registrant Info has been set, you can set up the event details for the two event sessions. The Event Details page is used to define deader fields for multiple-session events. Header fields hold event-specific information such as date, location, trainer/presenter, whether meals are provided, and so forth. These fields can also be used to create email custom fields that can be inserted into emails.
To set up Event Details for multiple events
- From the Event summary page, next to Event Details, click Edit. The Event Details page opens.
- For a multiple Event session, make sure that Multiple Sessions is selected. Also select the organized by value from the picklist, in this case, Event Sessions. Click Add Sessions from a list. The Add Sessions from List dialog box opens.
- If you are using a Picklist on your Form that identifies the Session, choose Picklist. This is a values list for this exercise, called Event Sessions.
- Click Save and Close.
- Expand each session and select the Date Values for each session. This is required if you want to send reminders for the sessions.

- To select additional features for the event: click Header Fields > Add Standard Event Headers to add the headers (Time and Trainer in this example) to the Event Details, then Add Standard Event Headers to save the headers and close the dialog box. The fields are added in the Event Details dialog box.
- To create Custom Headers, on the Header Fields menu, select Header Fields > Create Custom Header. The New Event Header dialog box opens to allow you to define a custom field. Type in the Display Name (Session Name in this case), select Text as the Data Type, choose to Display After the Date, and click Save and Close.

- Repeat for any additional fields you require such as URL, Login or other information required by users to access the webinar Event. The information is added in the Event Details dialog box one field at a time.
- After adding in your additional event headers, fill in all event details values pertaining to each session.

- When you are done, click Save and Close.
Step 5: Define the Automated Event Actions
Once you have set up the Event details, you can take care of automated Event Actions such as sending reminders at specified intervals before the webinar Event. When someone registers, the Processing Steps associated with these Event Actions are triggered.
To add automated event actions:
On the Event summary page, click Edit next to Event Actions. The Event Actions dialog box opens.
Even for a webinar, you may want to limit the number of participants due to technical or management considerations. By selecting Yes, the wait list options will appear. Fill in the Maximum number of Participants, the Email Address as the To address (you can enter more than one address using semi-colons as separators), the notification address when the event is full, and the email Subject Line for the notification email.
You can select to disable services by selecting a date and time. This disables all the event actions associated with this Event at the selected data and time. By default, this option is not selected.
Additional event actions
Use the tabs to access additional Standard and Advanced event actions. You can Enable an action (to make it run automatically), Add Processing Steps, or Edit Action Details (in some cases) using the menu.
Note: Standard actions are those normally associated with an Event, including continuous registration, setup for the waiting list, reminders, and a post-event follow-up email. Advanced actions include things like dealing with modified or incomplete registrations or cancellation of the Event. You can also add new reminders from the Advanced tab.
The following is specific information to help you use specific Standard event actions:
- Make sure you add the send email processing step to send an email notifying the applicant of successful registration.
- From New Registration, Add Processing Step named Send Email. Click Add.
- Select the Email that notifies the applicant that they have successfully registered.
- Make sure that the Source Type for Send Email To is a Constant mapped to the value of Contact Mapped to Custom Object Record.
- Click Save Processing Step to save it to New Registration.

Note: Selecting Contact Mapped to Custom Object Record will adhere to a contact's unsubscribe status, if it has one.
To set up a reminder for 1 day before the event:
- Add a processing step such as Send Batch Email to send a reminder email one day before the event.
Name the step Send 1 Day Before Reminder, set the Send Email To field to Contact Mapped to Custom Object Record, then click Save and Close.
- Next, click on 1 Day Reminder and make sure that the date mapped in the 1 Day Reminder action event is the date on which the event occurs. Also ensure that you are sending the reminder email to Registered contacts only. When you are finished reviewing the settings, click Close.
To send a Thank-you email after the Event:
- Click the 5 Day Post Event. In the Event Action dialog box, click Add Processing Steps and select Send Batch Email to add to this event action.
- Click Save Processing Step, then click 5 Day Post Event to open the Event Action dialog box again.
- Set Action Conditions so that only registrants who meet particular criteria receive a specific email. For example, you may send thank-you emails only to those who registered for and attended the event. The Attended? field, which you added earlier, is set manually to Yes by the event administrator for each attendee as the basis for the Send Batch Email Processing Step (see the diagram below for settings).

- Click Save and Close when you are finished.
Enabling event actions and viewing registrant execution
To enable event actions and review registrant execution of those actions:
- Click Enable for each service in the Event Actions menu when you are finished configuring the processing step. Enabled services will run automatically. Your list of Event Actions will look similar to the diagram below depending on the actions you have chosen to enable.
Once actions have been enabled you can review to see which registrants have executed through the event actions and when.
Note: Event actions fire off approximately every 20 minutes.
- Click Edit next to Event Actions in the main Event summary page. The Event Actions window opens.
- Click History Reporting, then click Custom Object Record Service History. The Custom Object Record Service History report contains 25 months of data.
Note that when you enable an event action, a "lightning bolt" is added to the icon for the Event in the Tree View.
Step 6: Test event registration
When everything else is done, you can test registration for your event.
To test event registration:
- Expand the Event Actions section of the main Event summary page.
- Add an email notification processing step to the New Registrations if not already done (covered in the Additional event actions section above).
- Ensure that the New Registration event is set to Enable. If not, click Enable.
- Fill out the registration form that you have set up.
Or
On the Event Options menu, select New Registrant. Then, submit one registration via the Custom Object Record dialog box. Fill in the Participant Info using your own email address and other information, then click Save and Close. - Wait approximately 15 to 20 minutes.
You will receive an Oracle Eloqua Notification System email showing the new registration.
Troubleshooting issues if you did not get an email notification:
Registrant status is On Hold
- Has the session value or picklist options on your Form changed? Ensure that the session value from your form match the Session name under Event Details.
Emails not being received
- Allow for resending of email. As testers, it's easy to forget that this email may have been sent before.
- Ensure that the email is selected (if testing Send Email)
- Ensure that the action is enabled, and that the time frame (if applicable) matches the status (if testing reminder or post-event emails).
- Check to see if registration is full but the Waiting List event was not enabled.
- Review the custom object record service history to see if it has been fired off for that contact. If so, view the junk email box or spam filter. If not, review after some additional time (you may need to wait 20 mins) and see if it has fired off any other custom object records.
How do I use my form for multiple webinars?
Step 1: Create additional hidden fields in your form to identify this webinar
- When you post the form information, you have to set a default field value so that this information can be updated to the appropriate event.
Note: These fields don’t have to be linked to the event.
- This example shows that the hidden field June Webinar gets a value of “Y” when submitted.

Step 2: Set the processing step for the specified webinar
- For future webinars, you have a different Attempt to Register processing step that points to different events based on a different conditions. For example, update the Attempt to Register processing step with a condition specifying that the June Webinar has a value of Y, then click Save.
Step 3: Change sessions
- When the first session of the webinar is full, you remove the default value for the June webinar and set the default value for the July webinar to Y. Change the parameters for the processing step so that it's testing for the July webinar. Subsequent form submissions will add registrants to the July webinar.
Setting up value choices for event sessions
As part of the form setup procedure, you need to select value choices corresponding to different sessions of the webinar. You'll do this when you set up the Event Sessions field.
To set up the value choices:
- When you are setting up the Event Sessions field, make sure that Single-Select Picklist is selected as the Field Type.
- Next to the Picklist Value Choices picklist, click New. The Picklist Value Choices dialog box opens.
- Fill in a List Name (use "Event Sessions") to identify the single-select picklist you are building, then click Save.
The dialog box expands to allow you to enter value choices.
- Enter the first value (the date of the first session: July 10, 2010) in the Option Value field and the name (July 10, 2010) that should be displayed for it in the picklist in the Display Name field. Click Add. The Value Choice is shown under Full Editor below (you can move values up or down in the list using the Move arrows or Edit/Delete them from the menu). A preview of the picklist is shown under List Preview.
- Add a second value (July 17, 2010 and July 17, 2010).
- Add a third value (July 24, 2010 and July 24, 2010)
- Click Save and Close to close the dialog box. This puts you back on the Create or Edit Field page with Event Sessions selected in the Value Choices for Picklist field.
- Click Save.