Configuring a progressive profile in list mode for the Design Editor
When you're creating your Design Editor form, you can add a progressive profile to optimize the form's performance. See Configuring a progressive profile in list mode for the Classic Design Editor if you're working in the Classic Design Editor.
To add a progressive profile in List mode:
- In the
 tab, drag and drop Progressive Profile to your form.
 - Drag the desired contact and custom fields inside. Learn more about contact and custom fields here.

- Click the Progressive Profile content block.
The Progressive Profile panel opens.
- Select List mode from the drop-down list.
Note: In contrast to List mode, Staged mode lets you decide which fields are displayed together and on which visit they appear to the contact. Learn more about adding stages.
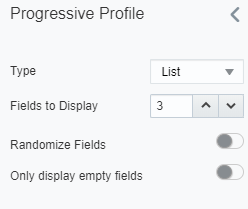
- List mode provides the following options:
Randomize Fields: This option allows you to randomize progressive profiling fields so that your contacts are always presented with new form fields.
- Only display empty fields: When this option is turned on, the form will only display fields that are empty. Field merges, static values, and previous submissions can create completed fields.
- Fields to Display: Select the number of progressive profile fields to be shown to each contact. If more fields have been completed than set to display, fields that a contact has already completed will still appear unless only display empty fields has been checked.
- List mode provides the following options:
- Click Save.
You have now configured your progressive profile.
Note: You cannot add an email field to a progressive profile because it is needed to connect information to a contact.
Configuring a progressive profile in staged mode for the Classic Design Editor