Initializing and monitoring the Salesforce integration
Important: The Salesforce native integration was deprecated February 1, 2021. We recommend using the
Auto synchs and queues were disabled during the preliminary setup process for this integration. With the required synchs and queues created and the integration configurations completed, you can now re-initialize the system and configure notifications for the ongoing monitoring and maintenance of the integration.
This section includes the following tasks:
- Re-enabling the auto synchs
- Enabling the internal and external queues
- Configuring system error notifications
Re-enabling the auto synchs
Now that you have completed the tasks for configuring data synchronization from Oracle Eloqua to Salesforce, you can re-enable the auto-synchs previously disabled.
To enable auto synchs:
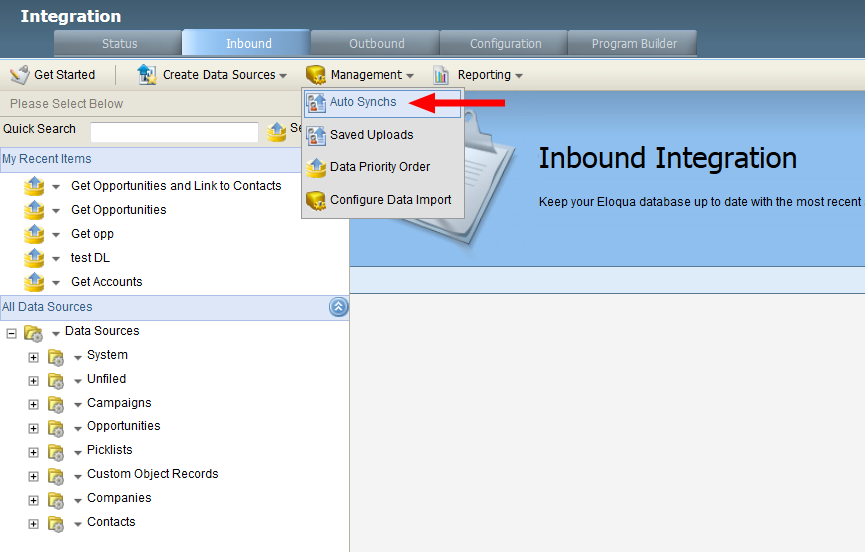
- Click Settings
 .
. - Click Integration under Platform Extensions.
- Click the Inbound tab.
- Select Auto Synchs from the Management menu.
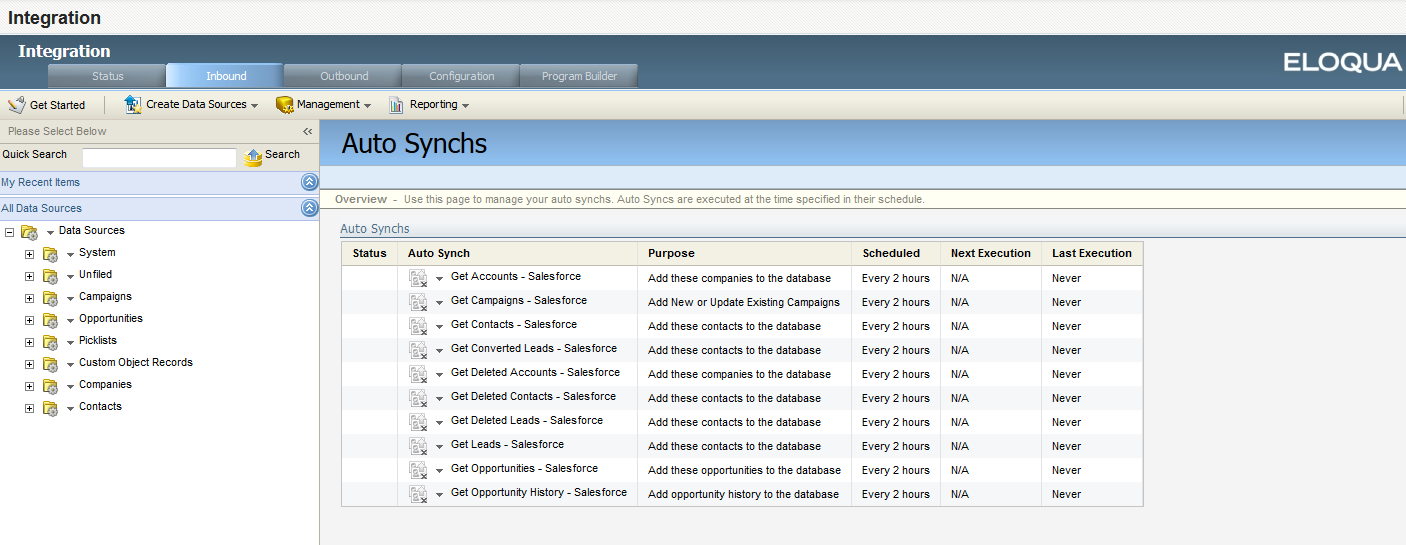
- Click the Get Deleted Accounts auto synch in the Auto Synch column. All the existing auto syncs are listed. A green check mark beside an auto synch indicates that it completed successfully the last time it ran.
- In the Auto Synch window, click Edit for the Auto Synch Details group.
- Check the Enabled box in the Upload Details window.
- For notification purposes, update the Email field with the address of your Salesforce or Oracle Eloqua administrator. You can specify multiple recipients using a semicolon (;) as a separator. You can update the address at any time.
- You can enable the following notification options:
- Send Email on Success: This sends a notification email each time the auto synch is executed successfully. Although these notifications are not mandatory on an ongoing basis, it is a good idea to select this initially as you complete and test the Salesforce integration.
- Send Email on Failure: This sends a notification email each time the auto synch fails. The notification explains the cause of failure (for example, inaccessible Salesforce fields, or changes in CRM user password). This notification should always be enabled.
- Click Save and Close.
- Click Close in the Auto Synch window.
- If you want to run the auto synchs now, rather than wait for the scheduled upload, click
 next to the auto synch name, then click Run Auto Synch.
 - Repeat this process for each of the seven integration auto synchs.
Important: This is the recommended order for enabling the remaining auto synchs: Get Accounts, Get Deleted Leads, Get Converted Leads, Get Leads, Get Deleted Contacts, Get Contacts.
Enabling the internal and external queues
As part of the initial preparations for this integration, you disabled both internal events and external calls. You can now re-enable the queues or confirm that they are already enabled.
To enable the internal and external queues:
- Click Settings .
- Click Integration under Platform Extensions.
- In the Status tab, click the Reporting menu, then click Integration Reporting.
- Click Enable beside both the Internal Event Queue Stats and External Call Queue Stats headings. The option to enable appears only if you previously disabled the queue. If Pause is currently displayed, the queue is already enabled
Validating auto synch processing
After you have configured the account, contact, and lead auto synchs, verify that they are running correctly.
To test your auto synchs:
- Click Settings .
- Click Integration under Platform Extensions.
- Click the Inbound tab.
- In the Management menu, click Auto Synchs. All the existing auto syncs are listed. A green check mark beside an auto synch indicates that it was successfully completed the last time it ran.
- To view historical processing data for an auto synch, click on the name of the auto synch in the Auto Synchs area.
- From the Reporting menu, click Auto Synch History.
A report is displayed that lists status details for each run of the auto synch. You can:
- Print the report or export it to Excel by clicking the options in the Export menu.
- View more detailed information about a specific auto synch processing run by selecting the down arrow in the first column of the table, then clicking View Upload Details.
Configuring system error notifications
With both the integration auto synchs and the internal and external queues re-enabled, you can now set up error notifications.
Errors can cause issues with the Salesforce integration. Configure error notifications to send alert emails when specified errors occur. Determine who on your team should receive these notifications on an on-going basis. These are the recommended errors to trigger notification:
| External Call: (All) | Error: CRM Login Error |
| External Call: Create Lead | Error: (All) |
| External Call: Update Lead | Error: (All) |
| External Call: Update Contact | Error: (All) |
To configure error notifications:
- Click Settings.
- Click Integration under Platform Extensions.
- In the Configuration tab, select Manage Error Notifications on the Error Notifications menu. The Integration Error Notifications window opens.
- In the Notification Setup area, enter the Email Address for the notification recipient and select the frequency with which the email will be sent.
- In the Add Notification area, select the external call and the specific error that should trigger a notification. It is typically a good idea to select (All) for the error type. You can also select whether this is a high priority error, which overrides the defined schedule and sends a notification every hour.
- Click Add Notification. The notification appears in the Receive An Email For The Following Errors table.
- Repeat to add more error notifications.
- Click Save.
Managing native CRM integration auto synchs
Managing native CRM internal events