Configuring profile criteria
When you create a lead scoring model, you must define the profile criteria. The profile criteria is explicit data about the lead, such as title, industry, or company revenues. This type of demographic data helps identify who the prospect is and the prospect's fit.
Oracle Eloqua uses the criteria to give a lead a profile score of A, B, C, or D. Where an A is the most suitable and a D is the least.
Before you begin
Here is an example profile scorecard:
| Profile field | Field values | Point | Weighting |
|---|---|---|---|
| Job title | VP Marketing | 100 | 30% |
| Director of Sales | 50 | ||
| Manager of Sales | 25 | ||
| Industry | Software | 100 | 30% |
| Pharmaceutical | 100 | ||
| Annual Revenue | $100 million | 20 | 25% |
| $1 billion | 100 | ||
| Current Solution | Competitor 1 | 100 | 15% |
| Competitor 2 | 80 |
Use the scorecard to help you do the following:
- List the profile fields that you want to consider when assessing the quality of leads.
- List the different values that are common among your leads and prospects. The more you include, the more contacts you will be able to evaluate accurately.
- Give each field value a number of points out of 100. The closer the value is to that of your ideal lead, the more points you should award that value. Note that there is no limit on the total points. For example, you can assign 100 points to 3 different values if they all indicate an ideal lead.
- For each field (not field value), decide a weighting percentage. This indicates how important the profile field is to the overall score. For example, if most of your quality leads come from specific industries or have specific job titles, you may want to weigh these fields higher than others. At first, it might be easier if you ensure that all weightings total 100%. However, this is not a requirement.
Configuring profile criteria
To configure profile criteria:
-
Click the Profile tab.
- Add the profile fields you want to use:
- In the left pane, select the type of profile field from the drop-down list. For example, select Contact to access basic contact fields.
- Double-click the profile field. The field appears in the left pane.
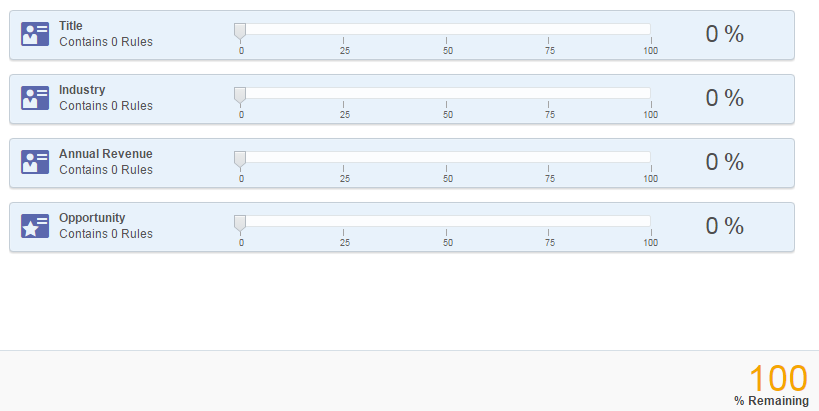
- Drag the slider to specify the weighting for a profile field. The more important a profile field is, the higher the weighting should be. Dragging the slider increments the weighting by 5%.

Tip: The % Remaining at the bottom of the screen is helpful if you expect the total of all the weightings to be 100%. However, the weightings do not need to total 100%.
- Add the values for the profile fields:
- Double-click the profile field.
- Click Add Rule. The Edit Rules window appears.
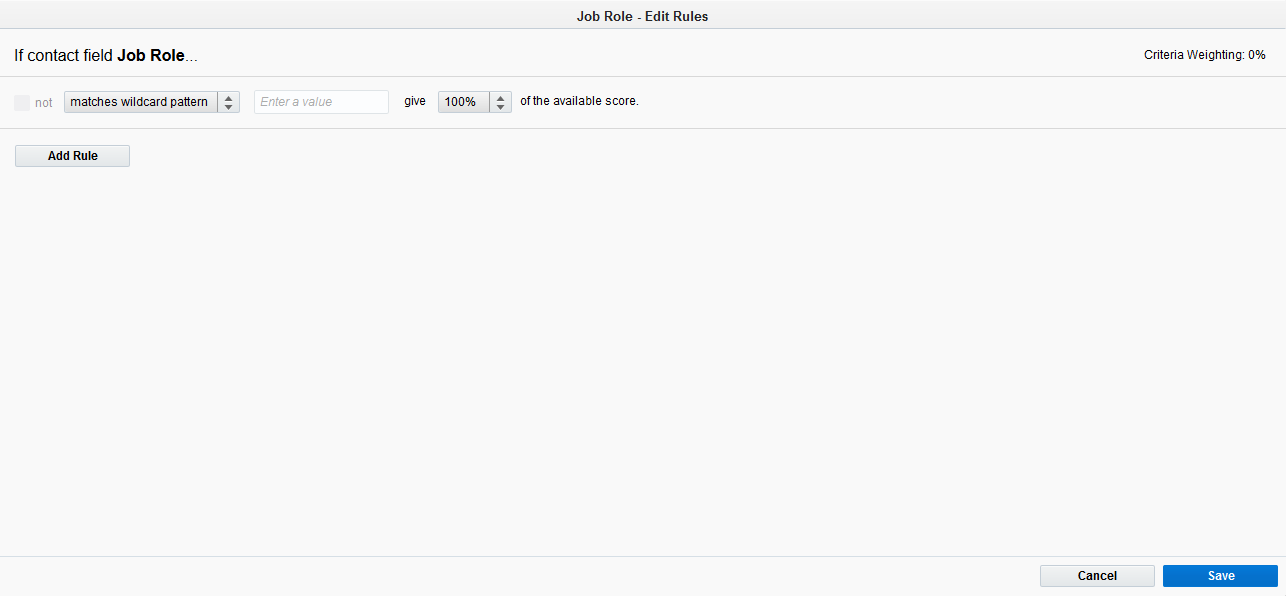
- Configure the rule to match the value you are looking for.
Note: You can use the Matches wildcard pattern option to search using wildcard characters. An asterisks (*) represents any string of characters. A question mark (?) represents a single character. For example, the wildcard pattern C?O returns both CEO and CFO. Limit the number of wildcard searches in your lead scoring model. The more wildcard searches you use, the more time it could take to score your contacts.
- Assign the percentage of available points for the rule using the drop-down list. This indicates how important the profile field is to the overall score.
Note: If a contact meets the criteria of more than one rule, Oracle Eloqua uses the rule that has the highest point value. For example, you want to give 100 % of the points for opening an email in the last 3 days, 50% for an email open in the last 7 days, and 25% for an email open in the last 30 days. If a contact opened an email 5 days ago, the contact receives 50% of the points even though the contact met two of the rules.
- Click Save.
The left pane indicates the number of rules added.
- Click Save to save the model.
Tip: To remove a profile field, mouse-over the field and click Delete  . It is recommended that you use no more than 5 profile fields per model.
Continue to configure the engagement criteria.