Adding feeders
Note: The program builder is an application separate from the Program Canvas. Program Canvas is an easy to use, drag-and-drop whiteboard that allows you to transform data within Oracle Eloqua in real-time.
To add a program feeder:
- In the classic UI, navigate to Orchestration > Tools > Program Builder. In the Redwood experience, navigate to Orchestration > Program Builder.
- Open an existing program, or create a new one.
- Find the step to which you want to add a program feeder.
- Click the drop-down arrow for the step, then click Add members to this step.
- Select a program feeder drop-down in the Automatically Recurring section, select and Edit an existing feeder, or create a new program feeder.
Example: In this procedure, we will create a new feeder as an example, so click New.
- Configure the Program Feeder Details:
If you select the check box, additional options appear:
- The name of the step to which you are adding the feeder is shown as read-only in the add members to program step field.
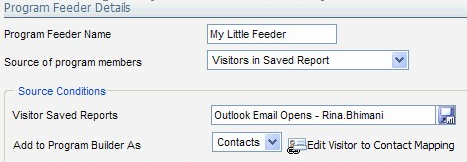
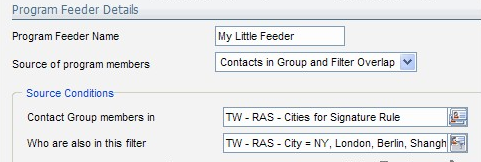
- Program Feeder Name: Fill in the name for the program feeder which will be shown at the top of the step to which it is added.
Source of Program Members: Specify where you want the program members for the feeder to be drawn from.
Note: The items listed below are for contacts. But depending on what is selected on the Program Step Details page, other types of data entities such as prospects, companies, and custom object records could also have some or all of the options shown.
Contacts in Filter: Pull from a contact filter. When you select this option, the next field becomes the Contact Filter field. You can click the button to search for and add an existing Contact Filter or create a new one.
Note: If you select an Activity-Based Filter, this can be run a maximum of once per day due to the load it imposes on the system. An Inactivity-Based Filter can only be run once per week. You will see messages in this regard if you select one of these Filters. In addition, note that feeders using Activity-Based Filters will place a contact into the program if there has been any activity by that contact since the last time the feeder was evaluated.
- Contacts in Group: Pulls from a specified contact group. When you select this option, the next field becomes the contact group field. You can click the button to search for and add an existing Contact Group or create a new one.
- Contacts in Group and Filter Overlap: Pulls members that are both in a selected contact group and a selected contact filter. When you select this option, two fields appear to allow you to select a contact group and a contact filter. You can click the buttons to search for and add an existing contact group and contact filter or create new ones.
- Evaluate: From the picklist, you can select how often you want the source conditions to be evaluated (ranging from once every hour to once every year). You can also select Restrict Evaluation Time to further restrict when the evaluation takes place so that members are only fed into the Program on a schedule that you control.
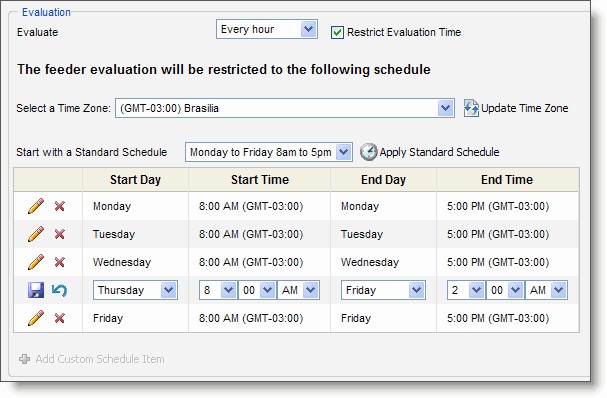
- Select a Time Zone: You can choose the time zone for the schedule to follow. This is particularly useful for setting up programs for a specific time zone so that you don't have to do any calculations to find the equivalent in local time. Important: If you have selected or built a schedule, and you change this setting, always click Update Time Zone to apply it to the schedule.
- Start with a Standard Schedule: Choose a standard business-hours schedule from the picklist and click Apply Standard Schedule to create the schedule or replace the current schedule (click OK in the confirmation dialog box that opens). You can also select a schedule, then edit or delete individual rows using the buttons next to each.
- Add Custom Schedule Item: If you select a Standard Schedule, you can add line items to the schedule by clicking this button.
- Advanced Options: This is used to set the ownership of the members who are entering from this Feeder to support functions to require an action from the owners or to execute an action on behalf of an owner. You can also select and Edit an existing Ownership Rule or Add a new rule.
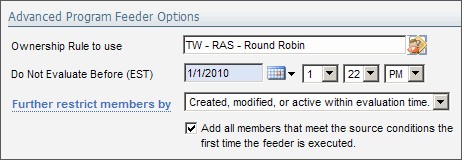
- Ownership Rule to use: Click the button and select a specific Rule that will assign members to one or more owner(s) based on specified criteria.
- Do Not Evaluate Before (EST): Set the date and time at which to make the current Feeder active. This is set to Eastern Time.
- Further restrict members by: You can select an option in this picklist to allow only members that meet the criteria selected (for example, that the members fed into the Program must have been created or modified within the evaluation time created by setting the start point above (Do Not Evaluate Before).
- Add all members: By selecting this, you ignore the further restrictions set in Further restrict members by the first time the Feeder is run. This is to ensure all current members in the Program member source are added on the first pass, but only those meeting the criteria are added thereafter.
- Once you have selected all the settings, click Save and Close to save the program feeder. If you want to enable the feeder immediately, you can click OK in the dialog box that opens to make the feeder active.
You can also run the Feeder once each time you click run it manually. To do this, in the program, click the feeder in the step you added it to, then click one of the program feeders in the View Step Inputs dialog box. At the bottom of the Program Feeder dialog box, click Save, then OK in the confirmation box to enable the feeder. Then click Run Manually to run the Feeder once. The owner of the Program will receive a notification email when the processing is completed.