Geofences and beacons for Android
This topic provides steps for configuring your mobile app to handle location-based triggers using geofences and beacons.
In this topic:
Responsys offers a location-based marketing feature that enables marketers to create marketing campaigns to target mobile app users in near real time based on their geographic location. This offering leverages Geofences and Beacons to send Mobile App Messages (Push / In-app / Message Center), SMS, and Email notifications to end users.
BEFORE YOU BEGIN:
-
Your account must have the Responsys Events Interface (REI) feature enabled, which is a Controlled Availability feature. To request access to this feature, please contact your Customer Success Manager or log in to My Oracle Support and create a service request.
-
Your organization's mobile apps must be built with the 19A Responsys Push SDK (version 6.40.0) or greater.
-
Your organization's mobile apps must be integrated with your chosen solution for Geofences, Beacons, or both. Bluedot is our go-to-market partner for this solution, but Responsys provides an open framework for Location Based Marketing (Geofences and Beacons), so you can integrate with any location provider.
Solution Description
This solution works by declaring location-related rules for apps built with the Responsys Push SDK and a Geofence and Beacon Location Provider's SDK. Here's an overview of the Design Time phase and the Execution Time phase.
Design Phase
Implementing this feature requires the following steps performed by app developers and marketers:
- Decide and configure the Geofence and Beacon locations with your Marketing and App Team.
- (Optional) Define up to 5 custom key-value pairs. This enables marketers to send additional custom data into Programs and Campaigns. For example, marketers may want to store specific coupon codes based on the location of the Geofence. The Responsys Account Administrator must also define these custom event fields within Responsys. We will explain optional data use cases later in this topic.
- App developers add the location provider's SDK to their mobile app and complete the required configuration.
- App developers update their mobile app to the latest SDK (at a minimum must be 19A/6.40).
- App developers develop the app layer/integration code to receive the Geofence Event and trigger the Responsys SDK’s Geofence Events APIs.
- Marketers design campaigns and program orchestration. Programs begin with a starting event of a Geofence or Beacon entry or exit.
Execution Phase
The execution phase follows this sequence of events:
- A marketer defines the locations to setup Geofences and Beacons.
- When an app user enters or exits the proximity of a Geofence or Beacon, an event is triggered.
- On the user's mobile device the Location Provider's SDK will raise an event. The mobile app raises the corresponding Responsys Geofence/Beacon event API.
- The Responsys SDK will then send the event to Responsys.
- Responsys will process the event.
- The event enters Responsys Program Orchestration.
- Marketers then send an email or SMS notification to the user as part of their campaign.
Here's a diagram illustrating the execution phase.

Now that you have an overview of the design and execution phases, the implementation steps are explained in detail to learn how to implement a Geofence/Beacon solution similar to this.
Implementation
Step 1 - Decide and Configure Geofences and Beacons
Marketers must plan the geographic locations best suited for Geofences and Beacons. Using retail as an example, a store location might be a good location for a Geofence. Marketers will log into their Location Provider's application to setup their Geofences and Beacons.
Here's an example configuring Geofences and Beacons using Bluedot. We are setting up a Geofence for one of our retail stores named Durham Denim, located in Redwood City. We are also adding custom fields such as CITY, COUPON_CODE, DISCOUNT, and STORE_NAME, which will enable us to send more data into Responsys, thereby giving us the ability to customize the message we send to our end users. This will be explained in greater detail in Step 2.
")
See your Location Provider's documentation for instructions on how to setup and configure your Geofences and Beacons.
Step 2 (Optional Step) - Defining custom key-value pairs
Custom key-value pairs enable marketers to send additional data from the Geofences and Beacons into Responsys Programs and Campaigns. This extends the capabilities of the out-of-the-box solution and tailors it to your needs.
As shown in the screenshot in Step 1, we have added the custom variables CITY, STORE_NAME, COUPON_CODE, and DISCOUNT.
Some reasons you might want to define custom key-value pairs include:
- Add more context on the Geofence or Beacon to make the event more actionable.
- Define routing logic in Programs
- Personalization in Campaigns
To setup custom key-value pairs:
- Define key-value pairs in the setup of your Geofences and Beacons with your location provider. Using Bluedot as an example, Value pairs are
STRINGdata types, with a maximum length of 256 characters for both the Key and Value. - In Responsys, the Responsys Account Administrator must define custom event fields in the Manage events UI under Tools > Manage events. These will represent the custom key-value pairs. All data types are supported.
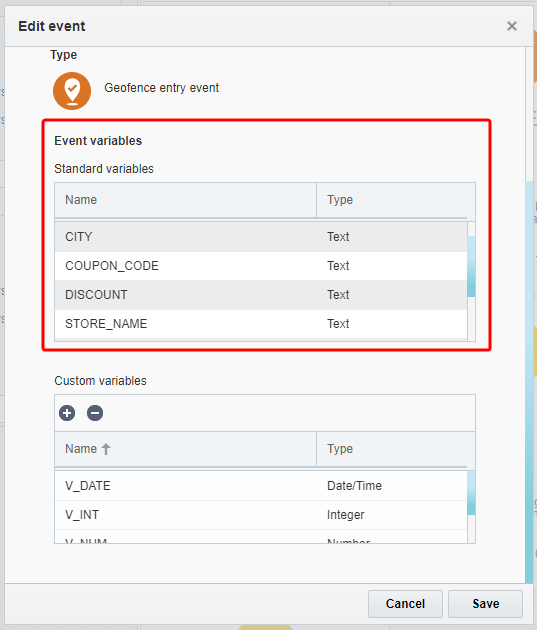
Here we've added the following custom variables: CITY, COUPON_CODE, DISCOUNT, and STORE_NAME. These data types are Text, but all data types are supported. See Steps 6 to 6.3 to learn how to use these variables in Program and Campaigns.
Step 3 - Add the Location Provider SDK to Mobile apps
App developers must add their Location Provider's SDK to their mobile apps. See your Location Provider's SDK documentation for instructions.
Step 4 - Update Apps to the Latest SDK Version
App developers must update mobile apps to the latest Responsys Push SDK. At a minimum, the SDK must be at least version 19A/6.40, but we always recommend using the latest SDK version. Refer to our SDK Support Policy to learn more about SDK support. You can download the latest SDK from the SDK download page.
Step 5 - Develop the App Layer Code
App developers must ensure when a Geofence or Beacon event occurs:
- App receives the Geofence Event raised by the Geofences Events SDK
- App raises a Geofence Event to Responsys by calling the Responsys SDK's Geofence Events API
- App passes all relevant parameters for the Geofence Event while calling the Responsys SDK's Geofence Events API. This includes any custom key-value pairs that the app wants to use in Responsys.
- Any custom key-value pairs are sent to Responsys.
There are currently 4 APIs:
- Triggering a Geofence Entry event
- Triggering a Geofence Exit event
- Triggering a Beacon Entry event
- Triggering a Beacon Exit event
App developers can learn how to call these APIs by referring to the platform-specific topics:
Step 6 - Create Campaign and Program Orchestration
Marketers can then create Programs with Geofence or Beacon events as the starting node.
Example: To demonstrate how marketers can use this feature, we will walkthrough creating an example campaign with a personalized push message with the custom key-value pairs we created in Step 2. The campaign will send a push message to users with a coupon code that is personalized to the Geofence. Next, we will create a Program using a Geofence entry event as the starting node to then send a push notification (containing the campaign and coupon code we created earlier).
In Programs there are 4 events available to marketers:
- GEOFENCE_ENTRY: A user enters a Geofence.
- GEOFENCE_EXIT: A user exits a Geofence.
- BEACON_ENTRY: A user enters the proximity of a Beacon.
- BEACON_EXIT: A user exits the proxmity of a Beacon.
Step 6.1 Creating a Campaign
For this example we will create a Push Campaign. For information on how to create and design a campaign, see the Oracle Responsys Help Center.
Step 6.2 Personalizing the Push Message
- From the campaign workbook, click Data Sources.
- Enter the event variables you want to use in the Alias column. There are two types of variables: standard variables (listed in the Responsys Help Center) and custom variables (explained in step 2 above).
In this example we want to personalize the Campaign with the event variables:
- The standard variable RSYS_GEN_FENCE_NAME.
- The custom variable CITY.
- The custom variable COUPON_CODE.
- The custom variable DISCOUNT.
- The custom variable STORE_NAME.

- Click Save.
- Click Create Message or Edit message.
- When designing your message, click Insert Personalization Token.
- Expand DynamicVariable and select the event variable you want to include. Continuing our example we'll start by selecting the COUPON_CODE variable.

- Click OK. Repeat these steps to personalize your push message.
Here's an example of our finished personalized push message.

The example below demonstrates how you can personalize the title, using the DISCOUNT and CITY variables.

Step 6.3 Creating a Program
In this program, we will only send the user a push message if they enter the Geofence for the Redwood City Durham Denim store. If this criteria is met, the user enters our program and will be sent our personalized push message (containing our coupon code). For our program, we will use a Geofence Entry event as the starting node, a Data Switch, and a Send Push Campaign event. For more information on how to create and design a program, see the Oracle Responsys Help Center.

Clicking Settings > Tracking and variables > Event Variables will display all Event Variables you can use in your program. This includes Standard Event Variables as well as the Custom Event Variables we defined in step 2.

Next, we'll configure our Data switch so that if Program variable conditions are matched, the program sends contacts to Option 1.

The Filter Designer will open, and we'll configure our Data switch so that if the RSYS_GEN_FENCE_NAME matches Redwood City, contacts will flow into Option 1, which will send users a push notification (the same campaign we created earlier with our store coupon code).

This is a basic example you can use as a starting point to understand how you can use Geofence and Beacon event variables in your programs.
About location-based marketing using geofences and beacons
Responsys now supports geofence and beacon events. The Responsys Push SDK has added a set of open APIs that enable app developers to raise entry and exit events for geofences and beacons. You can integrate with a geofence/beacon solution of your choice, or integrate with a native geofence/beacon solution.
Once implemented, marketers will be able to use geofence and beacon events in their program orchestrations in Responsys. These location-based events will be triggered when a mobile device user enters or exits a geofence or beacon zone.
To enable this feature:
-
Your account must have the Responsys Events Interface feature enabled, which is a Controlled Availability feature. To request access to this feature, please contact your Customer Success Manager or log in to My Oracle Support and create a service request.
-
Your organization's mobile apps must be built with the 19A Responsys Push SDK (version 6.40.0) or greater, when it becomes available.
-
Your organization's mobile apps must also be integrated with your chosen solution for geofencing, or beacons, or both. Depending on your solution, integration may also involve setup by a Responsys user with access to the Responsys Events Interface.
Responsys-side configuration and use
See the following topics in the Responsys Help Center for more information:
Steps to integrate the location-based triggers for geofences and beacons
Record a Geofence Entry event
App developers can use the SDK API onGeoRegionEntered to record any Geofence Entry event as and when it occurs in the application context.
The API takes in two arguments, a PIOGeoRegion object and a completion listener PIORegionCompletionListener. In the PIOGeoRegion, the parameters
geofenceId and geofenceName are the mandatory fields. Also any Strings in the object should have a length less than 256 characters.
The completion listener, PIORegionCompletionListener, helps in identifying if a error occurred while sending the events to the server.
The error can be found from the PIORegionException in the onRegionReported().
PushIOManager.getInstance(getContext()).onGeoRegionEntered
                (geoRegion, new PIORegionCompletionListener() {
                    @Override
                    public void onRegionReported(String s, PIORegionEventType pioRegionEventType, PIORegionException e) {

                    }
                });
Geofence Entry Event Object Attributes - (PIOGeoRegion)
Record a Geofence Exit event
Similarly, to record any Geofence Exit events at the server, the app developers can use the onGeoRegionExited() API.
PushIOManager.getInstance(getContext()).onGeoRegionExited
                (geoRegion, new PIORegionCompletionListener() {
                    @Override
                    public void onRegionReported(String s, PIORegionEventType pioRegionEventType, PIORegionException e) {

                    }
                });
Geofence Exit Event Object Attributes - (PIOGeoRegion)
| Property | Data Type | Max Length | Description | Example | Required/Optional |
|---|---|---|---|---|---|
source
|
String | 256 characters | The source of the event. App developers can choose to use this attribute to include details like the name of the Geofence and Beacon SDK/solution that they have integrated with, or the name of the Beacon hardware. | Android | Optional |
zoneId
|
String | 256 characters | ID of the region / zone. A region or zone represents a logical boundary for a Region that a Marketer wants to monitor. Often in location based services products, Geofences and Beacons are included within Regions or Zones. | 123 | Optional |
zoneName
|
String | 256 characters | Name of the Region / Zone. A region or zone represents a logical boundary for a Region that a Marketer wants to monitor. Often in location based services products, Geofences and Beacons are included within Regions or Zones. | Jpnagar | Optional |
geofenceId
|
String | 256 characters | ID for the Geofence | 123 | Required |
geofenceName
|
String | 256 characters | Name of the Geofence | FENCE_1 | Required |
dwellTime
|
Integer | NA | Time spent inside the Geofence (in minutes / seconds). The units of the Dwell Time depend on the solution being used by the app. | 240 | Optional |
extra
|
Map\<String, String> | 256 characters | Custom parameters to pass with Geofence information. Maximum 5 parameters are allowed. | area : Jones Street, category : apparel | Optional |
Record a Beacon Entry event
The SDK also has support for beacon related entry or exit events. For recording Beacon Entry event, app developers need to use
onBeaconRegionEntered() API. The API takes in two parameters, a PIOBeaconRegion object and a completion listener object similar to the one used in [1.] and [2.]
In the PIOBeaconRegion, the beaconId and beaconName are the mandatory fields, and any String values should be of length less than 256 characters.
PushIOManager.getInstance(getContext()).onBeaconRegionEntered
                (beaconRegion, new PIORegionCompletionListener() {
                    @Override
                    public void onRegionReported(String s, PIORegionEventType pioRegionEventType, PIORegionException e) {

                    }
                });
Beacon Entry Event Object Attributes - (PIOBeaconRegion)
| Property | Data Type | Max Length | Description | Example | Required/Optional |
|---|---|---|---|---|---|
source
|
String | 256 characters | The source of the event. App developers can choose to use this attribute to include details like the name of the Geofence and Beacon SDK/solution that they have integrated with, or the name of the Beacon hardware. | Android | Optional |
zoneId
|
String | 256 characters | ID of the region / zone. A region or zone represents a logical boundary for a Region that a Marketer wants to monitor. Often in location based services products, Geofences and Beacons are included within Regions or Zones. | 123 | Optional |
zoneName
|
String | 256 characters | Name of the Region / Zone. A region or zone represents a logical boundary for a Region that a Marketer wants to monitor. Often in location based services products, Geofences and Beacons are included within Regions or Zones. | NY Wall Street | Optional |
beaconId
|
String | 256 characters | ID for the Beacon | 123 | Required |
beaconName
|
String | 256 characters | Name of the Beacon | beacon-1 | Required |
beaconTag
|
String | 256 characters | Any tag to further categorize this Beacon. | KR_Entry | Optional |
iBeaconUUID
|
String | 256 characters | Proximity UUID of iBeacon. If beacon is not iBeacon use this for any other id purpose if required like eddystoneurl. | ffffffff-1234-aaaa-1a2b-a1b2c3d4e5f6 | Optional |
iBeaconMajor
|
String | NA | Major value of iBeacon | 1 | Optional |
iBeaconMinor
|
String | NA | Minor value of iBeacon. | 2 | Optional |
eddyStoneId1
|
String | 256 characters | UUID of EddyStone Beacon. You can use this field for any other purpose in case beacon is not eddystone. | ffffffff-1234-aaaa-1a2b-a1b2c3d4e5f6 | Optional |
eddyStoneId2
|
String | 256 characters | Instance ID of EddyStone Beacon. You can use this field for any other purpose in case beacon is not eddystone. | 456 | Optional |
proximity
|
String | 256 characters | User's / Device's proximity from the Beacon. Possible values are: Immediate, Near, Far, Unknown | Near | Optional |
extra
|
Map\<String, String> | 256 characters | Custom parameters to pass with Beacon information. Maximum 5 parameters are allowed. | area : Jones Street, category : apparel | Optional |
Record a Beacon Exit event
Similarly, a Beacon Exit event can be recorded using the onBeaconRegionExited() API.
PushIOManager.getInstance(getContext()).onBeaconRegionExited
                (beaconRegion, new PIORegionCompletionListener() {
                    @Override
                    public void onRegionReported(String s, PIORegionEventType pioRegionEventType, PIORegionException e) {

                    }
                });
Beacon Exit Event Object Attributes - (PIOBeaconRegion)
| Property | Data Type | Max Length | Description | Example | Required/Optional |
|---|---|---|---|---|---|
source
|
String | 256 characters | The source of the event. App developers can choose to use this attribute to include details like the name of the Geofence and Beacon SDK/solution that they have integrated with, or the name of the Beacon hardware. | Android | Optional |
zoneId
|
String | 256 characters | ID of the region / zone. A region or zone represents a logical boundary for a Region that a Marketer wants to monitor. Often in location based services products, Geofences and Beacons are included within Regions or Zones. | 123 | Optional |
zoneName
|
String | 256 characters | Name of the Region / Zone. A region or zone represents a logical boundary for a Region that a Marketer wants to monitor. Often in location based services products, Geofences and Beacons are included within Regions or Zones. | NY Wall Street | Optional |
beaconId
|
String | 256 characters | ID for the Beacon | 123 | Required |
beaconName
|
String | 256 characters | Name of the Beacon | FENCE_1 | Required |
beaconTag
|
String | 256 characters | Any tag to further categorize this Beacon. | KR_Entry | Optional |
iBeaconUUID
|
String | 256 characters | Proximity UUID of iBeacon. If beacon is not iBeacon use this for any other id purpose if required like eddystoneurl. | ffffffff-1234-aaaa-1a2b-a1b2c3d4e5f6 | Optional |
iBeaconMajor
|
String | NA | Major value of iBeacon | 1 | Optional |
iBeaconMinor
|
String | NA | Minor value of iBeacon. | 2 | Optional |
eddyStoneId1
|
String | 256 characters | UUID of EddyStone Beacon. You can use this field for any other purpose in case beacon is not eddystone. | ffffffff-1234-aaaa-1a2b-a1b2c3d4e5f6 | Optional |
eddyStoneId2
|
String | 256 characters | Instance ID of EddyStone Beacon. You can use this field for any other purpose in case beacon is not eddystone. | 456 | Optional |
proximity
|
String | 256 characters | User's / Device's proximity from the Beacon. Possible values are: Immediate, Near, Far, Unknown | Near | Optional |
extra
|
Map\<String, String> | 256 characters | Custom parameters to pass with Beacon information. Maximum 5 parameters are allowed. | area : Jones Street, category : apparel | Optional |
Adding Optional Data
Developers can specify up to 5 additional key-value pairs in the extra property of the PIOGeoRegion and PIOBeaconRegion objects. This enables apps to implement a custom geofence and beacon solution for their mobile app. More than 5 custom attributes will result in an error.
NOTES:
-
Any String fields for the geofence and beacon APIs should have a string length less than 256 characters.
-
For
PIOGeoRegion, mandatory fields aregeofenceIdandgeofenceName. Whereas for thePIOBeaconRegion, mandatory fields arebeaconIdandbeaconName.