Email Campaign Designer changes
Important: This topic applies to the Email Campaign Designer, which is now generally available. It has replaced the former Email Campaign Workbook. For the other channels, see Campaign Designer overview.
The Campaign Workbook now has an improved interface and is now called the Campaign Designer. This topic describes those changes. It also provides a place for users to compare the new and old interface. To learn more about the Campaign Designer's visuals, see Email Campaign Designer visuals overview. To learn more about the steps to using the Campaign Designer, see Launching an Email campaign with the Campaign Designer.
In this topic, you'll learn about:
- Message Designer vs. Campaign Workbook vs. and Campaign Designer
- Summary of significant changes
- Location changes for actions and information
To navigate to the Campaign Designer :
- On the side navigation bar, click
 Campaigns and select Manage Campaigns.
The Manage campaigns page opens.
- Click Create Campaign, or open an existing campaign.
Message Designer vs. Campaign Workbook vs. and Campaign Designer
Previously, users would have to define their campaign details in the Campaign Workbook, and create a message in the Message Designer. The Campaign Workbook is now called the Campaign Designer, and it was updated with a new interface. Unlike the Campaign Designer, there were no major changes made to the Message Designer's interface.
Message Designer
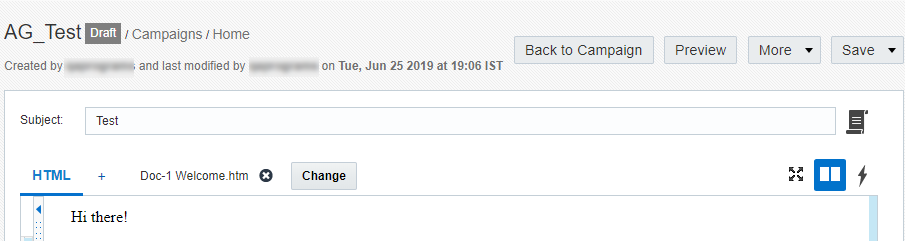
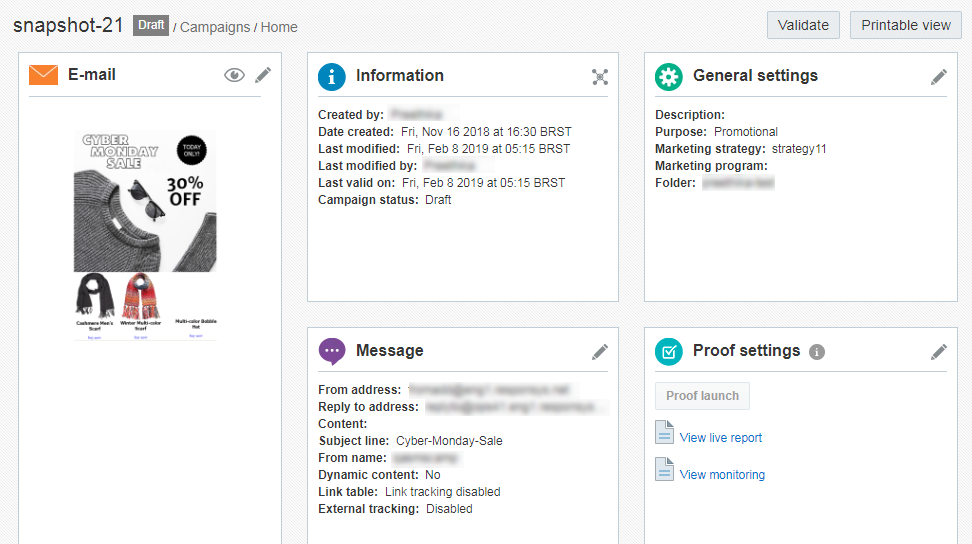
Campaign Workbook (old interface)
Campaign Designer (new interface)
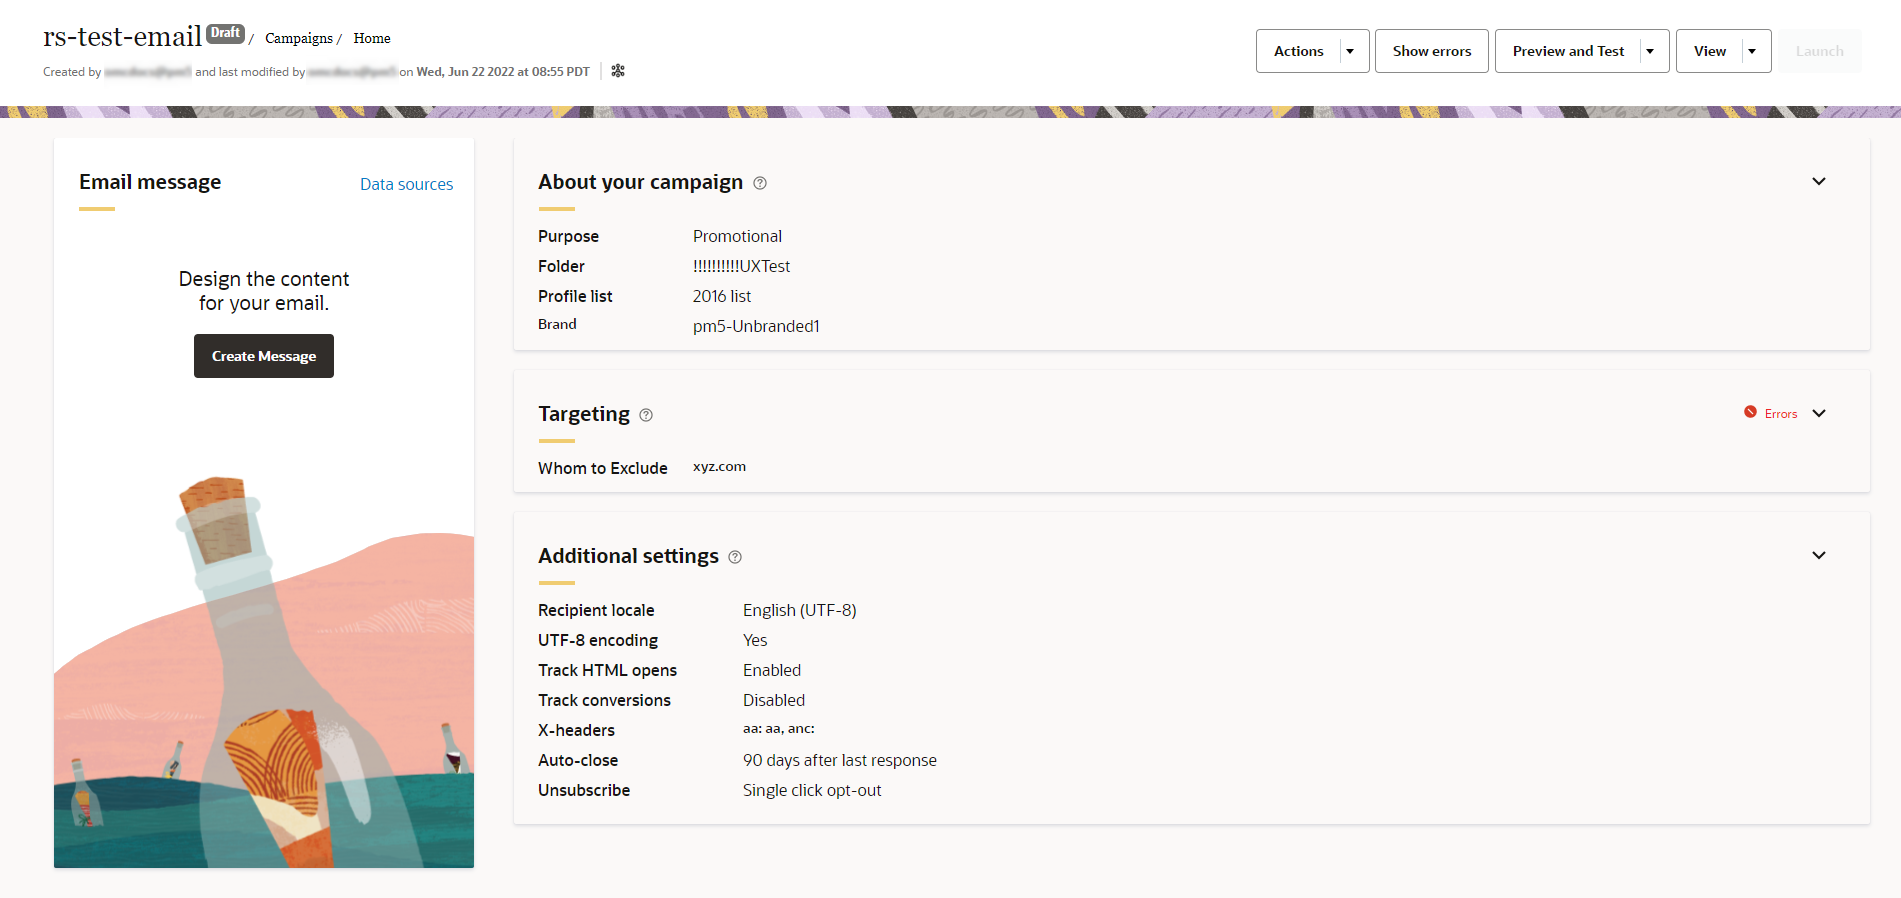
Differences from the old Campaign Workbook
Summary of significant changes
- With the Campaign Designer, hover your mouse over the Email message panel to see your message's key attributes (you will have to save the message first). The Campaign Workbook's Message panel has been replaced with this hover functionality. Hovering over the Email message panel will also allow you to edit or preview your message, or access the Data sources dialog.
- In the new Campaign Designer, actions are displayed at the top of the page, such as Preview, Launch, and so on.
- There are only two changes to the Message Designer:
- The page's header no longer says Email Message Designer and instead now has the campaign's name and information related to the campaign, such as the last modified date.
- The Workbook button has been changed to the Back to Campaign button.
- The Campaign Workbook is now called the Campaign Designer.
- Click
 to expand a panel.
 - The profile list can now also be changed from About your campaign.
- Options that were previously in the Information panel for the Campaign Workbook are now mostly at top of page, beside the campaign's name.

- Date created is no longer displayed. You can, however, find this information on the Manage Campaigns page.
- The Campaign Designer has fewer panels than the Campaign Workbook for ease of use.
- When editing information in a panel, users need to click Save at the top of that panel to save, and Cancel at the top of that panel to discard any changes.
- To change a campaign's name, users must click on the campaign's name at the top of the page.
Important: If you change a campaign’s name, folder, marketing program, marketing strategy, subject line, or external campaign ID, then historical and new launches for both triggered and standard launches will take these new values in Insight. It does not impact CED behavior as CED retains an unchanged ‘snapshot’ of values.
- Users can configure organizational access control in the Additional settings panel.
- Once the message has been saved, users can view information that was previously located in the workbook's Message panel by hovering over the Email message overlay.
- Users cannot create a Program from the Campaign Designer.
- The new email Campaign Designer simplifies the search process for objects in Oracle Responsys using the Object Search Picker. With the Object Search Picker, Oracle Responsys will make suggestions based on relevance as you begin to type.
Important: The Object Search Picker is only available if it is enabled for your account. Additionally, it is currently only available for the email channel under targeting for three options:
Whom to include> Everyone in any of the selected filters
Whom to include > Everyone associated with supplemental table or view
Whom to exclude > Everyone associated with supplemental tables or views

Location changes for actions and information
To see where the Campaign Designer panels are located, see Email Campaign Designer visuals overview
| Old campaign workbook panel | Old campaign workbook option or label | New campaign designer panel | New campaign designer button |
|---|---|---|---|
|
Preview |
N/A |
Preview and Test > Preview Mode Tip: You can also access preview mode via the Email message panel |
|
| Edit, or Create message (redirects to Message Designer) | Email message | Create message, or Edit message if you have previously saved your message | |
| Information | Created by | Top of page | N/A |
| Date created | N/A | N/A | |
| Last modified | Top of page | N/A | |
| Last modified by | Top of page | N/A | |
| Last valid on | N/A | N/A | |
| Campaign status | Top of page | N/A | |
| Approval status | Top of page | N/A | |
| View relationships | N/A | View > Campaign relationships | |
| General settings | Name | Top of page | N/A |
| Description | About your campaign | N/A | |
| Purpose | About your campaign | N/A | |
| Marketing Strategy | About your campaign | N/A | |
| Marketing Program | About your campaign | N/A | |
| Folder | About your campaign | N/A | |
| Brand | About your campaign | N/A | |
| Message | From address | Email message (once the message has been saved) | N/A |
| Reply to address | Email message (once the message has been saved) | N/A | |
| Email message (once the message has been saved) | N/A | ||
| Subject line | Email message (once the message has been saved) | N/A | |
| From name | Email message (once the message has been saved) | N/A | |
| Dynamic content | Email message (once the message has been saved) | N/A | |
| Link table | Email message (once the message has been saved) | N/A | |
| External tracking | Email message (once the message has been saved) | N/A | |
| Edit (redirects to Message Designer) | Email message | Create message, or Edit message if you have previously saved your message | |
| Proof settings | Proof launch | N/A | Preview and Test > Proof launch |
| View live report | N/A | View > Live report | |
| View monitoring | N/A | View > Monitor campaign | |
| Data sources | Edit | Email message | Data sources |
| Campaign settings | Edit | Additional settings | N/A |
| Testing and analysis | Test links | N/A | Preview and Test> Test Links |
| Analyze | N/A | Preview and Test > Deliverability | |
| Launch settings | Schedule launch | N/A | Launch |
| Edit | Additional settings | N/A | |
| View live report | N/A | View > Live report | |
| View monitoring | N/A | View > Monitor campaign | |
| Targeting | Edit | Targeting | N/A |
| Program | Create Program | N/A | N/A |
| N/A | Show Errors | N/A | Show errors |
| Printable view | N/A | View > Campaign summary | |
| Validate | N/A | Validate | |
| Request approval (if it's enabled for your account) | N/A | Actions > Request approval | |
| Insight | N/A | View > Insights | |
| Insight > Overlay report | N/A | View > Overlay report |