Email Campaign Designer visuals overview
Note: The Email Campaign Workbook now has an updated interface and is now called the Email Campaign Designer. Campaign Designer is now enabled for all accounts, and it replaces Campaign Workbook for this channel. Unlike the Campaign Designer, there were no major changes made to the Message Designer's interface.
Use the Campaign Designer to review details of the selected campaign, see any errors that need correction, and more. Click  to expand the panel. Learn more about Launching an Email campaign with the Campaign Designer. To monitor all campaign launches or take action on a campaign launch, use the Campaign Monitor. See all the different sections in the Campaign Designer and a summary of each section.
To open the campaign designer:
- On the side navigation bar, click
 Campaigns and select Manage Campaigns.
 - Open the campaign you want to work with.
Tip: To open the campaign designer in a new tab, use the keyboard shortcut Ctrl + click the campaign link.
Campaign Designer sections
Campaign Designer prior to launch
Campaign Designer after a launch has been scheduled
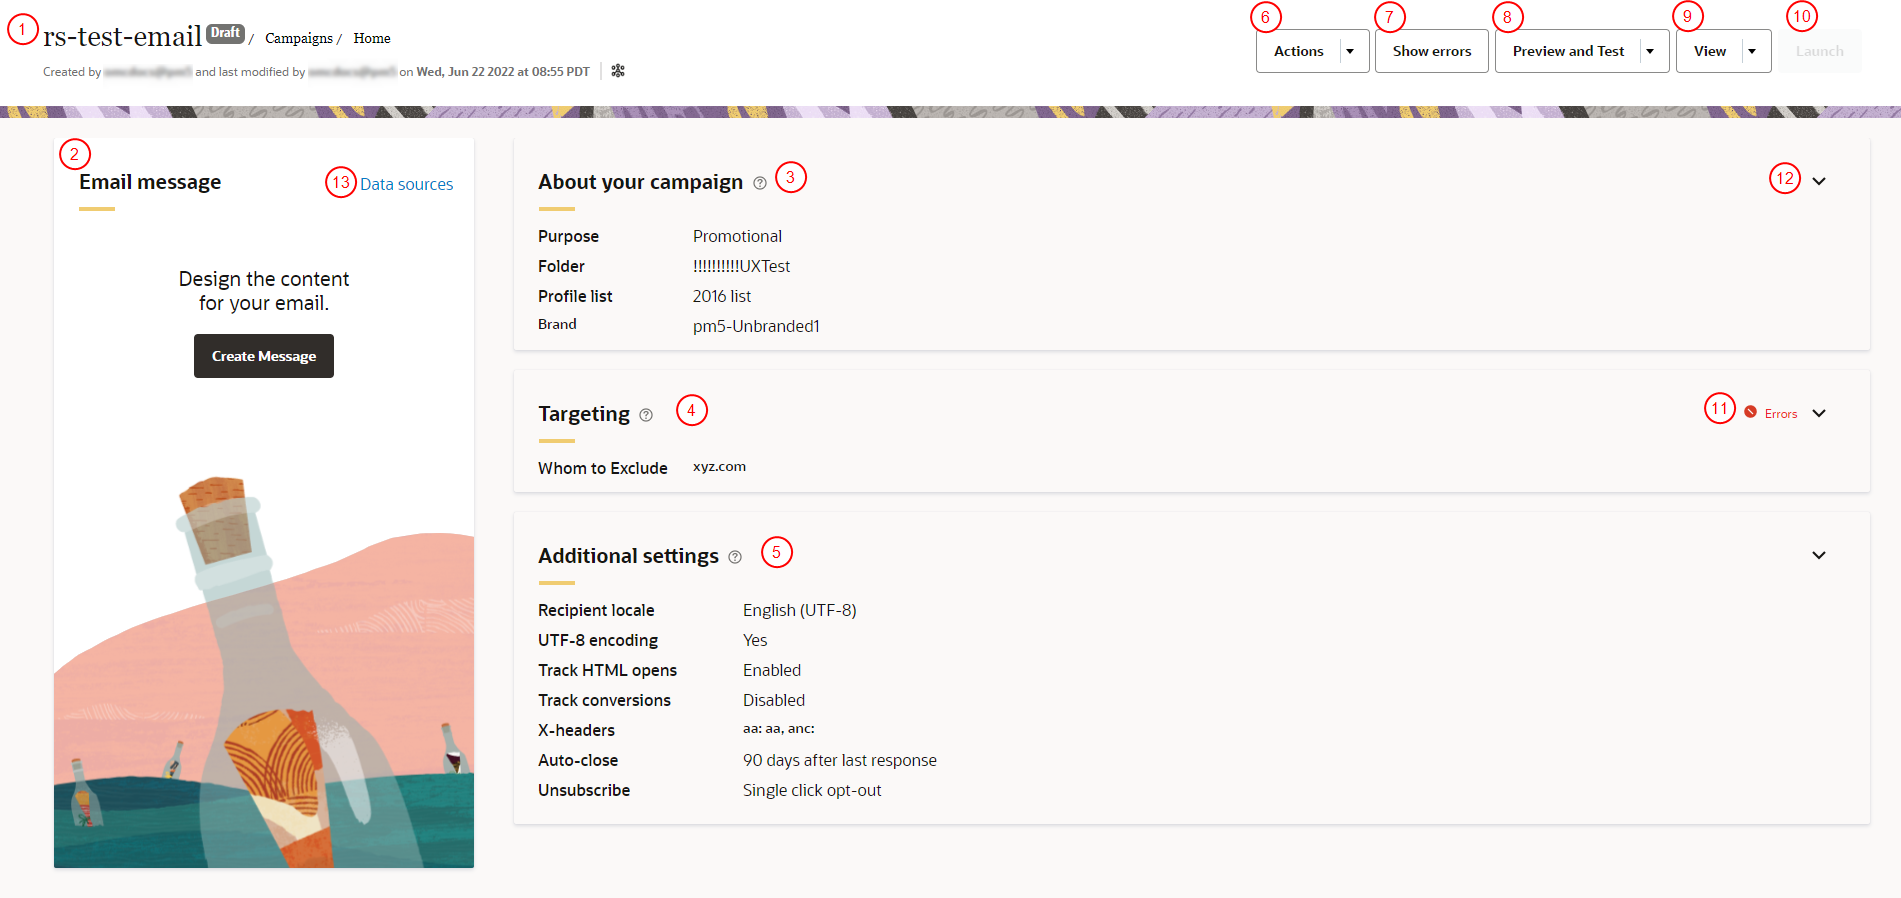
Overview of Campaign Designer sections
 View information related to your campaign's status (Draft, Active, Closed) and creation. Here you'll see who created the campaign, and when it was last modified and who modified it. If the Campaign Approval feature is enabled for your account, you will also see any approval requests' status here. Click on the campaign's name to change it.
 Email message panel. From this panel, you can edit your campaign's Data sources, Create Message, Edit Message (if the message has been saved), and view a summary of your message's configurations (if the message has been saved). If you have saved the message, you'll see a snapshot in the Email message panel.
 About your campaign panel. View your campaign's Description, Purpose, Marketing strategy, Marketing program, Folder, Profile list, and (if it's enabled for your account) Brand.
Note: If you change a campaign’s marketing strategy or marketing program for a standard launch, Insight will display the new marketing strategy and marketing program values for both historical and new standard launches. This does not impact the CED behavior.
 Targeting panel. Use this panel to ensure your campaign is targeting the right contacts.
 Additional settings panel. Use this panel to configure settings related to the email's footer, attachments, custom x-headers, auto-close, unsubscribes, notifications, throttling, and (if it's enabled for your account) organizational access control.
 Actions button. With this drop-down, you can request approval for the campaign if Campaign Approval is enabled for your account.
 Show errors button. Click this button to view and correct validation errors in your campaign. Once all the errors are corrected, Show errors will be replaced with Validate.
 Preview and Test button. With this drop-down, you can select from four options: Preview Mode, Test Links, Deliverability, and Proof Launch.
 View button. With this drop-down, you can analyze your campaign.
 Launch button. Click this button to configure your campaign's launch and to launch it. This button will only be available once all validation errors have been resolved.
 Errors. Hover over this text to see a description of the error.
 Click Expand
  to expand a panel. Once a panel is expanded, click Cancel to discard any changes in the panel, and click Save to save your changes.
 Data sources. Click this button to configure your campaign's data sources.
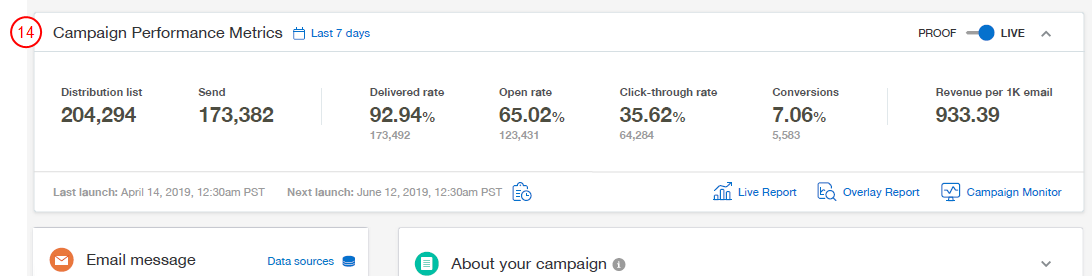
 Campaign performance metrics. With the Campaign performance metrics panel, you can evaluate how your campaign is performing without needing to navigate away from the Campaign Designer. This panel at the top of the Campaign Designer only displays after a live launch or proof launch has begun or been scheduled, and metrics only display after a live or proof launch has begun.
Note: The Campaign performance metrics panel is only available for the email channel.