Selected Task Details Screen
The Selected Task Details screen lets you see more details about a task selected in the Task List screen.
You can have more than one task set to In Progress. In this document when you see a reference to 'selected task', this refers to the task you selected last to view in the Task list on the Task List screen.
From this screen, you can:
-
Start a task.
-
Complete a task.
-
View a map showing your current location and the location of the task.
-
See basic travel distance and time to get to the task.
-
Launch your mobile device's default GPS mapping app to see the route from your current location to the location of the task with more advanced information such as live traffic information.
-
Go to any of the available tab screens to record or view other data for the selected task.
Selected Task Details Screen in Detail
The Selected Task Details screen is where you can view more detailed information about the selected task. Here you can start a task, complete a task, view a built-in map or launch an external GPS mapping app, go to all available tab screens to record or view other data for the selected task.
|
Section |
Task |
Effect |
Availability |
Errors/ |
Highlighted in Screenshot |
|---|---|---|---|---|---|
|
Back buton |
Lets you go to the Task List screen. |
Displays the Task List screen. |
Always |
None |
1 |
|
Toggle Map View Display button |
Low to medium resolution mobile device:
High resolution mobile device:
|
On a low or medium resolution mobile device, tapping this button will slide all screen items below the Control Bar downwards to reveal the Map panel. Clicking the Toggle Map View Display button again will slide the screen items back up, hiding the Map panel. On a high-resolution mobile device tapping this button will slide all screen items below the Control Bar and to the left of the Map panel so that the Map panel may take up more of the screen left-to-right. Clicking the Toggle Map View Display button again will slide the screen items back to the right, shrinking the Map panel. |
Always |
None |
2 |
|
GPS App Launch button |
Lets you use your device's default GPS mapping app for advanced mapping capabilities, including live traffic information. |
Launches your mobile device's default GPS mapping app to show the route from your current location and the location for the selected task. |
On a low or medium resolution mobile device this button is only displayed when the Current Task Map panel is also displayed. On a high-resolution mobile device this button is always displayed. |
None |
3 |
|
Task Detail panel |
Lets you see detailed information about the current task. This panel has several text display fields, which are explained in Selected Task Detail Panel Explained below. Also, on low or medium resolution mobile devices, this functions as a button to let you show or hide the Map panel. On a high-resolution mobile device, this panel does not function as a button. |
On a low or medium resolution mobile device, tapping this button will slide all screen items below the Control Bar downwards to reveal the Map panel. Clicking the Toggle Map View Display button again will slide the screen items back up, hiding the Map panel. |
Always |
None |
4 |
|
Start button |
Lets you mark the current task as started if you haven't started it yet. |
Sets the Status of the current task as In Progress and changes the button to an inactive state (as shown by the change of display style. |
Always displayed but may be displayed differently depending on the status of the current task as shown in the Start Button Availability Styles and Statuses below. |
None |
5 |
|
Complete button |
Lets you mark the current task as completed. |
Sets the Status of the current task as Completed and changes the display style of the Complete button to Completed. |
Always displayed but may be displayed differently depending on the status of the current task and the recording to data in any tabs marked in the configuration as Mandatory as shown in the Complete Button Availability Styles and Statuses below.
Note:
If there are no tabs marked as required then, when the Status of the current task is set to In Progress, the Complete button will be set to Started And Able To Complete. |
None |
6 |
|
Tab list |
Shows you all tabs that have been made active in the configuration.
Note:
In addition to the tabs displayed for the asset that the selected task is for, Field Service Mobile can show child assets of that asset. Each of these child assets will have one or more of its own tabs. See Child Asset Tabs Explained below for more detail. |
None |
The task list is hidden until all of the data for the selected task has been downloaded from the cloud. |
None |
7 |
|
Tab List entry |
To show you the name, current status and required status of a particular tab. This also functions as a button that displays the Tab screen for that particular tab when you tap it. There are several display styles for Current Task Tab List entry. These are detailed below in Selected Task Tab List Display Styles Explained. |
Displays the appropriate screen for the particular tab. Opened screen may depend on whether you have been into that tab previously for this task and saved data. For example, if you tap the Quote Tab List entry and has not saved any quote data previously for the current task then the Add/ Conversely if you have previously saved quote data for the current task and tapped on the Quote Tab List entry then the Quote List screen will be displayed. |
One or more tabs are set to active in the configuration. |
None |
8 |
|
Map panel |
Lets you see your current location and the task location on a map. Tapping on the Task Location button will display the Task List screen in Map View so that you may see more details about their assigned tasks. |
If you tap one of the Task Location buttons, then the Selected Task Details screen will be displayed in Map View. See Selected Task Detail Screen Map Panel Explained below for more detail. Displays the alert below if you attempt to pan the map with only one finger. |
For low and medium resolution mobile devices the map is only visible when you tap the Toggle Map View Display button or on the Task Detail panel. |
'Use two fingers to move the map'. |
9 |
Start Button Availability Styles and Statuses
|
Display Style |
Status |
Effect |
|---|---|---|
|
Not started |
Not started |
If you tap this button, it changes the Status of the current task to In Progress. Also, the Start text on the button is replaced with the time at which the Status of the current tab was set to In Progress. |
|
In Progress |
In Progress |
When the status of the current task is In Progress then this button becomes inactive when it's displayed. |
|
Completed |
Completed |
When the status of the current task is Completed then this button becomes inactive when displayed. |
Complete Button Availability Styles and Statuses
|
Display Style |
Status |
Mandatory Tab Completion |
Effect |
|---|---|---|---|
|
Not Complete |
Not Started |
- |
When the status of the current task is Not Started then this button, when it's displayed, becomes inactive. |
|
Started But Not Yet Able To Complete |
In Progress |
Incomplete |
When the status of the current task is In Progress but you haven't saved data for one or more required tabs, then this button, when it's displayed, becomes inactive. |
|
Started And Able To Complete |
In Progress |
Complete or there are no required tabs |
|
|
Completed |
Completed |
- |
When the status of the current task is Completed then this button, when it's displayed, becomes inactive. Also, the Complete text on the button is replaced with the time at which the Status of the current task was set to Complete. |
Selected Task Detail Panel Explained
|
Section |
Description |
Highlighted in Screenshot |
|---|---|---|
|
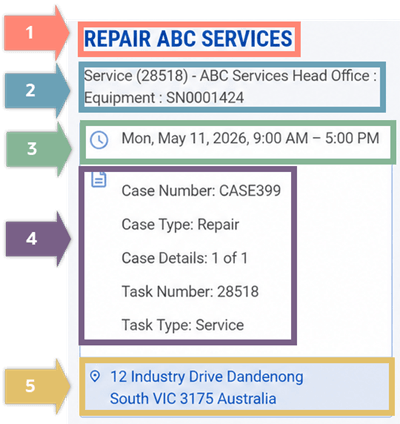
Selected Task Customer Name display text field |
This field displays the name of the customer for the selected task. |
1 |
|
Selected Task Purpose display text field |
This field displays information that is designed to inform you of this field's purpose. |
2 |
|
Selected Task Projected Start and End Time display text field |
This field displays the projected start time and projected end time. This time is displayed in your time zone (rather than the scheduler, should they be in different time zones). The format of this field is a concatenation of the following database fields and display items: [START TIME]+{am | pm | blank}+' - '+[END TIME]+{am | pm}
Note:
For the first am/pm label, if the second am/pm label matches the first, then the first am/pm label is set to blank. |
3 |
|
Selected Task Details display text field |
This field displays several details about the task including, but not limited to, the task number and the case number. |
4 |
|
Selected Task Address display text field |
This field displays the address of the asset for the selected task. |
5 |
The following is a screenshot of the Selected Task Details panel:
Selected Task Tab List Display Styles Explained
The items in the Selected Task Tab list have several visual styles that inform you of the tab's status. These are explained below.
|
Tab Status |
Description |
Explanation |
|---|---|---|
|
Standard |
Light text |
The name of the tab being shown in light gray text shows that the tab contents are viewable, editable and, if all requirements within that tab have been met, able to be saved to the cloud. |
|
Not Editable |
Dark text |
The name of the tab being shown in dark gray text shows that the tab contents are viewable but not editable or able to be saved to the cloud.
Note:
Field Service Mobile can be configured so that a tab is not editable until:
|
|
Current |
Light green bar at left plus white text |
A light green bar at the far left-hand side of the list shows that this tab is the last one that you have selected by tapping on its entry in the tab list. If the tab is not set as not editable then the name of the tab will be displayed in white text. |
|
Current and Not Editable |
Light green bar at left plus dark text |
A light green bar at the far left-hand side of the list shows that this tab is the last one that you have selected by tapping on its entry in the tab list. If the tab is not set as not editable then the name of the tab will be displayed in dark text. |
|
Mandatory Completion |
Dark green bar at left |
A dark green bar at the far left-hand side of the list entry shows that this tab must be appropriately filled out and its content saved before the Status of the selected task may be set to Complete.
Note:
If a tab is set to the Mandatory Completion setting but the task has not yet been marked as started then the display style will be set to Not Editable until the Status of the selected task is set to In Progress. |
Child Asset Tabs Explained
Besides the tabs for the selected task, Field Service Mobile can also show child assets in the Tab list.
An asset can have one or more child assets shown for a particular task. Each of these child assets in the tab list will have its own tabs.
To see the Tab list entries for a child asset, tap the Tab List entry and its tabs will show up.
These child asset tabs are indented to the right of the standard tab entries.
Selected Task Detail Screen Map Panel Explained
The map panel below shows you a symbol signifying your location as well as the location of the selected task.
Similar to many GPS mapping apps, you can zoom in, zoom out and pan around the map so that you can see the location and level of detail required.
Technician Symbol
The location of the technician is signified by an instance of the Technician Symbol.
If the technician's information in Field Service includes a photo of them this will be shown as part of the symbol.
Task Location Symbol

The task location is signified by an instance of the Task Location icon.
Tapping on any one of these icons opens the Selected Task Detail screen in Map View lets you see more details for the selected task.
Fastest Route Indicator
Running between the Technician symbol and the Task Location symbol is shown as the fastest route between the two points. The distance and estimated travel time are shown in the Control Bar at the top of the screen.
The estimated travel time is based on data excluding live traffic information. If you want a traffic-based estimate, you should load the route into your device's default GPS mapping app like Google Maps, using the GPS App Launch button.
Splay Zoom In Gesture
To zoom in on the map, spread two fingers apart on your device's screen on the location you want to zoom into.
Double Press Zoom In Gesture
Double-tap quickly in one location on the map to zoom in.
Zoom Out Gesture
To zoom out, pinch two fingers together on your device's screen anywhere on the map.
Pan North/South/East/West Gestures
To pan around the map, place two fingers on your device's screen anywhere on the map and slide up, down, left or right.