Manufacturing Mobile Administration/Setup
The Manufacturing Mobile Administration/Setup facility enables you to define the following features for your organization:
Bins
Bins enable you to identify areas and places in a location where you store inventory items. Bins help you organize and track on-hand quantities of items within a warehouse or location.
To create a manufacturing mobile bin record
-
Go to Manufacturing Mobile > Administration/Setup > Bins > New.
-
Enter a Bin Number or code to designate a bin location in your warehouse or stock room.
-
Select a Bin Type that best describes what the bin will be used for.
-
Enter the bin Sequence Number in relation to other bins in your warehouse.
Bin sequence numbers help to determine which bins in a warehouse zone take priority.
-
Select the warehouse Location for this bin.
The location cannot be changed after you save the bin record.
-
Select the Zone that you can set in pick strategies.
You can select the warehouse zone you want to associate with this bin.
-
Enter a Memo or note for this bin.
This memo is only stored with this record and not visible on other pages or lists.
-
Check the Inactive box to remove all references to this record from your account.
-
For this bin type, check the Block from Wave Order Picking box to prevent access to the bin during wave order picking. It includes removing the bin from bin lists and bin recommendations.
-
Enter the WMS Put Seq No that defines the sequence to put item into a bin.
-
Enter the WMS Replen Round Quantity to which the required replenishment quantity must be rounded down to determine the required number of replenishment tasks.
-
Select a WMS Stage Direction to define the direction of a stage. For example, In or Out.
-
Enter a WMS Replen Min Quantity of an item the bin should contain before a replenishment.
-
Select a WMS Bin Location Type record to define the type of a Bin location. For example, Stage or WIP.
-
Enter the WMS Replen Quantity of an item to be used for replenishment tasks.
-
Select the WMS Zone warehouse zone you want to associate with this bin and to set up in a putaway strategy.
-
To set an inbound staging bin as a cart, check the Set as a Cart box.
-
Enter a WMS Pick Seq No to define the sequence to Pick from a Bin.
-
Enter the WMS Pallet Position of the bin.
-
Enter the WMS Replen Max Quantity. This is the maximum number of an item the bin can contain after a replenishment.
-
Enter the WMS Aisle of the bin.
-
Enter the WMS Level of the bin.
-
For a WIP bin type, to use the bin for the Manufacturing Mobile processes, check the Use Bin in Manufacturing Mobile box.
-
Click Save.
Work Centers
A work center is the production area within a location where this work effort is performed.
If you set a default work center for work orders, this field is populated with the default work center. To learn more, see Assigning a Default Work Order Location and Work Center.
To edit or view a Manufacturing Mobile work center:
-
Go to Manufacturing Mobile > Administration/Setup > Work Centers.
-
Beside the work center you want to review or edit, click Edit or View.
To learn more, see Creating a Static Group.
Inventory Status
Inventory status is associated with all existing and incoming items at all locations until a transaction changes an item's status. Total inventory associated with this status is available to be allocated to orders. You can rename this status and add a description. You cannot delete this status.
To create an Inventory Status record, go to Manufacturing Mobile > Administration/Setup > Inventory Status > New. To learn more, see Creating Inventory Status Records.
If the inventory details are configured for a work order, the script deployment fails when you run the build with work id. To avoid this failure, you can remove the inventory details associated to a work order.
To remove inventory details:
-
Go to Customization > Scripting > Script Deployments.
-
In the Script Deployments list, beside the Mfg Mobile - Validate Work Order deployment, click Edit.
-
In the Mfg Mobile - Validate Work Order Script Deployment page, click the Parameters subtab.
-
Check the Remove Inventory Details in Work Order box.
-
Click Save.
Manufacturing Mobile Shifts
The Manufacturing Mobile SuiteApp enables you to create shop floor shifts. A shift represents a work time assigned to an employee.
To add a shift:
-
Go to Manufacturing Mobile > Administration/Setup > Shifts > New.
-
Enter a shift Name.
The ID field is populated automatically.
-
To remove all references to this record from your account, check the Inactive box.
-
Enter a shift Description.
For example, Afternoon Shift. 1:00 p.m. to 6:00 p.m.
-
Click Save.
Downtime Reason Codes
You can identify areas for process improvement by tracking downtime events that might occur during the manufacturing process.
Downtime reasons help you understand why manufacturing operations aren't running. You can set up as many reasons as you need. For example, e-stop (emergency stop), waiting on material, or waiting on operator. You can associate reason codes with a location or work center, or leave them as global. Reasons can be chargeable or not. If chargeable, the time spent during downtime will be charged to the work order. For example, lunch break is not chargeable, material shortage would be chargeable.
To create a reason code:
-
Go to Manufacturing Mobile > Administration/Setup > Downtime Reason Codes > New.
-
Select a Standard or Mfg Mobile - Reason Codes Form.
-
To complete the Standard Mfg Mobile - Reason Code custom form:
-
Enter a downtime Reason Code Name.
-
To remove all references to this record from your account, check the Inactive box.
-
To charge the machine downtime reason code to a work order, check the Chargeable - Machine box.
-
To charge labor downtime reason code to a work order, check the Chargeable - Labor box.
-
Enter a Description of the pause code reason.
-
-
To complete the Mfg Mobile - Pause Reason Codes custom form:
-
Enter a downtime Reason Code.
-
To remove all references to this record from your account, check the Inactive box.
-
Enter a Description of the pause code reason.
-
To charge the machine downtime reason code to a work order, check the Chargeable - Machine box.
-
To charge labor downtime reason code to a work order, check the Chargeable - Labor box.
-
-
Click Save.
Downtime Reason Details
Downtime categories identify the time an event caused a manufacturing process or operation to stop running. For example, maintenance, repair, or setup.
To create a reason detail:
-
Go to Manufacturing Mobile > Administration/Setup > Downtime Reason Details > New.
-
To remove all references to this record from your account, check the Inactive box.
-
Select a Reason for this downtime pause.
-
Select a Location where this reason code applies.
-
Select a Work Center where this reason code applies.
If the selected reason is chargeable, the Chargeable box is automatically checked.
The Description box is populated automatically as well.
-
Click Save.
Badge Ids
Operators on the shop floor require badge Ids. They can be set with badge numbers, effective from and to dates, can be transferred to a different employee, can reference an employee against a badge during a period.
To create a Badge Id
-
Go to Manufacturing Mobile > Administration/Setup > Badge IDs > New.
-
To remove all references to this record from your account, check the Inactive box.
-
Enter the Badge identifier (number or other code).
-
Click Save.
To add details to a new Badge Id:
-
Go to Manufacturing Mobile > Administration/Setup > Badge Ids.
-
Beside the Id you want to update, click Edit.
-
In the Mfg Mobile - Badge Ids page, click the Badges Details subtab.
-
Click New Mfg Mobile - Badge Details.
-
To remove all references to this record from your account, check the Inactive box.
-
To add a From date, click the From Date calendar icon.
-
To add a To date, click the To Date calendar icon.
-
Select the Employee you want to associate with this badge id.
-
Click Save.
To edit a Badge Id details:
-
Go to Manufacturing Mobile > Administration/Setup > Badge Ids.
-
Beside the Id you want to update, click Edit.
-
In the Mfg Mobile - Badge Ids page, click the Badges Details subtab.
-
To delete the Employee, click Remove.
-
To Update the badge details, click Edit.
-
Change the badge details: From Date, To Date, or Employee.
-
Click Save.
Badge Log Details
To enter badge log details:
-
Go to Manufacturing Mobile > Administration/Setup > Badge Log Details > New.
-
Select a Standard or Mfg Mobile - Log Details Form.
-
To remove all references to this record from your account, check the Inactive box.
-
Enter the Actual In Time.
-
Enter the Actual Out Time.
-
Click Save.
Badge Status Summary
To view a badge status summary:
-
Go to Manufacturing Mobile > Administration/Setup > Badge Status Summary.
-
Beside the Badge ID you want to view, click View.
Scrap Reason Codes
To record a scrap reason code:
-
Go to Manufacturing Mobile > Administration/Setup > Scrap Reason Codes > New.
-
Select a Standard or Mfg Mobile - Scrap Reason Codes Form.
-
Enter a Scrap Reason Code Name.
-
To remove all references to this record from your account, check the Inactive box.
-
Enter the Description of the scrap reason code.
-
Click Save.
Scrap Reason Details
To record scrap reason details:
-
Go to Manufacturing Mobile > Administration/Setup > Scrap Reason Details > New.
-
To remove all references to this record from your account, check the Inactive box.
-
Select a Scrap Reason Code.
The Description of the scrap reason code is displayed automatically.
-
Select the Location where the scrap reason code applies.
-
Select the Work Center where the scrap reason code applies.
-
Click Save.
Print Preferences
To define manufacturing mobile print preferences:
-
Go to Manufacturing Mobile > Administration/Setup > Item Print Preferences > New.
-
To remove all references to this record from your account, check the Inactive box.
-
Select the Assembly item you want to define the print preferences for.
-
Enter the number of Copies you want to print.
-
To print a label for each sample without a quantity in label, check the Bulk Printing box. This applies to both intermediate and final operation steps.
-
Select an Intermediate Template.
This print template is used for printing during intermediate operation steps for WIP work orders.
-
Select a Final Template.
This print template is used for printing final operation steps for WIP and non-WIP work orders.
-
Click Save.
To update a custom role with permission to a work order that has full permissions:
-
Go to Setup > Users/Roles > Manage Roles (Administrator).
-
Beside your custom Manufacturing Mobile role, click Edit.
-
On the Permissions subtab, select the Custom Record tab.
-
From the Custom Record list, select Mfg Mobile - Print Preferences.
-
In the Level column, select Full.
-
Click Save.
Repeat these steps for all existing custom roles who have permissions to work orders.
Set up Label Printing
To set up label printing:
-
Go to Setup > Custom > Mobile - Settings.
-
In the Mobile - Settings page, check the Enable Mobile Printing box.
-
Optionally, you can complete the fields on this page.
-
In the Enable for These Apps Only field, select Manufacturing Mobile.
-
Click Save.
To learn more, see Configuring Mobile App Settings.
To set up print templates:
-
Go to the Print - Templates List page.
-
To create a new template, click New Print - Template.
-
Enter a unique template Name.
For example, Finished Label Inventory or Finished Label Lot.
-
The Mobile Application name is Mfg Mobile.
-
In the Print Template Path field, enter the path to the custom template file in the File Cabinet.
-
Click Save.
Labor and Machine Start Stop
Manufacturers need to be able to calculate and capture the run time of the both the machines and labor involved in the production process.
Add Custom Roles to Start Stop
To use custom roles in the Start Stop feature, add the following custom role permissions:
-
MMobile - Work Center Preferences
-
MMobile - Badge IDs
-
MMobile - Badge Details List
-
MMobile - Badge Status Summary
-
MMobile - Badge Lot Details
To add permissions:
-
Go to Setup > User/Roles > Manage Roles.
-
In the Manage Roles page, click MfgMobile - Production Operator.
-
In the Permissions subtab, click the Custom Record tab.
-
If one of the listed permissions need to be added, click Edit.
-
In the list, select the permission you want to add and then click OK.
You can also use this process to edit custom record permissions.
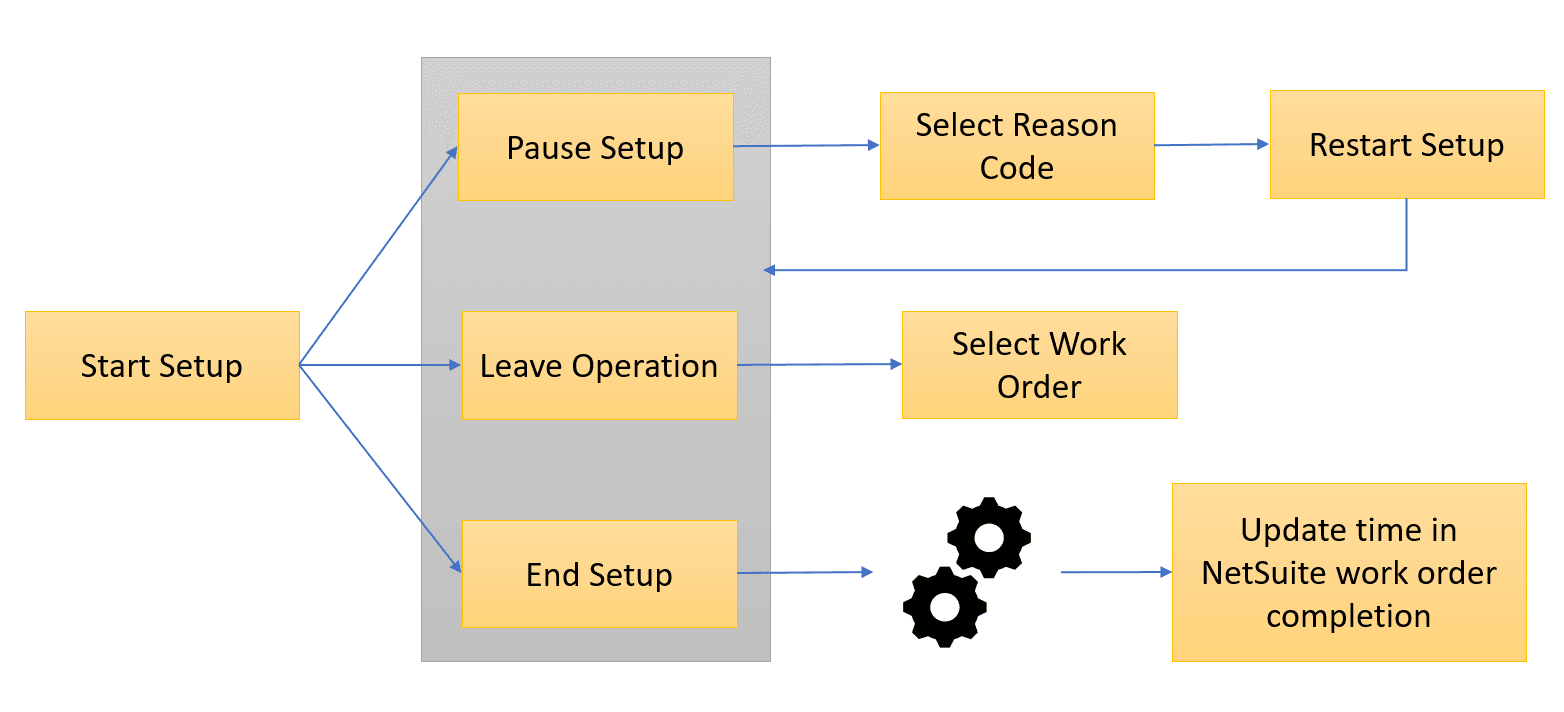
Labor and Machine Start Stop Setup
Labor and Machine Start Stop Setup Workflow
The following image displays the Manufacturing Mobile SuiteApp Labor and Machine Start Stop Setup workflow:
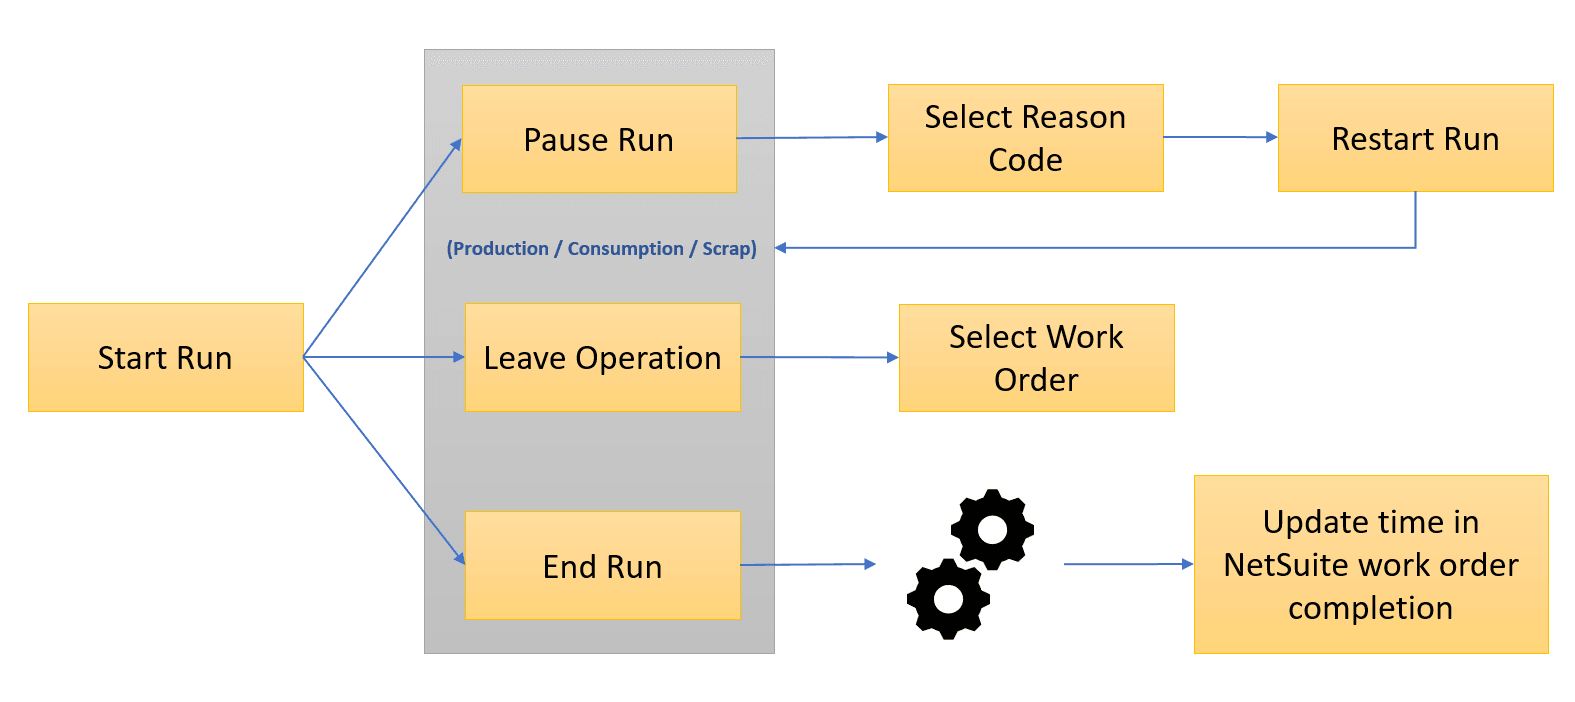
Labor and Machine Start Stop Run Operation Workflow
The following image displays the Manufacturing Mobile SuiteApp Labor and Machine Start Stop Setup workflow:
-
You can only run an operation after the Setup Workflow is complete.
-
When you select Auto Start Run in your work center preferences, the Run automatically starts after Setup ends.
-
There is no limit on the number of times you can run an operation.
-
The Leave Operation button lets operators leave an active operation without exiting the work center.
-
If you select Mandate a Badge for Running Operation, the system requires at least one operator for any active operation.
-
If you select Badge-in Required, the system disables the Leave Operation button.
-
The system displays this button only for concurrent work orders when you check the Allow to Run Concurrent Operations box on the Mfg Mobile - Work Center Preference page.
-
Labor and machine start stop prerequisites
To calculate and capture the machine and labor time of an operation setup or run, enter the operation Setup Time (measure in minutes) or Run Rate (measured in minutes or units).
For example, Setup Time could be 20 minutes. Run Rate could be 60 units or 45 minutes.
To enable the Mfg Mobile Preferences record:
-
Go to Manufacturing Mobile > Preferences > Mfg Mobile - Preferences.
-
In the Mfg Mobile - Preferences List , beside the preference you want to enable, click Edit.
-
In the Mfg Mobile - Preferences page, check the Enable Start-Stop Feature for Work Order box.
-
Click Save.
To set up work center preferences:
-
Go to Manufacturing Mobile > Preferences > Mfg Mobile - Work Center Preferences > New.
-
Select a Work Center.
-
To remove all references to this record from your account, check the Inactive box
-
Set your work center by enabling some or all of the following fields:
-
To record setup and run duration, check the Capture Actual Times box.
-
To allow operators to badge-in, check the Badge-In Required box.
At least one operator must be badged into the work center to begin the setup or run process.
This box is enabled when the Capture Times box is checked.
-
To allow multiple operations of the same or different work orders to run at the same time, check the Allow to Run Concurrent Operations box.
The same badge can't be used to work on two operations at the same time.
For more information, see Allow to Run Concurrent Operations Work Center Preference.
-
To restrict a badge from running an operation, check the Mandate a Badge for Running Operation box.
-
To enable operators to badge into another work center and be automatically badged out from the current work center, check the Auto Badge Out box.
-
To automatically start a run time when the operation setup is complete, check the AutoStart Run box.
This box is enabled when the Capture Times box is checked.
-
To process machine setup and run duration instead of the standard machine time for each routing operation setup, check the Process Actual Machine Time box.
Actual Machine Time is the sum of Operation InProgress time + Chargeable Pause duration.
This box is enabled when you check the Capture Times box.
-
To process labor setup and run duration instead of the standard labor time for each routing operation setup, check the Process Actual Labor Time box.
Actual Labor Time is the sum of Badge-In time when operation is InProgress + Badge-In time when operation is paused with a chargeable reason.
This box is enabled when you check the Capture Times box.
-
To calculate labor time using badged-in data, check the Labor Badge-In box. If badged-in data isn't available, the system uses machine time instead.
This box is enabled when you check the Capture Times box.
-
To prevent operators from recording consumption at the work center, check the Disable Consumption box.
-
To prevent operators from recording production at the work center, check the Disable Production box.
-
To prevent operators will from recording scrap at the work center, check the Disable Scrap box.
-
-
Click Save.
Allow to Run Concurrent Operations Work Center Preference
The Allow to Run Concurrent Operations work center preference controls how work orders and badge usage are managed within a work center. Different behaviors apply, depending on whether you check the box for this preference.
When the preference box is checked, the following behaviors apply:
-
Badge-in With Other User or Non-Login User Badge Not Allowed - Users with login access to NetSuite accounts can't badge-in using any badge that is not their own, whether the other badge belongs to a login user or a non-login user. Non-login users have no login access to NetSuite accounts but do have an assigned badge ID.
-
Badge Log Tracking Enabled - Badge log details are tracked against the processing work order within the assigned work center.
-
Multiple Work Order Processing Allowed - Users can process multiple different work orders at the same time within a work center. However, users can't simultaneously set up and run the same work order and operation.
-
Leave Operation Functionality Enabled - The Leave Operation button is visible. An operator can exit a running operation using this button.
When the preference box is cleared, the following behaviors apply:
-
Badge-in with Other User or Non-Login User Badge Allowed - Users with login access to NetSuite accounts can badge-in using another user's badge, whether that badge belongs to a login user or a non-login user. Non-login users have no login access to NetSuite but do have an assigned badge ID.
-
Badge Log Tracking Disabled - Badge log details are not tracked against the processing work order within the assigned work center.
-
Multiple Work Order Processing Not Allowed - Users can't run multiple work orders at the same time within a work center.
On the Work Order Completion record, the labor resource is always recorded as 1, regardless of the number of users who badge in. The system records either the cumulative Labor Setup Time (Minutes) or Labor Run Time (Minutes) associated with the operation.
To set up badges:
-
Go to Manufacturing Mobile > Administration/Setup > Badge Ids > New.
-
Enter a badge id Name.
-
Check the Inactive box to remove all references to this record from your account.
-
In the Badge Details subtab, click New Mfg Mobile - Badge Details.
-
In the From Date field, select the date this badge becomes active.
-
In the To Date field, select the date the badge stops being active.
-
Select the name of the Employee you are assigning this badge to.
You cannot create a badge without an employee name.
-
Click Save.
To set up downtime pause reason codes:
-
Go to
-
Manufacturing Mobile > Administration/Setup > Downtime Reason Codes > New.
-
In the Mfg Mobile - Pause Reason Codes page, enter a Reason Code.
For example, lunch Break or machine maintenance.
-
Check the Inactive box to remove all references to this record from your account.
-
Enter a Description of the pause reason code.
-
Check the Chargeable - Machine box to record this pause as chargeable machine time.
-
Check the Chargeable - Labor box to record this pause as chargeable labor time.
-
Click Save.
To set up downtime pause reason details:
-
Manufacturing Mobile > Administration/Setup > Downtime Reason Details > New.
-
In the Mfg Mobile - Pause Reason Details page, select a Reason.
For example, material shortage or power outage.
-
Select the Location that you want to apply this reason detail to.
-
Select the Work Center that you want to apply this reason detail to.
The Description field is automatically populated from the downtime reason code.
-
Click Save.
To badge-in or out:
-
In the Manufacturing Mobile App, in the Work Options or Select Operation page, tap the badge icon.
-
Scan or Enter a Badge ID.
The Enter Id Number popup window displays the following information:
-
Total In represents the number of operators currently in at the work center.
-
Last ID Scanned displays the last scanned badge ID.
-
Status shows whether the badge is scanned in.
-
-
Tap Enter.
You can only badge in when your badge ID is active for the specified dates.
Operation Log
The Operations Log enables Administrators or Production Managers to view the work orders and operations that are in progress. You can only end operations if no operators are badged in.
Only users with the Production Manager or Administrator role can view operation logs when the Badge-In Required box is cleared.
Production operators can only view the operations they have worked on and are in progress. They can only end operations if no operators are badged in.
Administrators can customize the Production Operator role, by granting Edit permission to the Mfg Mobile - Preferences custom record on the Permissions subtab. This change displays all operation logs, regardless of which user performed the work.
-
Anyone who has Full/Edit permissions will have access to the Production Manager view in the Operation Log.
-
If your permission level is Create/View, you will have access to the Production Operator view in the Operation Log.
-
If your permission level is None, you cannot view the Operation Log content.
To view the Operations Log:
-
In the Manufacturing Mobile window, click the menu icon.
-
Click Operation log to display the following fields:
-
Work Order # - displays the work order number.
-
Work Center - displays the work center where the operation is in progress.
-
Operation Sequence - displays the sequence.
-
Start Date - displays the date when the operation status became InProgress.
-
Status - displays the status of the operation.
-
Total Badged In - displays the badges that are currently in operation.
-
-
Click End Operation to end the operation.