SuiteScript 2.1 User Event Script Tutorial
A user event script runs on the server and is triggered when you take action on a record. It can run logic in three situations:
-
After you start to open the record, but before it loads.
-
After you click Save to save the record.
-
After the record's submitted to the database.
This tutorial walks you through how to set up a basic user event script. Here's what you'll do:
-
Step One: Check Your Prerequisites
-
Step Two: Create the Script File
-
Step Three: Review the Script (Optional)
-
Step Four: Upload the Script File to NetSuite
-
Step Five: Create a Script Record and Script Deployment Record
-
Step Six: Test the Script
Before you start, check out SuiteScript 2.1 Script Basics for an overview of key terms. For details about the structure of SuiteScript 2.1 entry point scripts, see SuiteScript 2.1 Anatomy of a Script.
Sample Script Overview
The sample script is meant for the employee record. When you deploy it, here's what it does:
-
When you start creating a new employee record, the script disables the Notes field before the page loads.
-
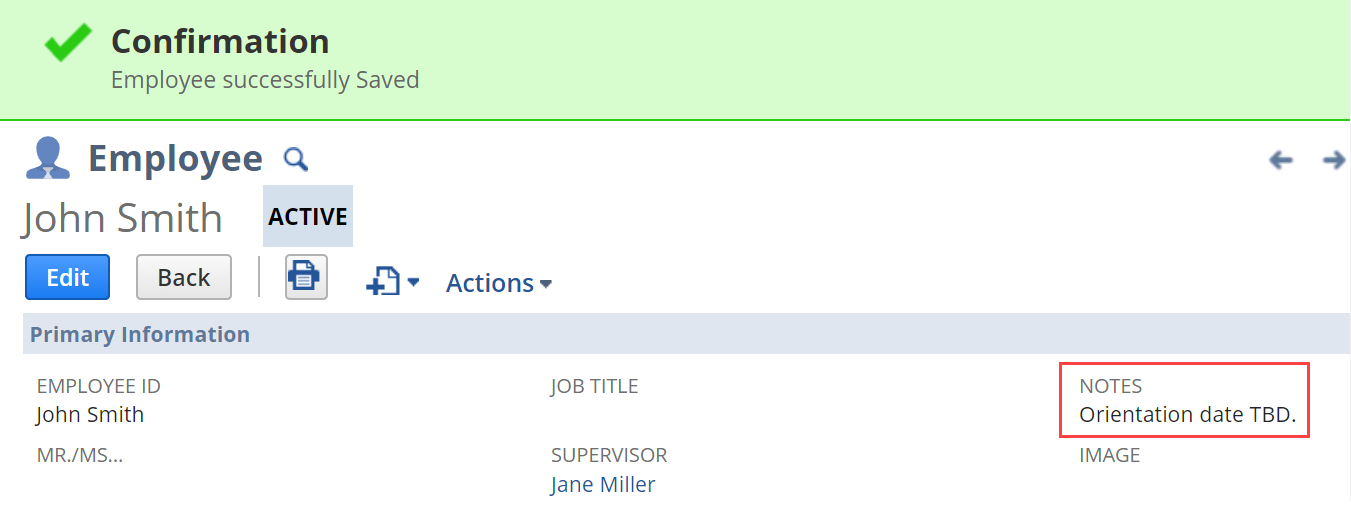
After you fill out all the required info and click Save, the script adds a note saying no orientation date has been set yet.
-
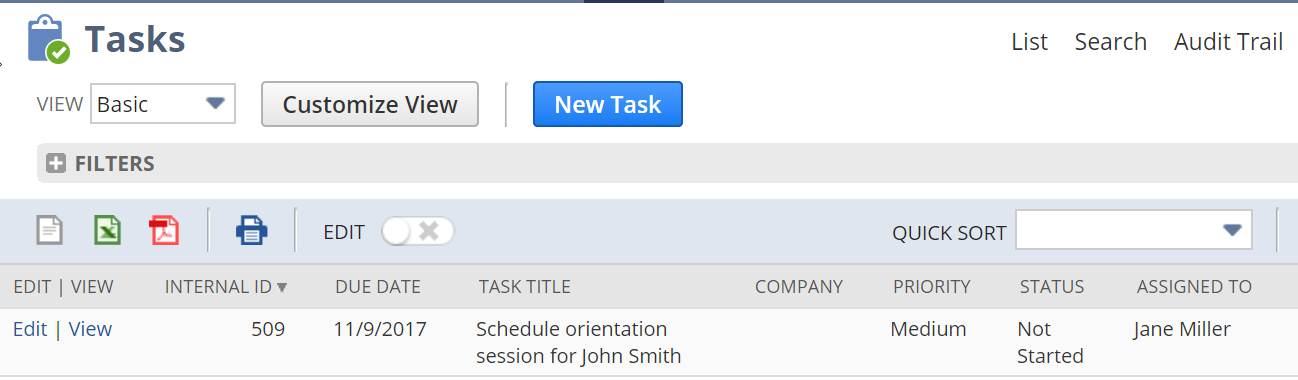
Once the record's submitted, the script creates a task to schedule the new employee's orientation and assigns it to their supervisor.
This script uses all three SuiteScript 2.1 User Event Script Type entry points: beforeLoad(context), beforeSubmit(context), and afterSubmit(context).
Check Your Prerequisites
Before you start, make sure your system is set up correctly:
Enable the Feature
You'll need to enable the Client and Server SuiteScript features in your account. For help, see Enabling SuiteScript.
Create an Employee Record
You'll also need an employee record you can use as the supervisor for the test employee.
To see your current employee records, go to Lists > Employees. If you don't have one you can use, create a new employee. For help, see Adding an Employee.
Create the Script File
Before you go any further, create the entry point script file. Just copy and paste the code below into your favorite text editor, then save it as createTask.js.
            /**
 *@NApiVersion 2.x
 *@NScriptType UserEventScript
 */

// Load two standard modules.
define ( ['N/record', 'N/ui/serverWidget'] ,
    // Add the callback function.
    function(record, serverWidget) {
        // In the beforeLoad function, disable the Notes field.
        function myBeforeLoad (context) {
            if (context.type !== context.UserEventType.CREATE)
                   return;
            var form = context.form;
              var notesField = form.getField({
                   id: 'comments'
            });
              notesField.updateDisplayType({
                displayType: serverWidget.FieldDisplayType.DISABLED
            });
          }

        // In the beforeSubmit function, add test to the Notes field.
        function myBeforeSubmit(context) {
            if (context.type !== context.UserEventType.CREATE)
                return;
            var newEmployeeRecord = context.newRecord;
            newEmployeeRecord.setValue({
                fieldId: 'comments',
                value: 'Orientation date TBD.'
            });
        }

        // In the afterSubmit function, begin creating a task record.
        function myAfterSubmit(context) {
            if (context.type !== context.UserEventType.CREATE)
                return;
            var newEmployeeRecord = context.newRecord;
            var newEmployeeFirstName = newEmployeeRecord.getValue ({
                fieldId: 'firstname'
            });
            var newEmployeeLastName = newEmployeeRecord.getValue ({
                fieldId: 'lastname'
            });
            var newEmployeeSupervisor = newEmployeeRecord.getValue ({
                fieldId: 'supervisor'
            });
            if (newEmployeeSupervisor) {
                var newTask = record.create({
                    type: record.Type.TASK,
                    isDynamic: true
                });
                 newTask.setValue({
                    fieldId: 'title',
                    value: 'Schedule orientation session for ' +
                        newEmployeeFirstName + ' ' + newEmployeeLastName
                });
                newTask.setValue({
                    fieldId: 'assigned',
                    value: newEmployeeSupervisor
                });
                try {
                    var newTaskId = newTask.save();
                    log.debug({
                        title: 'Task record created successfully',
                        details: 'New task record ID:  ' + newTaskId
                    });
                 } catch (e) {
                     log.error({
                         title: e.name,
                            details: e.message
                     });
                }
            }
        }

        // Add the return statement that identifies the entry point funtions.
        return {
            beforeLoad: myBeforeLoad,
            beforeSubmit: myBeforeSubmit,
            afterSubmit: myAfterSubmit
        };
    });
Review the Script (Optional)
If you want to see how the script is put together, check out the next sections.
JSDoc Tags
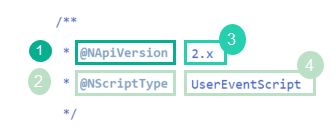
The following image shows the JSDoc block for this script. To see what the numbered callouts mean, look at the table after the image.
|
Callout |
Description |
|---|---|
|
1 and 3 |
The @NApiVersion tag (set to 2.x) is required in all entry point scripts. Valid values are 2.0, 2.x, and 2.1 |
|
2 and 4 |
The @NScriptType tag (set to UserEventScript) shows what script type you're using. It's not case sensitive, but using Pascal case makes it easier to read. |
beforeLoad Function
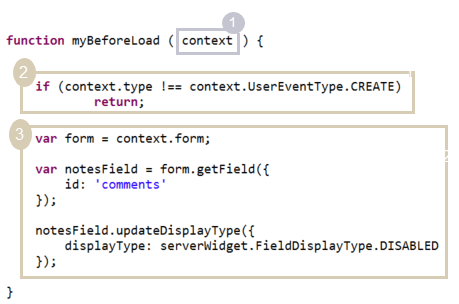
The next image shows the myBeforeLoad function. Because of how the script's return Statement is set up, this function runs when beforeLoad is called.
|
Callout |
Description |
|---|---|
|
1 |
The |
|
2 |
This statement makes the rest of the function run only if you're creating a new record. It checks the |
|
3 |
These statements disable the Notes field. They use the |
beforeSubmit Function
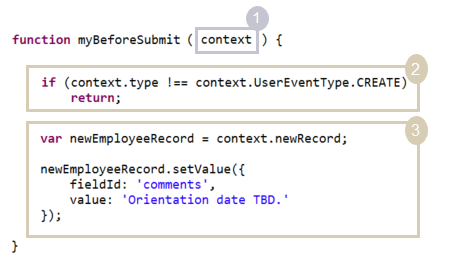
The next image shows the myBeforeSubmit function. Because of the return Statement, this runs when beforeSubmit is called.
|
Callout |
Description |
|---|---|
|
1 |
The
Note:
The |
|
2 |
This statement makes the rest of the function run only if you're creating a new record, using the |
|
3 |
These statements add text to the Notes field by using the |
afterSubmit Function
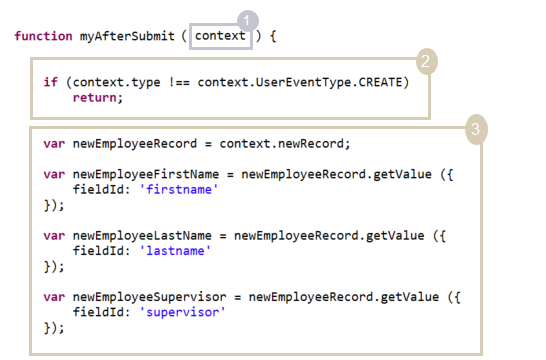
The next image shows the myAfterSubmit function. Because of the return Statement, this runs when afterSubmit is called.
The first part of the function gets data from the employee record:
|
Callout |
Description |
|---|---|
|
1 |
The |
|
2 |
This statement makes the rest of the function run only if you're creating a new record, using the |
|
3 |
These statements use |
The rest of the function creates the task record:

|
Callout |
Description |
|---|---|
|
4 |
There's a conditional statement-it checks if the Supervisor field has a value. If so, the logic inside the curly braces runs. |
|
5 |
These statements use the N/record Module APIs to create the new task and set its values. |
|
6 |
This code tries to save the new task record. If there are errors, they're logged in the script deployment record's execution log. |
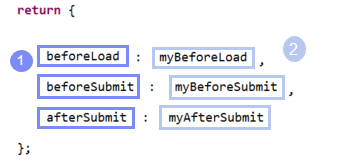
return Statement
The next image shows the callback function's return statement.
|
Callout |
Description |
|---|---|
|
1 |
Entry points. The callback function's return statement must use at least one entry point for the script type set by @NScriptType. See Callout 4 in JSDoc Tags. This script uses all three user event script entry points. |
|
2 |
Entry points functions. For each entry point, your script needs to define a function for it. |
Upload the Script File to NetSuite
Once you've created your entry point script file, upload it to your NetSuite File Cabinet.
To upload the script file:
-
In the NetSuite UI, go to Documents > Files > SuiteScripts.
-
In the left pane, select the SuiteScripts folder and click Add File.
-
Follow the prompts to locate the createTask.js file (created in Step Two) in your local environment and upload it.
Even after you upload the file, you can edit it right from the File Cabinet if needed. For details, see the help topic Editing Files in the File Cabinet.
Create a Script Record and Script Deployment Record
Before an entry point script can run in your account, you'll need to create a script record for the file and a script deployment record.
To create the script record and script deployment record:
-
Go to Customization > Scripting > Scripts > New.
-
In the Script File dropdown list, select createTask.js.
If you haven't uploaded the file yet, you can do it here-click the plus sign next to the dropdown. You might need to hover your cursor to the right to see the icon.
-
After you have selected the script file and it is displayed in the dropdown list, click the Create Script Record button.
If your file passes validation, the system adds a new script record and lists createTask.js on the Scripts subtab.
-
Fill out the required body fields as follows:
-
In the Name field, enter Create Task Record User Event.
-
In the ID field, enter _ues_create_task_record.
-
-
Click the Deployments subtab.
-
Add a line to the sublist, as follows:
-
Set the Applies to dropdown list to Employee.
-
In the ID field, enter _ues_create_task_record.
Leave the other fields as they are. The Status field is set to Testing by default, so the script won't run for other users. If you want everyone to use it later, change the status to Released.
-
-
Click Save.
The system will create the script and its deployment records.
Test the Script
Now that the script's deployed, let's make sure it works.
To test the script:
-
Start creating a new employee record: go to Lists > Employees > Employees > New.
-
On the new employee form, check that the Notes field is disabled. If beforeLoad worked, the field should be grayed out and not editable.
-
Fill in all required fields-these might vary based on your account settings, but you'll need at least:
-
Name - Enter a first name of John and last name of Smith.
-
Subsidiary - (OneWorld only) Choose an appropriate value from the dropdown list.
-
-
To make sure afterSubmit works, add a value for Supervisor if you haven't done so already.
-
Click Save. You'll see a success message, and the new record appears in View mode.
-
Check that beforeSubmit worked: The Notes field should say Orientation date TBD.
-
Check that afterSubmit worked:
-
Select Activities > Scheduling > Tasks.
-
Make sure your view includes tasks assigned to all users.
-
Check that a task was created and assigned to the supervisor you picked earlier.
-
Next Steps
If you want to customize this entry point script to call a custom module, see SuiteScript 2.x Custom Module Tutorial.