SuiteScript 2.x Custom Module Tutorial
A custom module script holds logic you can use in other scripts. If you reuse logic in several scripts, store it in a custom module instead of copying it-this is a lot more efficient.
This tutorial walks you through creating a custom module script and updating an entry point script to use that module.
This tutorial includes and overview and several tasks:
Sample Script Overview
The custom module script in this tutorial automatically creates a phone call record. After you create this module and upload it to your NetSuite File Cabinet, you can call this module from an entry point script.
When you've finished updating the entry point script (as described in this tutorial), the custom module runs each time a new employee record is created. If the new employee record has values for Phone and Supervisor, the module schedules a call between the supervisor and the new employee.
Deploy the Prerequisite Script
If you have not deployed the user event script described in SuiteScript 2.1 User Event Script Tutorial, deploy it now.
Create the Custom Module Script File
Copy and paste the following code into the text editor of your choice. Save the file and name it phoneCall.js.
            /**
 * phoneCall.js
 * @NApiVersion 2.x
 * @NModuleScope Public
 */


// This script create a record, so it loads the N/record module.

define (['N/record'] ,

    // The next line marks the beginning of the callback
    // function. The 'record' argument is an object that
    // represents the record module.

    function (record) {

        // The next line marks the beginning of the entry point
        // function.

        function scheduleCall (context) {
            var newPhoneCall = record.create({
                type: record.Type.PHONE_CALL,
                isDynamic: true
            });

            newPhoneCall.setValue({
                fieldId: 'title',
                value: context.phoneCallTitle
            });

            newPhoneCall.setValue({
                fieldId: 'assigned',
                value: context.phoneCallOwner
            });

            newPhoneCall.setText({
                fieldId: 'phone',
                text: context.phoneNumber
            });

            try {
                var newPhoneCallId = newPhoneCall.save();

                log.debug({
                    title: 'Phone call record created successfully',
                    details: 'New phone call record ID:  ' + newPhoneCallId
                });

            } catch (e) {
                log.error({
                    title: e.name,
                    details: e.message
                });
            }
        }

    // Add the return statement that identifies the entry point funtion.
    return {
        schedule: scheduleCall,
    }
});
Review the Script (Optional)
If you want to learn more about how this script is structured, check out the next sections. Note that these images don't show the entire script. For more details, refer to the comments in Create the Custom Module Script File.
JSDoc Tags
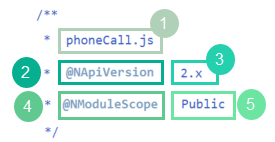
A custom module script isn't required to have JSDoc tags, but you should use them. The following illustration shows this sample's JSDoc block.
|
Callout |
Description |
|---|---|
|
1 |
The title of the file that holds this script. You don't have to list this annotation, but it can be useful. Any script that loads this module has to use the file's name. |
|
2 and 3 |
The |
|
4 and 5 |
The |
Entry Point Function
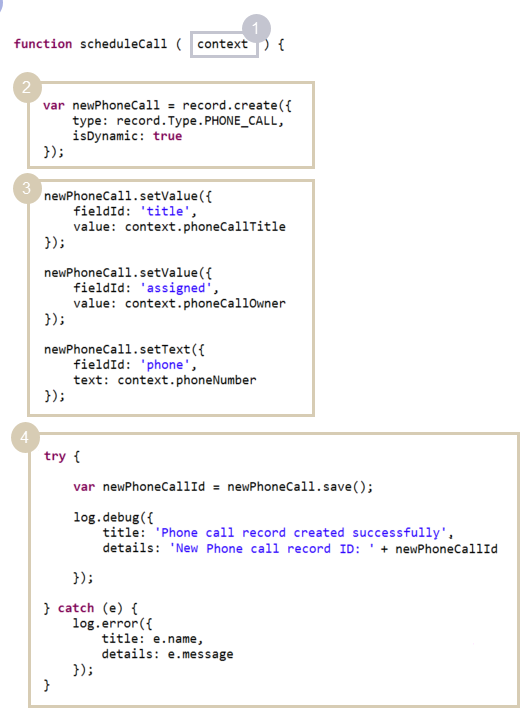
Every custom module script has to define an object that's returned when the script's entry point is called. This object could be a static value, like a string. However, it's much more common for custom module scripts to return a function, like this script does. Because of the way the Return Statement is set up, the entry point function shown in the following diagram is invoked when the script's schedule entry point is invoked.
Like an entry point function in a standard script, this function takes a context object as its argument.
|
Callout |
Description |
|---|---|
|
1 |
The context object that's available when the schedule entry point is called. The property values for this object are set in the script that calls this custom module. |
|
2 |
This statement uses the record.create(options) method to start making a phone call record. |
|
3 |
These statements set fields on the phone call record. They use the context object's properties, along with the Record.setValue(options) and Record.setText(options) methods. The values of the context object - phoneCallTitle, phoneCallOwner, and phoneCallNumber - must be defined in the script that calls the custom module. |
|
4 |
This try/catch block tries to save the new phone call record with Record.save(options) method. If saving fails, the block catches and logs the error that caused the issue. |
Return Statement
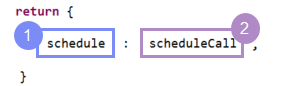
Like an entry point script, the callback function in a custom module script needs a return statement. The return statement must include at least one entry point.
|
Callout |
Description |
|---|---|
|
1 |
The custom module's entry point. As with an entry point script, every custom module script must use at least one entry point. The difference is an entry point script has to use a standard entry point that matches the script type. With a custom module, you create the entry point, so you can use the return statement to name it however you like. |
|
2 |
A reference to an object. This example references a function. This structure is probably the most common. But the entry point could also reference another object, static value. Whatever you reference, it has to be defined in the same script file. |
Upload the Custom Module Script File to NetSuite
After you create your custom module script file, upload it to your NetSuite File Cabinet.
To upload the script file:
-
In the NetSuite UI, go to Documents > File > SuiteScripts.
-
In the left pane, pick the SuiteScripts folder and click Add File.
-
Follow the prompts to find the phoneCall.js file in your local environment and upload it to the SuiteScripts folder.
Even after you upload the file, you can edit it in the File Cabinet if you need to. For details, see Editing Files in the File Cabinet.
Modify the Entry Point Script
After you upload a custom module script file, you don't need to take any other actions for it to be available. Unlike entry point scripts, you do not have to create a script record or script deployment record for it. However, to use the custom module script, it needs to be referenced by a script that's already been deployed.
In the next steps, you'll update an entry point script to use the phoneCall.js module, as well as the user event script from the SuiteScript 2.1 User Event Script Tutorial. To update the file, you can use either of the following approaches:
-
If you want to copy and paste the updated script directly from this help topic, skip ahead to Copy the Full Script.
-
If you want to read about how to make the needed edits yourself, refer to Update the Script.
Update the Script
This procedure tells you how to update createTask.js so that it uses the phoneCall.js custom module file. For more information about how dependencies should be defined in the following procedure, see Module Dependency Paths.
To update the script:
-
Open the createTask.js file for editing.
-
Add /phoneCall.js to the first argument of the define function to update your dependencies.

-
Add another dependency to the callback function's first argument. This object represents the phone call module. You can use it to access the phone call module's API.

-
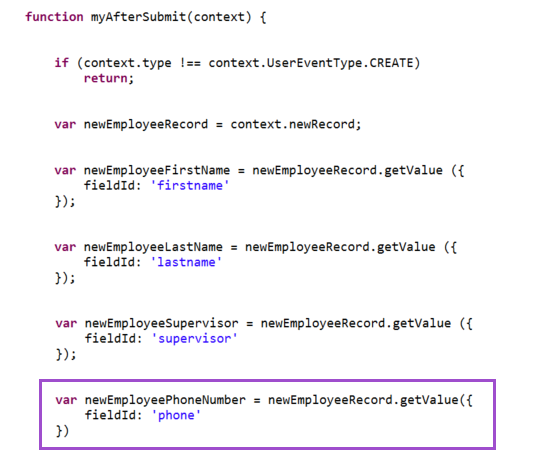
In the script's afterSubmit function, add logic to get the employee's phone number.
-
Create a block of code that does the following:
-
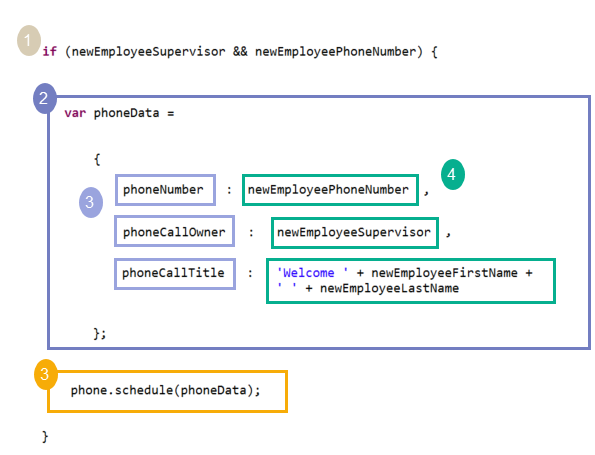
Add a conditional test to check if the employee record has values for both the phone number and supervisor fields (Callout 1).
-
Create an object called phoneData that sets all the fields needed for the phone call module's schedule method (Callout 2).
-
Call the schedule method, passing the phoneCall object as its argument (Callout 3).
-
-
Upload the revised script file to your NetSuite File Cabinet, overwriting the prior version.
Copy the Full Script
Here's the fully updated user event script. If you haven't already created the script file using the steps described in Writing the Client SuiteScript File, copy and paste the following code into the text editor of your choice. Save the file and name it createTask.js.
              /**
 *
 *@NApiVersion 2.x
 *@NScriptType UserEventScript
 */

define (['N/record', 'N/ui/serverWidget',  './phoneCall'],
    function(record, serverWidget, phone) {

       // In the beforeLoad function, disable the
       // Notes field on the record.

        function myBeforeLoad (context) {
            if (context.type !== context.UserEventType.CREATE)
                  return;
              var form = context.form;

              var notesField = form.getField({
                   id: 'comments'
              });

              notesField.updateDisplayType({
                   displayType: serverWidget.FieldDisplayType.DISABLED
              });
         }

        // In the beforeSubmit function, add a message to the Notes field.

        function myBeforeSubmit(context) {
            if (context.type !== context.UserEventType.CREATE)
                 return;
            var newEmployeeRecord = context.newRecord;
            newEmployeeRecord.setValue('comments', 'Orientation date TBD.');
        }

        // In the afterSubmit function, take several actions culiminating
        // in creating both a task record and a phone call record.

        function myAfterSubmit(context) {

        // If the user is not creating a new record, then stop executing.

        if (context.type !== context.UserEventType.CREATE)
            return;

        // Use the context object's newRecord property to retrieve values
        // from the new record.

        var newEmployeeRecord = context.newRecord;
        var newEmployeeFirstName = newEmployeeRecord.getValue ({
              fieldId: 'firstname'
        });

        var newEmployeeLastName = newEmployeeRecord.getValue ({
            fieldId: 'lastname'
        });

        var newEmployeeSupervisor = newEmployeeRecord.getValue ({
            fieldId: 'supervisor'
        });

        var newEmployeePhoneNumber = newEmployeeRecord.getValue({
               fieldId: 'phone'
        });

        // If the user entered a value for the supervisor field,
        // create a task record for the supervisor.

        if (newEmployeeSupervisor) {
            var newTask = record.create({
                type: record.Type.TASK,
                isDynamic: true
            });

            newTask.setValue({
                fieldId: 'title',
                value: 'Schedule orientation session for ' +
                newEmployeeFirstName +  ' ' + newEmployeeLastName
            });

            newTask.setValue({
                fieldId: 'assigned',
                value: newEmployeeSupervisor
            });

            try {
                var newTaskId = newTask.save();
                log.debug({
                      title: 'Task record created successfully',
                       details: 'New task record ID:  ' + newTaskId
                });

             } catch (e) {
                 log.error({
                     title: e.name,
                        details: e.message
                 });
             }
        }

        // If the user entered values for both the supervisor and
        // phone number fields, use the phoneCall module to schedule a phone call.

        if (newEmployeeSupervisor && newEmployeePhoneNumber) {
            var phoneData =
                {
                    phoneNumber:  newEmployeePhoneNumber,
                       phoneCallOwner:   newEmployeeSupervisor,
                       phoneCallTitle:   'Welcome ' + newEmployeeFirstName +
                                ' ' + newEmployeeLastName
                   };
            phone.schedule(phoneData);
        }
     }

    return {
        beforeLoad: myBeforeLoad,
        beforeSubmit: myBeforeSubmit,
       afterSubmit: myAfterSubmit

    };
});
Upload the Revised User Event Script
After you update the createTask.js file, upload it to your NetSuite File Cabinet.
To upload the script file:
-
In the NetSuite UI, go to Documents > File > SuiteScripts.
-
In the left pane, pick the SuiteScripts folder and click Add File.
-
Follow the prompts to locate the createTask.js file in your local environment and upload it to the SuiteScripts folder.
-
If the system says a file with that name already exists, click OK to overwrite it.
Test the Script
Now that both files are uploaded, make sure the custom module works as expected.
To test the script:
-
Start creating a new employee record by going to Lists > Employees > Employees > New.
-
In the new employee form, check if the Notes field is disabled. If the beforeSubmit entry point works, the field will be gray and you can't edit it.
-
Enter values for the required fields. These fields might vary depending on your account's features and customizations. At minimum, they include:
-
Name - Enter Susan as the first name and Johnson as the last name.
-
Subsidiary - (OneWorld only) Choose a value from the dropdown list.
-
-
To make sure that the custom module logic is used, enter values in the Supervisor and Phone fields.
-
Click Save. You'll see a success message, and the system will show the new record in View mode.
-
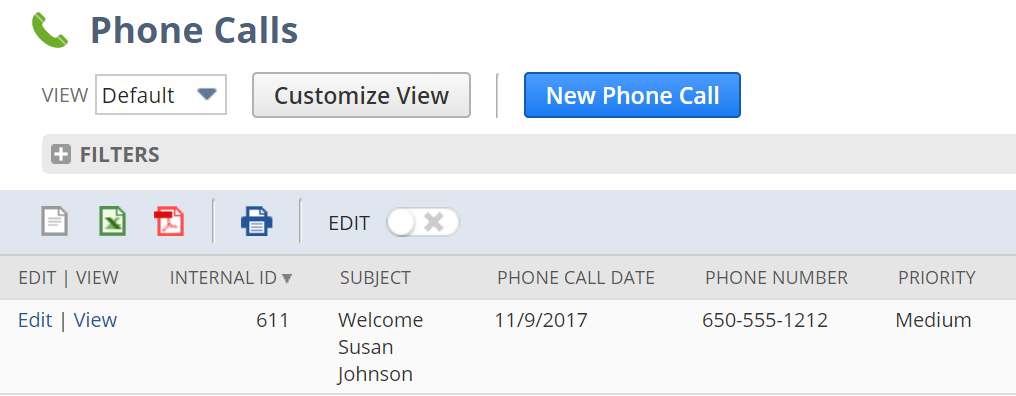
Check that the phone call record was created successfully:
-
Select Activities > Scheduling > Phone Calls.
-
Check the filtering options to make sure phone calls for all employees are shown
-
Make sure a phone call was scheduled to welcome the new employee.
-