Perform the Update to NSPOS 2020.1.X
To use the functionality provided in the 2020.1.X release, you must log into NetSuite and update your NetSuite Point of Sale (NSPOS) environment to bundle 294243.
The update procedure you will use depends on your current NSPOS release:
Working with bundles requires an Administrator Role. If you need assistance performing this update and verifying settings, please contact NetSuite Customer Support.
Register backward compatibility - When upgrading to 2020.1.X from 2018.2 or 2019.1, only registers that have connected to the replication server within 10 days prior to the upgrade can be used in backward compatibility mode.
If a 2018.2 or 20191.1 register was not online within the 10 days, it will be unable to connect and must be restaged to 2020.1.X.
If you are using NSPOS 2018.2.X (Bundle 27525 or 399097)
Follow these steps to install the new 2020.1.X bundle 294243 and then uninstall the previous bundle for NSPOS 2018.2.X.
Reprinting Receipts - Any receipts generated using 2018.1.2.X will not be available for reprinting after your upgrade to NSPOS 2020.1.X.
The 2018.2.X reprint function was replaced in NSPOS 2019.1.X, and is considered to be obsolete.
Do not uninstall your previous bundle until you have installed the new bundle. Otherwise, you could lose data and the integration with NetSuite ERP will stop working.
Install bundle 294243 for NSPOS 2020.1.X:
-
Log in to NetSuite as an administrator.
-
Go to Customization > SuiteBundler > Search & Install Bundles > List.
-
Locate Bundle ID 294243 in the list.
If not found, tap New and search for
294243using the Keywords field. -
Click the Name by the Bundle ID.
-
Click Install.
-
NetSuite alerts you in red font if conflicts exist between your previous installation and the current installation.
If any of these conflicts appear, select Replace existing object. If you are unsure, contact NetSuite Customer Support.


-
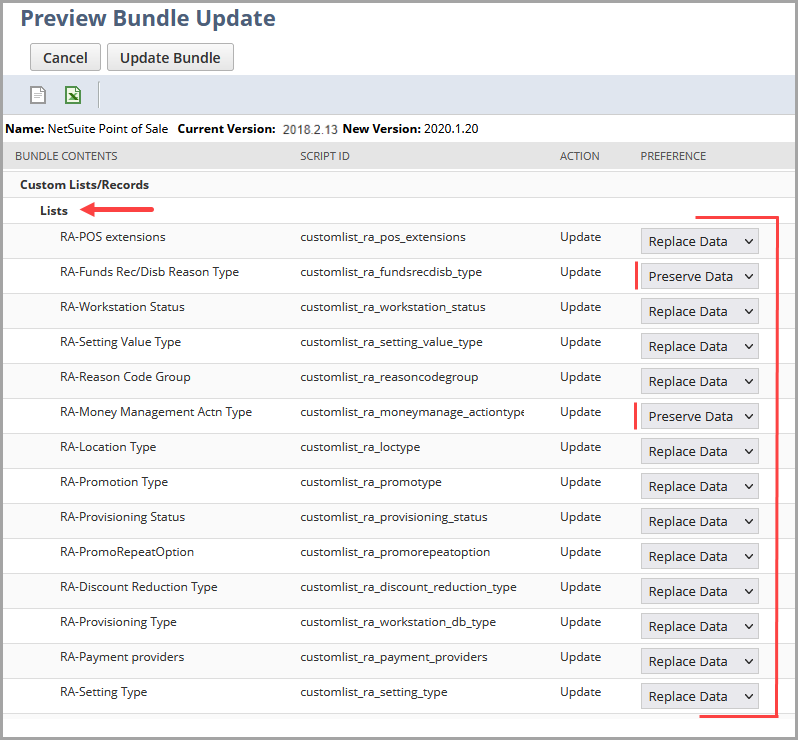
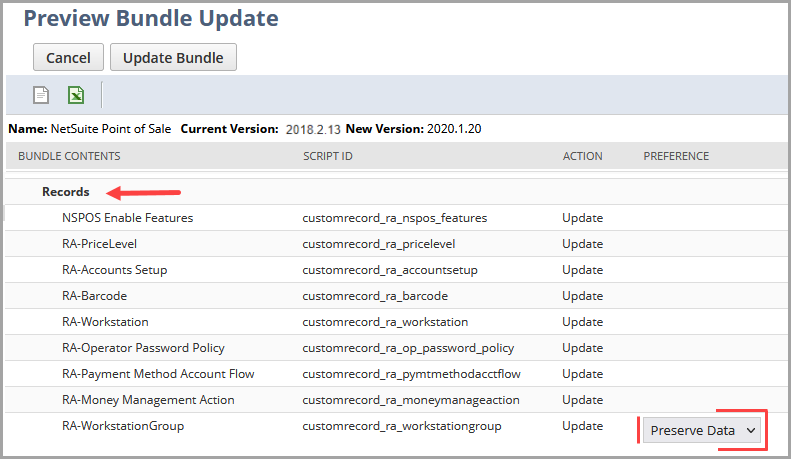
Review the Custom Lists/Records section to ensure the Preference column matches these images.
If not, select Replace Data or Preserve Data as shown.
-
After you have verified the Preference column, click Update Bundle to begin the installation.
-
Click OK at the prompt.
The Status column will display a green check mark when the installation is complete.
Do not uninstall a bundle until after the replacement is installed. Otherwise, you will lose data and the integration with NetSuite ERP will stop working.
Uninstall the NSPOS 2018.2.X bundle:
-
Log in to NetSuite as an administrator.
-
Go to Customization > SuiteBundler > Search & Install Bundles > List.
-
Locate Bundle ID 27525 or 399097 in the list.
-
Click the Name by the Bundle ID.
-
Click Uninstall.
-
Click OK.
If you are using NSPOS 2019.1.X (Bundle 294243)
Follow these steps to update your bundle 294243 from NSPOS 2019.1.X to 2020.1.X.
Update bundle 294243 to NSPOS 2020.1.X:
-
Log in to NetSuite as an administrator.
-
Go to Customization > SuiteBundler > Search & Install Bundles > List.
-
Locate Bundle ID 294243 in the list.
If not found, tap New and search for
294243using the Keywords field. -
A blue icon under the version number indicates that a new version is available. Using your mouse, point to the blue icon to display more information.
If you do not see the blue icon, your installed bundle is already up to date and no further action is required.
-
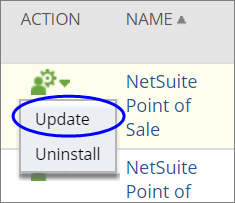
Using your mouse, point to the green icon and click Update. Allow time for the page to load
-
Review the updates to be installed.
-
NetSuite alerts you in red font if conflicts exist between your previous installation and the current installation.
If any of these conflicts appear, select Replace existing object. If you are unsure, contact NetSuite Customer Support.
-
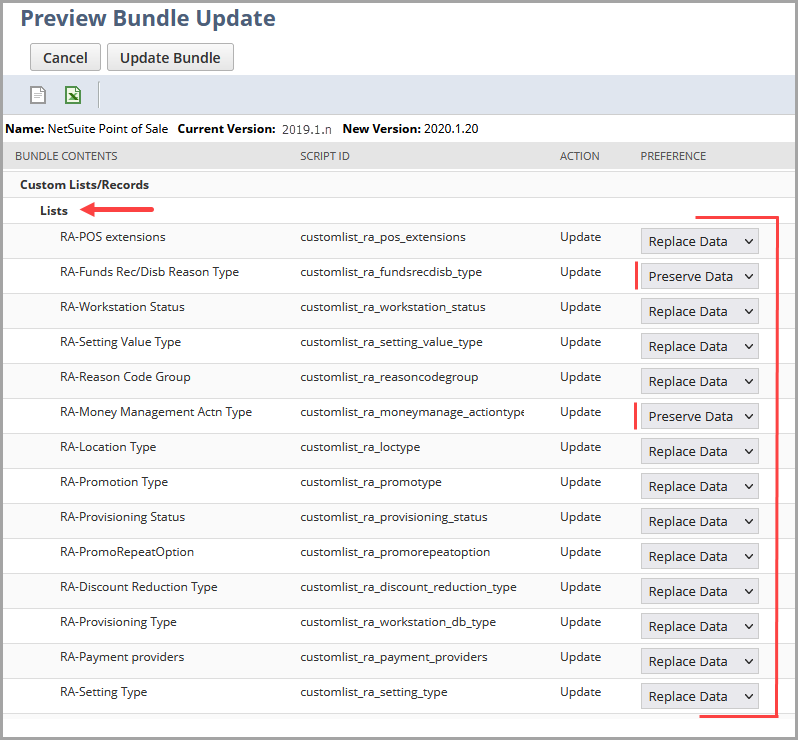
Review the Custom Lists/Records section to ensure the Preference column matches these images.
If not, select Replace Data or Preserve Data as shown.

-
Click Update Bundle.
-
Click OK at the prompt.
The Status column will display a green check mark when the installation is complete.
If you are using NSPOS 2020.1.1 (Bundle 294243)
Follow these steps to update your bundle 294243 from NSPOS 2019.1.X to 2020.1.X.
If you have already configured digital receipts, you should recheck that setup after the upgrade. The bundle change affects the digital receipt address and state fields. Some of this data will not be retained.
Update bundle 294243 to NSPOS 2020.1.X:
-
Log in to NetSuite as an administrator.
-
Go to Customization > SuiteBundler > Search & Install Bundles > List.
-
Locate Bundle ID 294243 in the list.
If not found, tap New and search for
294243using the Keywords field. -
A blue icon under the version number indicates that a new version is available. Using your mouse, point to the blue icon to display more information.
If you do not see the blue icon, your installed bundle is already up to date and no further action is required.
-
Using your mouse, point to the green icon and click Update. Allow time for the page to load
-
Review the updates to be installed.
-
NetSuite alerts you in red font if conflicts exist between your previous installation and the current installation.
If any of these conflicts appear, select Replace existing object. If you are unsure, contact NetSuite Customer Support.
-
Click Update Bundle.
-
Click OK at the prompt.
The Status column will display a green check mark when the installation is complete.