Facebook Share
Commerce web stores let you add a Facebook Share button on your Product Details Pages (PDPs) to help visitors to share items from your site. This button is enabled by default.
For sharing to work, you must obtain an appId from Facebook and associate the appId with your shopping domain. See the following help topics for more information:
Facebook Share
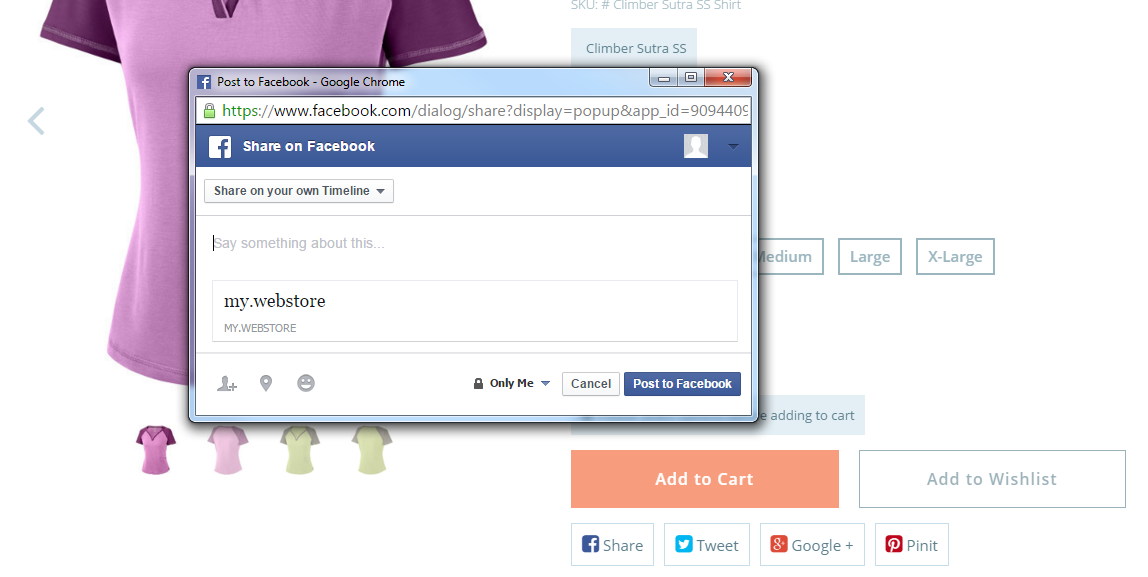
The Facebook Share button lets visitors share an item from your website on Facebook. When a visitor clicks the Share button, the Share on Facebook window displays and lets the visitor enter comments about the page and choose how it's shared. Sharing options include:
-
Own timeline
-
Friend's timeline
-
In a group
-
On a page the visitor manages
-
Private
If the visitor is not logged in to Facebook, then the Facebook login form is displayed first.
Facebook Open Graph
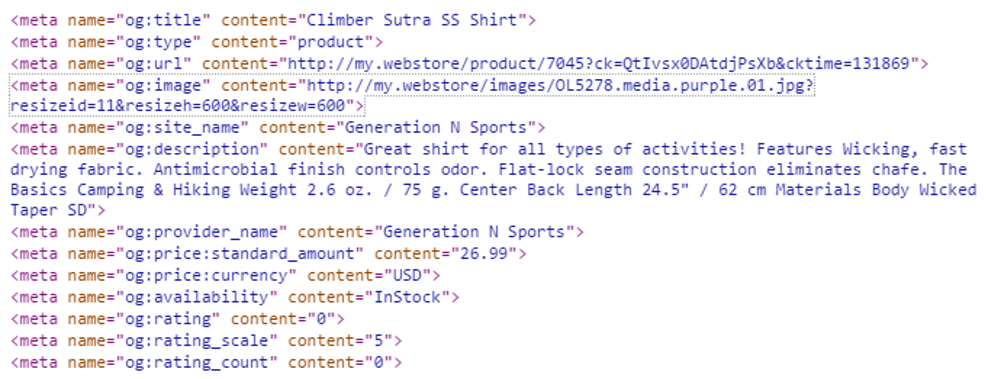
Facebook uses Open Graph markup for data collection. With this method, product metadata is included in the HTML header of the PDP. The following Open Graph metatag mappings for Facebook are defined in the SC.Shopping.Configuration.js file in the ShoppingApplication@x.x.x module:
            metaTagMapping: {
         // [Open Graph](http://ogp.me/)
         'og:title': seo_title
      ,   'og:type': seo_type
      ,   'og:url': seo_url
      ,   'og:image': seo_image
      ,   'og:site_name': seo_site_name
      ,   'og:description': seo_description
      ,   'og:provider_name': seo_provider_name
      ,   'og:price:standard_amount': seo_price_standard_amount
      ,   'og:price:currency': seo_price_currency
      ,   'og:availability': seo_availability
      ,   'og:rating': seo_rating
      ,   'og:rating_scale': seo_rating_scale
      ,   'og:rating_count': seo_rating_count
      }
The following screenshot shows Open Graph metadata included in the HTML header output of a PDP:
Configure Facebook Share
Follow the correct configuration procedures below, depending on the version of SuiteCommerce Advanced you're implementing. For information about configurable properties, regardless of your implementation, see Configuration Properties Reference.
See the Facebook developer documentation at https://developers.facebook.com/docs/plugins for more information about the Facebook Share plugin.
To configure Facebook Share properties:
-
Go to Commerce > Websites > Configuration.
-
Select your website and domain and click Configure.
-
Go to the Integrations tab and the Facebook subtab.
-
Configure the following properties as required:
-
Enable - Check this box to enable the Facebook sharing service.
-
Application ID - Enter your custom application ID to associate you domain to your application ID.
-
Facebook Popup Status - Select yes to enable the Facebook popup. Select no to disable it.
-
Facebook Popup Resizable - Select yes to make the Facebook popup resizable. Select no to restrict resizing.
-
Facebook Popup Scrollbars - Select yes to show scrollbars on the Facebook popup menu. Select no to hide them.
-
Facebook Popup Personalbar - Select yes to show a personal bar on the Facebook popup menu. Select no to hide it.
-
Facebook Popup Directories - Select yes to show a directories bar on the Facebook popup menu. Select no to hide it.
-
Facebook Popup Location - Select yes to show a location bar on the Facebook popup menu. Select no to hide it.
-
Facebook Popup Toolbar - Select yes to show a toolbar on the Facebook popup menu. Select no to hide it.
-
Facebook Popup Menubar - Select yes to show a menu bar on the Facebook popup menu. Select no to hide it.
-
Facebook Popup Width - Enter the width (in pixels) of the Facebook popup.
-
Facebook Popup Height - Enter the height (in pixels) of the Facebook popup.
-
Facebook Popup Left - Enter the left offset (in pixels) of the Facebook popup.
-
Facebook Popup Top - Enter the top offset (in pixels) of the Facebook popup.
For more information about the Facebook configurable properties, see Facebook Subtab.
-
-
Click Save.
To configure Facebook Share properties (SuiteCommerce Advanced pre-Vinson):
-
Create a custom ShoppingApplication@x.x.x module to update the
SC.Shopping.Configuration.jsfile. See Develop Your SCA Customization for instructions.Note:Don't edit the original
SC.Shopping.Configuration.jsfile. See Best Practices for Customizing SCA for information and best practices for customizing JavaScript.This task requires developer experience.
-
The Facebook share button is enabled by default, but you need to set the appId for your website. Other configuration options are available as shown in the following code snippet:
, facebook: { enable: true , appId: '123456789012345' , popupOptions: { status: 'no' , resizable: 'yes' , scrollbars: 'yes' , personalbar: 'no' , directories: 'no' , location: 'no' , toolbar: 'no' , menubar: 'no' , width: '500' , height: '250' , left: '0' , top: '0' } -
To disable Facebook Share, set the
enableparameter to false in thefacebookfunction. This removes the Facebook Share button from the PDP and disables Facebook functionality. -
Save and deploy to your website. See Deploy SCA Customizations to NetSuite for more information.
For detailed instructions about creating a custom SuiteCommerce Advanced module, see Develop Your SCA Customization.
Facebook appId and Domain Association
As part of configuring the Facebook Share button on your website, you must obtain an appId from Facebook and associate it with your shopping domain. To obtain the appId, register as a developer with Facebook at Create a Facebook for Developers account.
To obtain an appId and associate your domain:
-
Go to https://developers.facebook.com/apps/.
-
Click Create a New App.
-
In the Display Name field, enter the name of your web store or site.
-
The Namespace field is optional, but you can set it to a unique identifier for your app.
-
From the Category dropdown list, select the category that best describes your site.
-
Click the Create App ID button.
-
Complete the security check.
-
Click the Settings menu.
-
Click Add Platform.
-
Click Website.
-
In the Site URL field, enter the URL for your site.
-
In the App Domains field, enter your shopping domain.
-
Take note of the App ID. This is the value to enter as the appId in the shopping configuration file.
-
Click Save Changes.