Receipts
You can assist customers in NetSuite Point of Sale (NSPOS) by reprinting a receipt from a previous transaction. Typically customers request this for their record keeping or for submitting an expense report or purchase order. Also helpful is printing gift receipts that provide gift recipients with a method to return items without immediately knowing the value of the gift.
Reprint Receipt Using Receipt Search
Reprinting receipts is a vital function for many retailers. Use Reprint Receipt Search to find a prior transaction and print the associated receipt. You can print a receipt even if the original register was restaged and its database no longer has the requested transaction history. You can also use the receipt search request a receipt search using a register different from the original transaction register.
The feature works by leveraging your server connection to locate any transaction that occurred within the same Subsidiary.
Guidelines for using Reprint Receipt Search
The following guidelines apply:
-
Register used for reprinting must be online (connected to the replication server).
-
Original transaction register and register used for reprinting must both be in the same Subsidiary.
-
Reprints use the original receipt template. Logos and other images will use the most current image.
-
You can reprint using any supported printer.
-
Administrators can choose to enable an 'all-store' search or keep it limited to a 'same-store' search (default).
The search form has the option to Include server in search. Use this option to locate transactions made on other registers within the same store or on a register that was restaged after the transaction was made.

Administrators have a behind-the-scenes option to Include all stores in a receipt search. Because an 'all store' search can cause the query to run for an extended time, the form defaults to searching within the same store. The 'same store' default is also in place for retailers who do not perform business across store locations. There is no option on the search form to include all stores.
Using Reprint Receipt Search to Reprint
Follow this procedure to locate and reprint a receipt. Note that the more specific your criteria, the faster and more specific the results will be.
To reprint a receipt:
-
Tap Reprint Receipt Search.
-
At the Would you like to print the last receipt? prompt:
-
Tap Yes to print the receipt for the last transaction.
The receipt prints and the task is complete.
-
Tap No to search for a transaction.
Follow the remaining steps.
-
-
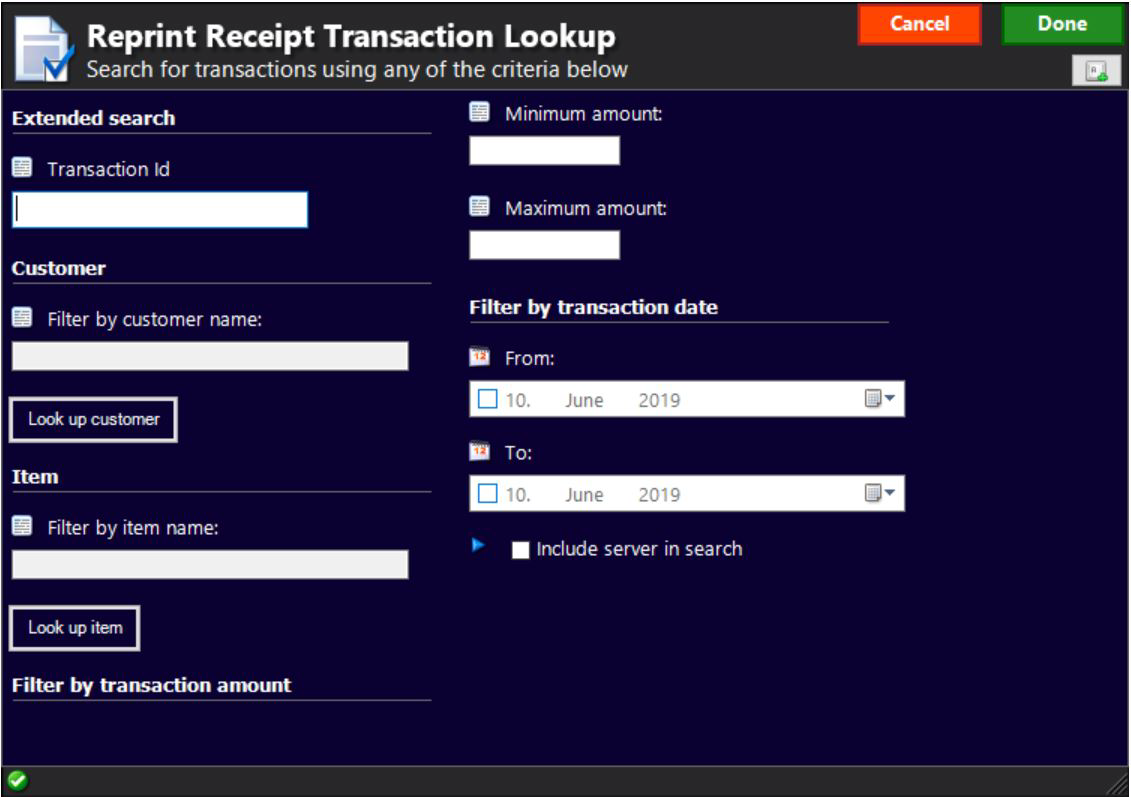
Enter search criteria in the form.
-
Transaction ID - If known, enter the complete ID. This method provides the fastest results.
Except for the Include server in search criteria, entering a Transaction ID causes the other search fields to become unavailable.
-
Customer - Enter a portion of the customer's name or tap Look up customer.
-
Item - Enter a portion of the item name or tap Look up item.
-
Transaction amount - Enter a Minimum amount or a Maximum amount to locate the transaction by how much the customer paid.
For example, if the transaction is estimated to have been over $30.00, enter 30.00 as the minimum amount. You can enter amounts in both fields to search within a range. Enter positive amounts, even if the transaction was a return that listed negative amounts.
Note:This form does not use decimal assumption to automatically add decimal places to an amount.
-
Transaction date - Enter a From or To date to locate the transaction by when it occurred. You can enter dates in both fields to search within a range.
-
Include server in search - If the transaction did not occur on the register used for the search, check this box to include all registers within the store.
Including the server also searches for transactions that took place before a register was restaged. If the register used in the search made the original transaction and has not been restaged since then, you can improve search efficiency by not checking Include server in search.
-
-
Tap Done.
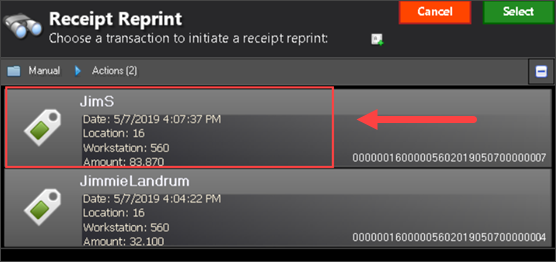
If no receipts match your criteria, NSPOS prompts you to search using different criteria.
-
Tap the desired receipt to print it.
Enabling Receipt Searches to Include All Stores
By default, searching past transactions to reprint a receipt is limited to the store in which the purchase was made. However, your business needs for reprinting receipts might include searching across all stores. This section describes how to enable the Include all stores in search option.
Although you can enable searching across all stores, note that it can slow down performance at the register. Depending on the number of stores and registers active in your business, the delay in returning the desired transaction could be long.
You can limit which registers can run an all stores search by choosing the appropriate tab. Options include limiting it to the registers in a Workstation Group, an individual register, or registers within a particular store.
-
Universal Settings - Enable the option from this tab to authorize all registers in all stores.
-
Group Settings - Open this tab to limit all store searches to registers within the enabling register's Workstation Group.
-
Workstation Settings - Open this tab to limit all store searches to the register used to enable the search option.
-
Store Settings - Open this tab to limit all store searches to registers within the enabling register's store.
The Reprint Receipt Transaction Lookup form will not show that "all stores" is enabled.
Including All stores in a search can slow down search performance. You should restrict the option to a subset of your total register count.
To Include All Stores in a receipt search:
-
Sign in to an NSPOS register as an administrator.
If you want to use Workstation Groups, then the register should be a member of the desired group.
-
Tap Manager Functions > System Configuration > Settings and Flags.
Or press Ctrl+F12, search for and tap
settings. -
Determine which registers can perform an 'all stores' search:
-
To enable the search option for all registers in all stores, keep the Universal Settings form displayed.
-
To enable the search option for only registers within the register's Workstation Group, tap Group Settings.
-
To enable the search option for this register only, tap Workstation Settings.
-
To enable the search option for only registers within this register's store, tap Store Settings.
-
-
Search for
all stores.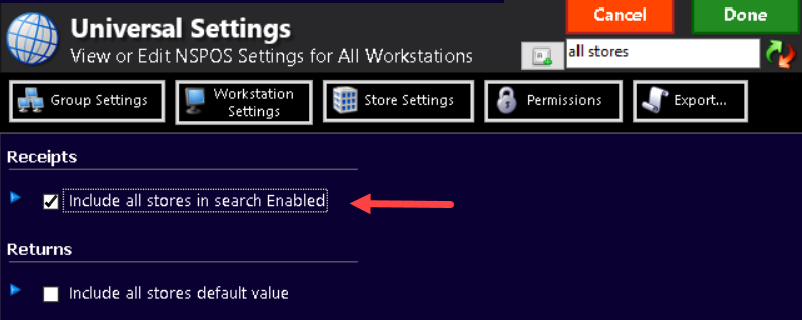
-
Check the Receipts > Include all stores in search Enabled box.
-
Tap Done.
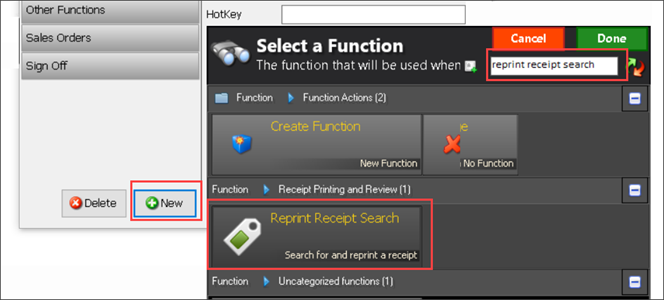
Setting up a Button to Search for and Reprint Receipts
To use the new Reprint Receipt Search feature, you can set up a new button or you can remap an existing button. One option is to remap your current Reprint Receipt button.
The button setup should be applied to one register in each Workstation Group. If you do not use Workstation Groups, you can use any NSPOS register to 'universally' set up the button.
The button will not appear on other registers until NSPOS is closed and restarted on those registers.
To set up a Reprint Receipt Search button:
-
Sign in to an NSPOS register.
-
Tap Manager Functions > System Configuration > Button Edit.
Or press Ctrl+F12, search for and tap Button Edit.
-
Select whether to place the button on the Side or the Main button bar.
-
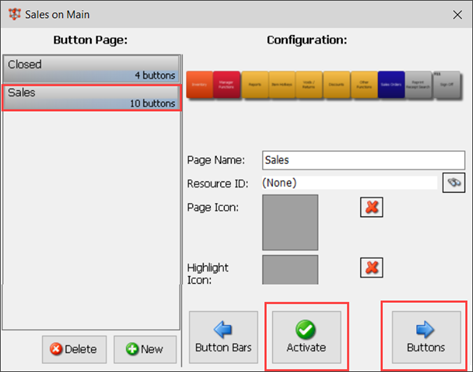
Tap Pages.
-
Tap the Sales or other row in the Button Page list.
-
Tap Activate so that you can see the changes immediately.
-
Tap Buttons.
-
Choose whether to create a new button or remap an existing button. Either:
-
Tap New to create a button.
-
Select an existing button to remap it. For example, you can remap your current Reprint Receipt button.
-
-
Search for
reprint receipt search. -
Tap Reprint Receipt Search.
-
Tap Done.
-
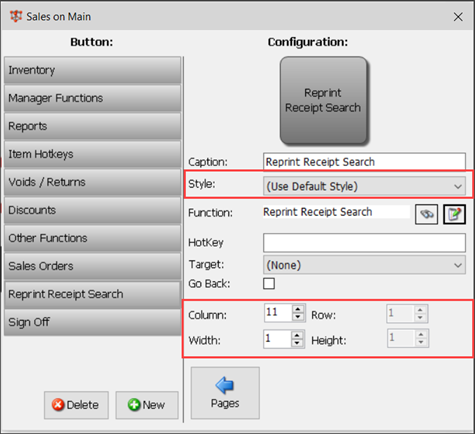
If desired, choose a color from the Style list.
-
Set the placement for your button by changing the Column and Row fields.
-
If you want to make your button smaller or larger, adjust the Width and Height.
 Tip:
Tip:Because you tapped Activate earlier, you can see the changes behind the edit form.
-
Close the Button Edit form when your setup is complete.
The button will not appear on other registers until NSPOS is closed and restarted on those registers.
If you use Workstation Groups, repeat these steps for one register in each group.
Print Gift Receipt
To ease making returns for a gift recipient, you can print a gift receipt for an entire transaction or only selected items from the transaction.
To print a gift receipt:
-
Tap Print Gift Receipt. This may appear under Other Functions.
-
Collect the two receipts that print. Give the summary version to the customer.
-
At the Would you like to print the last receipt? prompt:
-
Tap Yes to print the receipt for the last transaction.
-
Tap No to search for a transaction in the Past Retail Transactions list. Tap a transaction to print the receipt.
-
-
You have the option to print All Items from a transaction on the gift receipt or specific items only. After selecting items, tap Done to print.
The gift receipt prints.
About the Receipt Transaction Barcode
Each receipt includes a transaction barcode at the bottom. This barcode can be scanned to resume suspended transactions and return items. The details are included here for informational purposes only.
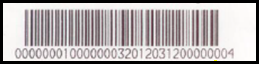
This 32-character code is divided into the following sections:
-
1 - 8 is the Store ID
-
9 -16 is the Workstation ID
-
17 - 24 is the Transaction Date
-
25 - 32 is the Transaction Number