Discounts
Based on your permissions, you can discount an item or an entire sales transaction. NSPOS offers many different discount functions. However, they are all based on the same five methods:
-
Item % Off - An item discount you enter as a percentage off the original item price. For example, reduce the price of an item by 25%.
-
Item $ Off - An item discount you enter in units of currency subtracted from the original price. For example, take $5.00 off an item's price.
-
Sale % Off - A sales transaction discount you enter as a percentage off the total sale. For example, 25% off the entire transaction.
-
Sale $ Off - A sales transaction discount you enter in units of currency subtracted from the total sale. For example, a $10.00 discount off the entire transaction.
-
Price Override - Depending on permissions granted for your setup, you can override the price of an item by entering a lower price. For example, a sales associate might lower the price of an item from $59.99 to $49.99 to match a competitor's price. A manager's approval may be required. Do not use Price Override to increase a price.
Your system administrator can define Reason Codes to track price changes. This provides visibility to discounts provided for specific promotions or for things such as sales of damaged merchandise. Discounts can also be removed at the item and sale total levels.
This section details the five main discount types. Also see Other Discounts and Actions for steps to apply other discount types and to void discounts from the current transaction.
Active promotions apply discounts automatically. When applied to an item, the promotion name appears in the item's Journal line.
How Multiple Discounts are Applied in NSPOS
When more than one discount is applied to an item, NSPOS applies each discount sequentially. The first discount is applied to the base price. The next discount is applied to the previously-discounted amount. This process continues until all eligible discounts have been applied. Multiple discounts are sometimes called "stacking discounts."
For example, an item is eligible for the following discounts
-
Discount 1 = 10%
-
Discount 2 = 10%
-
Item base price = $100
NSPOS applies the discounts as follows:
-
Discount 1 applied to $100 (base price): 100 - 10% = 100 - 10 = $90
-
Discount 2 applied to $90 (discounted price): 90 - 10% = 90 - 9 = $81
Final price = $81
Promotions with multiple discounts and promotions on items with other discounts are also calculated in NSPOS using this method.
By default, NetSuite ERP applies the first and subsequent discounts to the item base price only.
Applying Discounts at the Register
Use the procedures in this section to apply discounts as you are adding items to the register's journal.
-
Other Discounts and Actions
Item % Off
Follow these steps to discount an item by a percentage.
To apply an item % off discount:
-
Start a sales transaction.
-
Scan or select the item to discount.
-
Tap Discounts.
-
Tap Item % Off.
-
Enter the Discount % as a number, without the percent sign. For example, enter 10 for 10%.
-
Tap Enter or tap the green check mark.
-
Choose a Percent Discount Reason Code and tap Select.
-
Confirm the discount percentage and Reason Code appear for the item and that the discount has been applied to the Subtotal.
Item $ Off
Follow these steps to apply a discount to an item by a fixed amount.
To apply an item $ off discount:
-
Start a sales transaction.
-
Scan or select the item to discount.
-
Tap Discounts.
-
Tap Item $ Off.
-
Enter the Discount $ as a number, without a currency symbol. For example, enter 1.00 (or 100 with decimal assumption on) to apply a $1.00 discount.
-
Tap Enter or tap the green check mark.
-
Choose a Price Reduction Reason Code and tap Select.
-
Confirm the discount amount and Reason Code appear for the item and that the discount has been applied to the Subtotal.
Sale % Off
Follow these steps to discount an entire sales transaction by a percentage.
To apply a sale % off discount:
-
Start a sales transaction.
-
Tap Discounts.
-
Tap Sale % Off.
-
Enter the % Sale Discount as a number, without the percent sign. For example, enter 10 for 10%.
-
Tap Enter or tap the green check mark.
-
Choose a Percent Discount Reason Code and tap Select.
-
Confirm the discount percentage and Reason Code appear and that the discount has been applied to the Subtotal.
NSPOS spreads the discount equally among all items on the transaction. The discount is applied to the total - including sales tax - by reducing each item's price and tax in equal proportions.
Sale $ Off
Follow these steps to discount an entire sales transaction by a fixed amount.
To apply a sale $ off discount:
-
Start a sales transaction.
-
Tap Discounts.
-
Tap Sale $ Off.
-
Enter the Discount Amount as a number, without a currency symbol. For example, enter 1.00 (or 100 with decimal assumption on) to apply a $1.00 discount.
-
Tap Enter or tap the green check mark.
-
Choose a Price Reduction Reason Code and tap Select.
-
Confirm the discount amount and Reason Code appear and that the discount has been applied to the Subtotal.
NSPOS spreads the discount equally among all items on the transaction. The discount is applied to the total - including sales tax - by reducing each item's price and tax in equal proportions.
Price Override
You can choose this discount type to lower an item's price. The override applies to the current transaction only, and may require your manager's approval.
Use Price Override to lower a price only. Do not use it to increase a price.
To override a price:
-
Start a sales transaction.
-
Scan or select the item to override.
-
Tap Discounts.
-
Tap Price Override. A numeric keypad appears showing the original price for the item less any applied discounts or previous overrides.
-
Enter the New Price as a number, without a currency symbol. For example, enter 49.99 (or 4999 with decimal assumption on).
-
Tap Enter or tap the green check mark.
-
Choose a Price Override Reason Code and tap Select.
-
Confirm the new price and Reason Code appear for the item and that the new price has been applied to the Subtotal.
Other Discounts and Actions
NSPOS includes options for other discount types.
You can remove discounts applied to a transaction.
Manufacturer Coupon
A coupon is a form of discount. Coupons can be a set amount off an item's price, or they can be redeemed for free items. Sales associates typically scan coupons directly after scanning or selecting the item referenced in the coupon. Scanning a coupon usually means no further steps are necessary.
Follow these steps only if you need to manually redeem a coupon by entering the coupon details.
To manually redeem a manufacturer coupon:
-
Start a sales transaction.
-
Scan or select the item or items eligible for the coupon.
-
Receive the coupon from the customer.
-
Tap Discounts.
-
Tap Manufacturer Coupon.
-
Enter the Manufacturer Coupon Amount as a number, without a currency symbol. For example, if the coupon is $0.50 off, enter 0.5 (or 50 with decimal assumption on).
If the coupon can be redeemed for a free item, enter the value of the free item, subject to the maximum value shown on the coupon.
-
Tap Enter or tap the green check mark.
-
Confirm the coupon value is applied to the Subtotal.
Discounts for Damaged Items
You can apply a discount to the price of an item that is damaged.
To apply discount for damaged items:
-
Apply any of the discount types listed previously, such as Item $ Off.
-
Choose a Reason Code of Damaged.
-
Tap Select.
Damaged Items - If you have more than one of the same item on a sales transaction, and you apply a damaged item discount, that discount is applied to each item. For example, a $5.00 discount for one damaged item that is part of a quantity of three results in a total discount of $15.00.
To apply a damage discount to one item only, either apply a Sale $ Off discount to the entire sales transaction or enter the transaction with the damaged item appearing in a separate line.
Employee Discount
You can apply an employee percent off discount to all items in a sales transaction. Your system administrator has set the discount percent based on your store's policy.
To apply an employee discount:
-
Start a sales transaction.
-
Tap Discounts.
-
Tap Employee Discount.
-
Tap Enter or tap the green check mark.
-
Continue as a normal sales transaction.
Remove Item Discount
You can remove discounts manually applied to single items.
To remove an item discount:
-
Select a discounted item.
-
Tap Discounts.
-
Tap Remove Item Discount(s).
-
At the How would you like to remove discounts? prompt:
-
Tap Last One to remove only the most recent discount applied to that item.
-
Tap All to remove every discount applied to that single item. This function only removes discounts for the line item that you selected. It does not remove discounts applied to other items in the transaction.
-
Remove All Discounts
You can remove all discounts manually applied to the sales transaction.
To remove all discounts:
-
Tap Discounts.
-
Tap Remove Sale Discounts or Remove All Discounts.
-
At the Are you sure you want to remove all discounts? prompt, tap Yes.
Maximum Discount Limits and Manager Approvals
To prevent excessive discounts from being applied manually, NSPOS includes settings to limit the maximum amount or percent off available to be given at the cashier's discretion. An amount or percentage exceeding that limit requires a manager's approval.
For example, with a maximum amount off limit of $10.00:
-
If a discount added by the cashier is $10.00 or less, manager approval is not required.
-
If a discount added is $10.01 or greater, the cashier must get a manager to approve the discount.
The amount-off limit includes price overrides. The discount amount for overrides is the difference between the override price and the price shown in the journal.
Performing a Manager Approval
If a cashier attempts to add a discount greater than the maximum discount limit, they receive a prompt as follows. The prompt includes the discount requested and informs the cashier of the need to get approval.
The manager logs in using the fields included in the prompt and taps Confirm to make the approval.
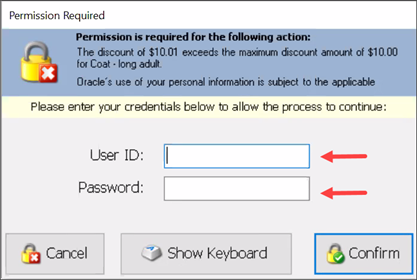
Approvals can be made by any user with a role higher than Specialist (Resource ID 2). Typically, cashiers have a Specialist role. Higher roles include Manager (Resource ID 9070) and System Administrator (Resource ID 9090). See Roles to Grant Permissions.
Manager-role access ends when the approval is complete. The manager is automatically logged out after tapping Confirm. The cashier does not receive enhanced access from the manager having logged in to make the approval.
If a Manager adds a Discount greater than the Maximum
If a manager is logged in and working the transaction, that manager receives a different prompt when attempting to exceed a maximum discount limit. The prompt includes information about the discount limit and a Yes or No option to proceed.
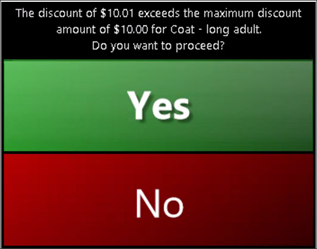
If the manager taps Yes, the discount is applied. If the manager taps No, they receive a prompt listing that the discount exceeded the maximum and was not applied.

Setting Discount Limits
Administrators configure maximum discount limits through NSPOS settings. The two settings for discount limits are:
-
MaxDiscountAmount - Applies to amount-off item or sale discounts, percent-off item or sale discounts, and item price overrides.
-
MaxDiscountPercent - Applies to percent-off item or sale discounts.
For both maximums, cashiers can apply discounts up to and including a setting's value. For example, with MaxDiscountPercent limit of 10, an approval is required for discounts of 10.01% or greater.
These limits are reviewed as follows when a sales associate applies a discount to a transaction:
-
Discount Amount (Item $ Off, Sale $ Off) - When applied, NSPOS verifies that the calculated discount is not higher than the set MaxDiscountAmount.
-
Discount Percent Item (Item % Off, Sale % Off) - When applied, NSPOS verifies that the calculated discount is not higher than the set MaxDiscountPercent and MaxDiscountAmount.
-
Price Override (New Price) - When applied, NSPOS verifies that the calculated discount is not higher than the set MaxDiscountAmount.
See Flags and Settings for the steps to configure a setting. Enter maximum values as a number, without a currency symbol or percent sign.