Employees and NSPOS
This section is a guide to setting up and managing your employees that perform tasks or need access to NetSuite Point of Sale (NSPOS).
Also see Working with the optional Time Clock in NSPOS.
NSPOS application menus might use the term operator instead of employee. Unless required for making an entry or adjustment in the application, we use the term employees in this guide.
Employees Roles, Passwords, and Idle Time-outs
Use these topics to assist your employees with their NetSuite Point of Sale (NSPOS) access levels, passwords, and other NSPOS access tasks.
Typical NSPOS Employee Roles
The following are the employee types in a typical NSPOS setup. These types and their access levels are set using Roles to grant the required permissions.
-
Sales Associates - Perform sales transactions and work with customer information.
-
Specialists - Perform tasks that require training and responsibilities beyond a basic sales associate.
-
Openers/Closers - Perform sales associate and specialized tasks plus can be delegated to perform beginning of day and end of day till tasks.
-
Managers - Perform beginning of day and end of day till tasks, can sign in during transactions to authorize discounts or other overrides, run reports and assist employees with optional time clock issues.
-
Administrators - Set up employees, configure NSPOS to fit business needs, perform other tasks described in this guide.
The list of duties isn't comprehensive. These are brief descriptions only; you might have roles or positions that are specific to your business.
To match the term used on certain pages within the NSPOS application, some topics or steps use operator to refer to an employee.
Roles to Grant Permissions
In NSPOS, we grant permissions using roles or groups that are assigned to Resource IDs.
For the steps to change a role, see Changing an Employee's Security Role.
|
Employee/Operator Role/Group |
Operator Role/Group ID |
Resource ID |
|
Sales Associate, Cashier, xPOS Access |
100 |
2 |
|
Specialist |
200 |
2 |
|
Opener / Closer |
500 |
9050 |
|
Manager |
700 |
9070 |
|
System Administrator |
900 |
9090 |
Each Resource ID gives a basic set of permissions that for retail transactions, such as processing sales, taking returns, applying discounts and entering customer information. Managers are assigned roles with Resource IDs that have greater permissions, allowing overrides and other high-level functions not available to sales associates. Administrators have Resource IDs that let them access and configure almost any area in the NSPOS application.
If an employee or operator tries to use a function their Resource ID doesn't allow, an authorization override window displays that may include manager steps for authorizing the employee/operator to proceed.
As an administrator, you can adjust security by assigning roles and adjusting the Resource IDs required to access function buttons and pages. This chapter lists steps to adjust security roles at the employee level only. To adjust the role needed to access a function, see Set Button Security and Set Page Security. Most setup tasks, like editing an existing employee/operator or unlocking an account, require 9090 level access.
Authentication
An employee/operator logs into NSPOS with a User ID and Password. The User ID is the RA-Operator ID set up on their employee record (RA-Employee Form) in NetSuite ERP.
The "accountability" method for till and cash drawer management determines if one User ID can log into multiple registers at the same time.
-
If you use Operator Accountability for till management, a User ID can only log into one register. If an employee moves to another register, they must log out of the current register.
-
If you use Register Accountability for till management, a User ID log into multiple registers. This setup is sometimes called "parallel" or "concurrent" authentication.
For more information about till accountability methods, see Register (Till) Accountability vs. Operator (Till) Accountability.
Passwords
Signing into NSPOS requires entering a User ID and Password. NSPOS uses Payment Card Industry (PCI) Software Security Framework (SSF) guidelines to determine requirements for setting and maintaining passwords. See Appendix: PCI SSF Information for NSPOS.
Password Requirements
-
Employee passwords for NSPOS are only valid on registers within their assigned locations
-
If an employee record is inactivated, that employee's NSPOS password won't work at their assigned locations.
-
Employees with an NSPOS Manager role can unlock associate accounts and reset passwords. Managers can perform these tasks only for roles with fewer permissions (lower access levels), such as Sales Associate, Specialist, and Opener/Closer.
This password feature is disabled by default in the RA-Setting record.
To enable managers to unlock accounts and reset passwords:
-
Log in to NetSuite as an administrator.
-
Go to Customization > Lists, Records & Fields > Record Types.
-
Locate RA-Setting and click List
-
Find Allow Managers to Manage Passwords and click Edit.
-
Check the Value box to enable this password feature.
Or clear the box to disable the feature.
-
Click Save.
Warning:Don't edit other RA-Setting options unless you're trained to do so or receive specific instructions. Incorrectly changing a setting could impact your NSPOS processing,
By default, employees set up prior to upgrading to NSPOS 2020.1.X can log in at any location.
If an employee is inactivated in NS ERP by mistake or if an employee returns to active work after their record was inactivated, it's best to set them up as a new employee. See Setting up a New Employee.
How Employees Change Their Password
Applies to NSPOS 2024.1 and later.
Employees with access to NSPOS can change their password without assistance. The administrator can still set the requirements for employee password length, format, and lockout actions.
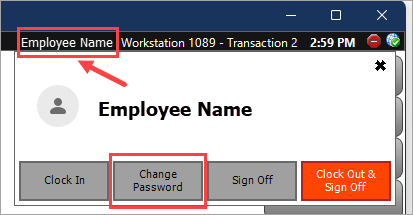
Employees can't change their password if a transaction is open in the journal. NSPOS automatically checks for open transactions when the employee taps Change Password.
The password length, format, and lockout requirements for your employees can be set by your administrator. To review the default password-policy for non-administrator roles and to find steps to adjust that policy, See Configuring Password Requirements by Role in NSPOS.
The employee password feature is available only on registers running NSPOS 2024.1.X or later. For registers using backward compatibility to remain on a prior release, an administrator must continue to make all password changes.
NSPOS includes an optional time clock feature that a business can use for employees to Clock In and Clock Out of their shifts. If your business does not use this feature, your employees should ignore these options. For information about using this feature, see Working with the optional Time Clock in NSPOS.
Location and Working Hours Restrictions
You can set up employee location-restrictions in NetSuite ERP that limit where an associate can log in. You can also restrict access to only the working hours assigned to the employee's normal shift.
You can modify location and working hour assignments as needed.
Location Restrictions
You can limit the locations in which a cashier, sales associate, or other employee can log into an NSPOS register. By specifying the authorized locations, the employee will be unable to log in at other 'unassigned' locations.
Multiple locations can be authorized, with the default for new and existing employees being 'all locations.' Locations can be assigned using the employee record in NetSuite ERP or the management function in NSPOS. A store manager (Resource ID 9070) or administrator (Resource ID 9090) might use the NSPOS option to change location restrictions from an NSPOS register.
If no location is set up for an employee, and they no longer have the 'all locations' default, they cannot log in to any register in any location.
If a manager edits their own employee record and removes their access to the location from which they are currently logged in, they will be unable to log back in at that location.
If an employee must work another employee's shift at a location to which they are not assigned, the store manager or administrator can use these steps to authorize the location to that employee.
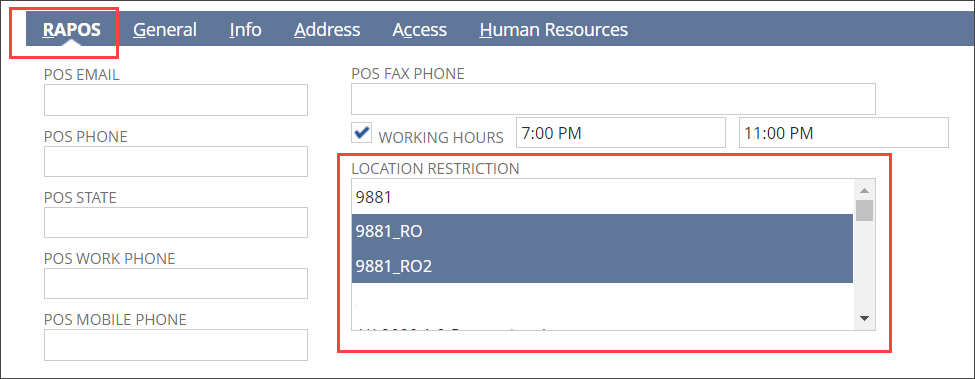
To set up location restrictions in NetSuite:
-
Log into NetSuite.
-
Go to Lists > Employees > Employees.
-
Click Edit for the employee to assign locations.
Important:Although the default is 'all locations,' if you Edit an employee record, you must set up their location restrictions.
-
For Custom Form, select RA -Employee Form.

-
On the RAPOS subtab, under Location Restriction, highlight one or more locations for which the employee should have access.
This "restricts" the employee to only logging into NSPOS at those locations.
Tip:Press the Ctrl key to select multiple locations. If no locations are highlighted, the employee can log into all locations.
-
Click Save.
Note: After setting up a location restriction, there is a brief delay needed to synchronize the restriction between the replication server and NetSuite ERP.
To review location assignments, click View on the employee's record and open the Custom subtab.
If a location assigned to an employee is set to Inactive, viewing the employee's record will still show the assignment. Editing the employee record will remove the assignment.
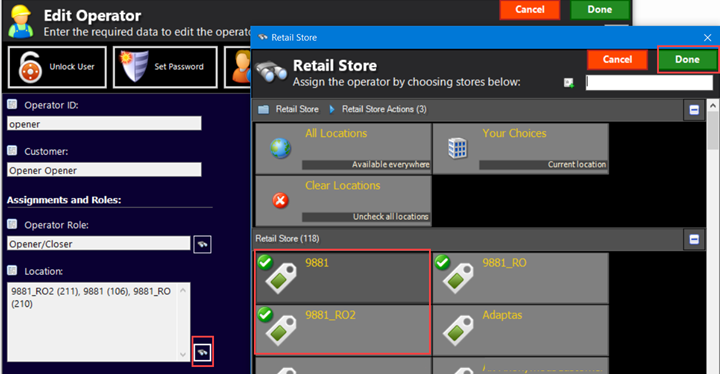
To set up location restrictions in NSPOS:
-
Press Ctrl+F12 on the keyboard to open the Function List.
-
Enter part of the employee's name
receiptsin the search field. -
Tap the employee's name.
-
Under Location, tap the 'binoculars' search icon.
Tap the locations to which the employee should have logon access.
Tip:To grant an employee access to all locations, highlight all locations.
If your list of locations is large, enter search criteria at the top to display a specific location.
-
Tap Done to close the location list.
-
Tap Done to save the restriction assignments.
If a manager edits their own employee record in NSPOS and removes access to the location from which they are currently logged in, they will be unable to log back in at that location.
No Temporary Override for Locations
You can't temporarily override a location restriction. If an employee needs a temporary authorization, a manager or administrator can create a 'new' employee and authorize them to the location.
If an employee needs to work another employee's shift at a location they're not assigned to, the store manager or administrator can use the previous steps to add the location.
Working Hour Restrictions
Use the NSPOS working hours feature to limit register access by the hours assigned to an employee's shift. This prevents an employee from logging in outside of those hours, and will automatically log off an employee when their working hours end. The employee is prompted on the register 15 minutes before they are logged off.
This feature helps manage overtime hours and prevents unauthorized access when a store isn't open. By default, employees have no working hour restrictions.
Things to note:
-
Working hours run from 12:00 AM to 11:59 PM in the register location's time zone
-
Working hours apply to all seven days of the week.
-
Working hours are set and can be viewed in NetSuite ERP
-
Working hours aren't available for viewing from an NSPOS register
-
Working hours can be temporarily extended for up to 12 hours
If a scheduled employee isn't available for a shift, their substitute's working hours can be extended. However, the substitute must be authorized to work in the location.
Working hours are set within a 24-hour period that starts and ends at midnight. You can't set up 'night shift' hours that overlap the midnight transition.
At Working Hours Shift End
Before automatically logging off an employee, NSPOS verifies whether a transaction is open (in progress) on the register. This prevents data loss and avoids impacting your business.
-
If there is an open transaction, the log off is paused until immediately after the transaction closes
-
If there are no open transactions, the log off happens as expected
To set up working hours for an employee working in NSPOS:
-
Log into NetSuite.
-
Go to Lists > Employees > Employees.
-
Find the desired employee and click Edit.
-
For Custom Form, select RA -Employee Form.
-
Open the RAPOS subtab.
-
Check the Working Hours box.
-
Enter the Shift Begin and Shift End times.
Working hours apply to all seven days of the week.
Important:Employees can't log into NSPOS until their working hours begin. If an employee needs to log in before their shift to prepare the cash drawer or perform other register tasks, set their hours to begin at least 30 minutes early.
-
Click Save.
To review a working hours assignment, click View on the employee's record and open the Custom subtab.
Extending a Working Hours Shift
When the employee receives a 15 minute log off alert, an option is provided for a store manager (Resource ID 9070) or administrator (Resource ID 9090) to extend their shift. A shift can be extended up to 12 hours and is entered in minutes, from 1 to 720. The default time to extend is 15 minutes.
If a shift extends past midnight local time, you'll need to enter a new extension at midnight.
Lockouts after Invalid Sign-on Attempts
NSPOS will lock out an employee after five failed sign-on attempts due to entering an incorrect password. This blocks the employee's access to the register. Administrators are responsible for unlocking accounts. See Unlocking an Employee NSPOS Account. Contact NetSuite Customer Support if you need more information or assistance.
Idle Time-outs
It is important that an NSPOS register not be left unattended with an employee logged into Sales Mode. Depending on the logged in Role and NSPOS release, the register will automatically switch to Closed Mode after a certain amount of time has passed without any input.
For till management using "Operator (Till) Accountability," an idle time-out is treated the same as choosing Lock, keeping the cashier logged in and their till restricted to use on that register only. See Register (Till) Accountability vs. Operator (Till) Accountability.
-
Idle Time-outs
For the administrator role, a register left idle for 15 minutes will log the administrator off and switch to Closed Mode. Access to NSPOS from the register is denied until an administrator or other role signs on again.
For all other roles, administrators can set the desired idle time-out period. See Configuring Password Requirements by Role in NSPOS and review the setup for Auto Lock Down Period in Minutes.