Setting up a New Employee
As an administrator, you manage the NetSuite Point of Sale (NSPOS) employee setup for your business using the NetSuite online application and manager tools in NSPOS. The setup has two parts:
Some steps use the term operator to refer to the NSPOS employee.
You should use NetSuite ERP first to set up a new employee record, followed by the Edit Operator steps at an NSPOS register.
If you do not have access to NetSuite ERP, the NSPOS Create Operator option will provide a new employee with a logon to the register. NetSuite will automatically create the employee's record after the next server synchronization.
Create the NSPOS Employee record and RA-Operator ID in NetSuite ERP
This task requires an administrator login to NetSuite. The RA-Operator ID becomes the User ID the employee uses to sign in at the register.
To create an employee and assign an ID:
-
Log in to NetSuite ERP as an administrator.
-
Go to Lists > Employees > Employees > New.
Note:To update an existing employee, go to Lists > Employees > Employees > Search.
-
Under Custom Form, select RA-Employee Form.
-
For RA-Operator ID, enter the User ID the operator will use to sign on to NSPOS. Common choices are your internal employee number or the operator's first initial, last name. Do not include spaces.
Important:The RA-Operator ID is also the user's temporary password. You will change this in the NSPOS steps.
Note:The password fields under Access are for signing into the NetSuite online application. Because most employees will not need this access, you can leave these fields blank.
-
Enter the employee's Name. Other informational fields, such as Phone and Email, are optional.
-
On the Info subtab, select the employee's Subsidiary company. This is the company or division under which they will work. Select Parent Company to allow all subsidiaries.
-
Click Save.
-
Allow at least 15 minutes for this information to synchronize with your NSPOS registers.
Complete the Employee/Operator Setup in NSPOS
Follow these steps to complete the operator setup for the employee by assigning a location and setting a role to manage access.
About employee customer records: To simplify administration and because employees often make purchases as customers, each employee with access to NSPOS is associated behind the scenes with a customer record. This customer record is automatically assigned to the Employee customer group and may be eligible for any automated employee discounts you offer.
To complete the operator setup in NSPOS:
-
Press Ctrl+F12.
-
Search for
edit operator. -
Tap Edit Operator.
-
Search for the new operator by last name or open an operator group.
-
Tap the operator record to open.
-
Adjust the Operator Role and Location as needed.
-
Operator Role - By default, the Operator Role is set to Specialist or Cashier (sales associate). You can change this to Manager or another role by tapping the browse icon.
The ability to quickly change roles is helpful for when you need to temporarily assign a sales associate/cashier to a manager role to cover a shift. You can reverse this later.
-
Location - By default, new operators can work at any Location, but you can limit this by tapping the browse icon and choosing locations.
-
-
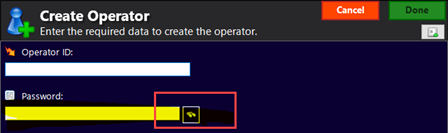
Tap the Password search icon and enter the password in the form that displays.
If a password doesn't meet the current policy, the requirements for the role display to guide you.

-
Click OK to close the form. to set the new operator's password.
-
Tap Done when all required fields for your business are complete.