Customizing the Revenue Recognition Approval Workflow
You can customize the Revenue Recognition Approval Workflow by enabling only the features that suit your business requirements. You can change the email notification and add substitute approvers to the approval routing. If you want to update the amount validation criteria, use either the total revenue amount or total carve-out to compare with the limits. You can also add components, conditions, and triggers that change the approval routing process. When planning your customization, you can review the workflow process in the following topics:
Making a Copy of the Revenue Recognition Approval Workflow
To begin your customization, you must create a copy of the workflow.
To make a copy of the workflow:
-
Go to Customization > Scripting > Workflows.
-
From the workflows list, click the link for the Revenue Recognition Approval Workflow.
-
On the workflow page, point to the More link and then select Make Copy.
The default workflow states, actions, and other components are copied to your custom workflow. For detailed instructions, see Copying a Workflow.
After completing your customization, you can run the workflow in testing or released mode. Before releasing your custom workflow, ensure that the original Revenue Recognition Approval Workflow is not running. For more information, see Running the Revenue Recognition Approval Workflow.
The instructions in the following sections show you how to update components specific to the Revenue Recognition Approval Workflow. For topics about adding or changing workflow components, see Working with Workflows. For detailed instructions to customize each workflow component, you can view the topics for states, conditions, actions, and custom fields.
Setting the Amount Validation Field
Revenue arrangements can be validated using its total revenue or total carve-out amount. By default, the amount validation field uses the total revenue amount. You can change the default on workflow states that run the actions and transitions for the amount validation.
If you change the amount validation field for the action, you must also change the field for the transitions of all affected states.
The following instructions apply only to the General Limit Check state, which runs the action for the amount validation.
To set the amount validation field for an action:
-
On the workflow diagram, double-click the General Limit Check state.
-
On the Workflow State page, click the Actions subtab.
-
In the list of actions, click the Edit link for the Set Field Value action with the following parameters: [RRAW] Total Revenue Amount = Total Revenue Amount.
![Screenshot of the Actions subtab on the Workflow State page, focused on the Set Field Value action with the parameter [RRAW] Total Revenue Amount = Total Revenue Amount](img/Accounting/RevenueExpenseRecognition/RevRecApproval_TotalRevenue.png)
-
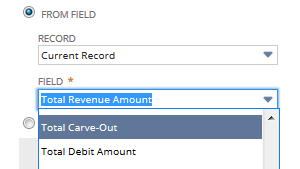
On the Workflow Action page, in the Value section, select your option in the Field field: Total Carve-Out or Total Revenue Amount.
-
Click Save.
The following instructions apply only to the following states that run the transition for the amount validation: Pending Approval, Approved, and Rejected.
To set the amount validation field for a transition:
-
On the workflow diagram, double-click the state to be updated.
Note:You must update the field for the three states that run the amount validation.
-
On the Workflow State page, click the Transitions subtab.
-
In the list of transitions, click the Edit link for the Resubmit transition.
-
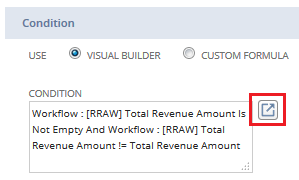
On the Workflow Transition page, in the Condition section, point to the area beside the Condition field, and then click the Open icon.
This opens Visual Builder where you can select the amount validation field for the condition of the transition.
-
On the Workflow Condition page, do the following:
-
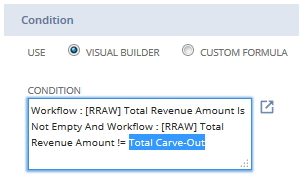
In the Field column, look for the [RRAW] Total Revenue Amount (Workflow) field.
-
In the Value Field column, select Total Carve-Out or Total Revenue Amount.
![Screenshot of the Workflow Condition page, focused on a row with [RRAW] Total Revenue Amount (Workflow) in the Field column and showing options in the Value Field column](img/Accounting/RevenueExpenseRecognition/RevRecApproval_Field.png)
-
Click OK to save your selection.
-
Click Save to save the updated condition.
The Condition field shows your updated selection for the amount validation field.
-
-
Click Save to save the updated workflow transition.
Changing the General Limit
Upon entry of a revenue arrangement, the workflow validates its amount using the general limit. The limit is set to 10000 by default. You can set your own limit by updating the General Limit field on your custom workflow.
To change the general limit:
-
In the context panel of the workflow, click the Workflow tab, and then click the Fields view.
-
From the list of fields, select General Limit to open its record.
-
On the Workflow Field page, click the Validation & Defaulting subtab.
-
In the Default Value field, enter the new value for the general limit.
-
Click Save.
The new general limit applies to transactions submitted after your update. An existing transaction in Pending Approval status would've already been validated against the old general limit. However, if the transaction is resubmitted after the update, it's validated against the new general limit.
Updating an Email Notification
You can change the content of the approval or rejection email on any of the following states: Pending Approval, Rejected, Approved. To find out which state to update, click a state from the workflow diagram. Review the details of the state in the context panel. Look for the Send Email action row and display its parameters by hovering over the row.
To update an email notification:
-
On the workflow diagram, double-click the state.
-
On the Workflow State page, click the Actions subtab.
-
In the list of actions, click the Edit link for the Send Email action that contains the message to be updated.
-
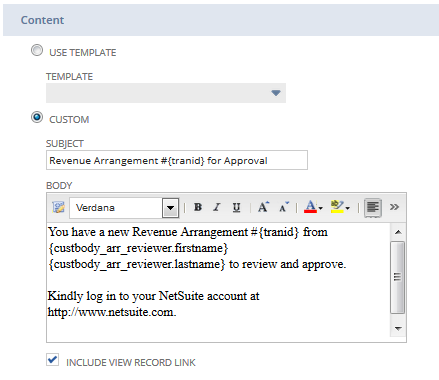
In the Content section, you can edit the body and subject of the email in their appropriate fields.
For more information about updating workflow emails, see Send Email Action.
-
Click Save.