Setting Up Quotes in SCIS
In NetSuite, you can give customers an estimate before the order is accepted. In SuiteCommerce InStore (SCIS), estimates are called Quotes. A sales associate can create a quote in SCIS based on items and discounts in the cart, and then print or email it to the customer. After the customer reviews the order amount, the sales associate can make changes as needed, and then convert the quote into a sales order or cash sale.
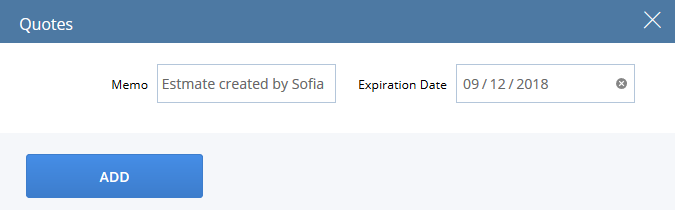
As the NetSuite administrator, you define which fields are displayed in the Quotes entry form in SCIS. In SCIS, the sales associate enters information in the required fields. Any sales associate can use SCIS to find a quote and convert it to a sale. You can find existing quotes by scanning the transaction number displayed on the receipt, or by typing the transaction number or the customer's name in SCIS.
To set up quotes in SCIS, you must complete the following tasks:
Permissions for Quotes
The sales associate must have permission to create Estimates. To grant additional permissions to sales associates, you must modify the SCIS Clerk role. Also, check that permissions are set properly for creating quotes.
To work with quotes in SCIS, a role with edit-level permission for the Estimate transaction is required. For more information about role-based permissions for SCIS, see SuiteCommerce InStore Roles.
To check that permissions for Quotes are set appropriately:
-
Go to Customization > Lists, Records, & Fields > Record Types.
-
Find SCIS Permission, and click List in that row.
-
On the SCIS Permission records for quotes, ensure that the expected roles appear in the list of Authorized Roles. For example, if you want sales associates to enter and modify quotes, the SCIS Clerk role must be an Authorized role.
Click Edit next to the following roles:
-
QUOTES_CONVERT
-
QUOTES_CREATE
-
QUOTES_UPDATE
-
-
Click Save after making changes.
Defining Fields for Display on the Quote Form in SCIS
To configure the entry form used for Quotes in SCIS, an administrator must create a copy of the default saved search, and then modify the CustomConfiguration.js file. By creating a modified copy of the default saved search, you can define which fields appear in the popup window presented to the sales associate in SCIS. In the configuration file, you define the search you want to use in SCIS.
To create a modified copy of the saved search for quotes:
-
Go to Reports > Saved Searches > All Saved Searches.
-
Click Edit next to SCIS Estimate Header Fields.
-
Check the Public box.
-
Click the Results subtab. Select the fields you want to display in the Quotes popup window.
Important:Ensure the fields that are on the original saved search also exist on your customized saved search. If you've created a custom Quote form with custom fields, you should be able to select those fields on the Results subtab.
-
Click Save.
To define your saved search for quotes in the CustomConfiguration.js file:
-
Go to Commerce > Hosting > Website Hosting Files.
-
Find the SuiteCommerce InStore folder in the File Cabinet. Go to Web Site Hosting Files > Live Hosting Files > SSP Applications > NetSuite Inc. - POS > SuiteCommerce InStore
-
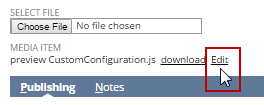
Click Edit next to CustomConfiguration.js.
-
In the file record, click Edit.
-
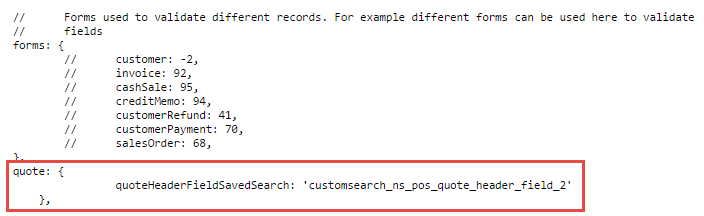
Add the following line in the CustomConfiguration.js file, after the section where forms are defined. Replace
'customsearch_xxxx_xxxx_xxxx'with the ID for the custom search you want to use.quote: { quoteHeaderFieldSavedSearch: 'customsearch_xxxx_xxxx_xxxx' },Note the following example:
After you modify the saved search, a sales associate can click Quotes in SCIS to open the popup window and enter information in the fields you've defined.