Shift4 UTG
NetSuite's integration with the Shift4 UTG (Universal Transaction Gateway) payment gateway provides EMV and other functionally for your NSPOS setup. To begin your setup with Shift4, visit their site at www.shift4.com. Then review and follow the sections in this topic.
Setting Up Shift4 UTG
Follow the steps in this topic to set up Shift4 UTG.
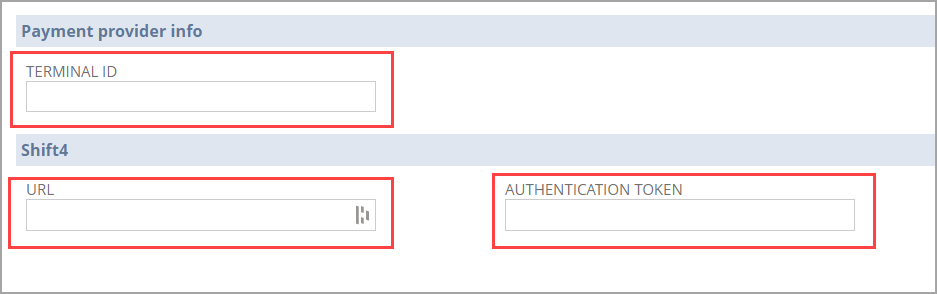
Before starting, you must have the following ready for each RA-Workstation on which you want to configure and use the Shift4 gateway.
Terminal ID: This is the serial number found on the register credit card PIN pad or swipe device. It is usually an 8-digit number. On many devices, this ID displays during the initial power-up.
URL: This is the URL/ IP address of the server running UTG.
Authentication Token: Each RA-Workstation record requires a unique Authentication Token. This can be obtained from the Shift4 Portal. Shift4 will provide you with the information needed to access their portal, and they are available to help you with this process.
The following steps require an update to each RA-Workstation record for which you want to configure and use the Shift4 UTG gateway.
To set up Shift4 UTG:
-
Log in to NetSuite as an administrator.
-
Go to Customization > Lists, Records, & Fields > Record Types.
-
Locate the RA-Workstation row and click List.
-
Click Edit for the first workstation to update.
-
For Payment Provider, select Shift4.
-
In the Shift4 section, complete the following fields:
-
Terminal ID - Enter the serial number found on the register credit card PIN pad or swipe device. It is usually an 8-digit number.
-
URL - Enter the URL/ IP address of the server running UTG.
-
Client GUID - The GUID is set up automatically for NSPOS. No changes are needed.
-
Authentication Token - Enter the token value generated from the Shift 4 portal. Each token must be unique to each RA-Workstation record.
-
-
Click Save.
-
Repeat for the next workstation.
After configuring your RA-Workstation records, verify that your Tender in NSPOS is configured to use EMV. If you are not certain how to do this, please contact NetSuite Professional Services.
During register staging, if using an Ingenico device with Shift4, you must also select to install the Ingenico extension. See Extension Synchronization Selection for NSPOS 2020.1.X.
Before your cashiers can user Shift4 at the workstation, the set up must first perform a synchronization download from NetSuite. This takes approximately 15 minutes.
Shift4 and EMV Receipt Requirements
NetSuite Professional Services must update your receipts to match EMV requirements.
Shift4's EMV standards include requirements for the information printed on merchant and customer receipts. EMV requirements can vary across payment processors, but in most instances receipts must include:
-
Merchant name, address and telephone number
-
Invoice number
-
Date and time
-
Amount
-
Last 4 digits of the credit or debit card number
-
Card type using full spelling
-
Authorization code
-
The words Merchant Copy or Customer Copy
Credit Card Transactions Overview Report for Shift4 UTG
NSPOS includes a report for verifying transaction amounts processed on registers through the payment gateway over a period of time. The Credit Card Transactions Overview report closely matches the end of day report available from Shift4. Use this report to compare the results from similar reports provided by your gateway.
Administrators may want to configure this report function as a button for access by your store managers. Be sure to include any access restrictions that you believe are appropriate.
To run a Credit Card Transactions Overview report:
-
In Sales Mode, complete all sales transactions.
-
From the Main button bar, tap Manager Functions and/or tap Reports.
-
Tap Credit Card Transactions Overview. The report displays.
-
To adjust criteria, choose from the fields at the top and tap View Report.
-
To print or save and export the report, choose from the options at the top.
-
Tap X in the upper right to return to the Journal window.
Also see Credit Card Transactions Overview Report.
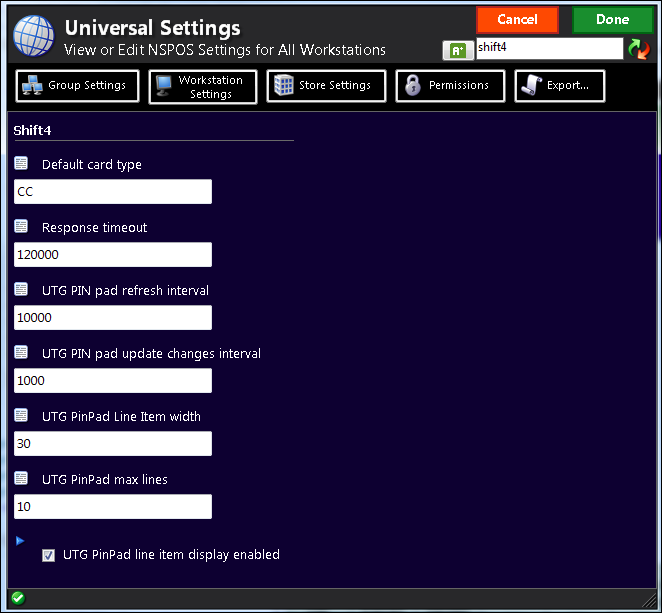
Line Item display for Shift4 UTG PIN Pads
You can display items as they are processed for a sales transaction on Shift4 UTG PIN pads. This option is disabled by default. Enabling Shift4 line item display on one register will populate registers across your network during the next synchronization cycle.
Shift4 UTG performance issues can delay the item-display refresh rate, causing a lag between a physical scan and the item appearing on the PIN pad. Shift4 is working on this, and it only affects the PIN pad display.
To enable Shift4 Line Item Display:
-
Log in to any NSPOS register as an administrator.
-
Go to Universal Settings (Ctrl+F10).
-
Search for Shift4.
-
Enter the desired values using the table below as a guide.
-
Tap Done.
|
Setting |
Description |
Value |
Default Value |
|---|---|---|---|
|
Response timeout |
Time POS waits for a response from UTG. |
Milliseconds |
120000 |
|
UTG PIN pad refresh interval |
Interval to prevent PIN pad from moving to idle state due to no Journal changes. This prevents the display from going idle while a transaction is delayed, but in progress. |
Milliseconds Set to 0 to disable this feature. If items are scanned at the POS more than one time every 10 seconds, this setting is not needed. |
10000 |
|
UTG PIN pad update changes interval |
Periodically check for Journal changes and update on PIN pad display. Changes include items added and quantities updated. No update if no changes. |
Milliseconds Set to 0 to disable this feature. If disabled, the PIN pad display will update with each new scan. |
1000 |
|
UTG PinPad Line Item width |
Line width supported by PIN pad. Refer to PIN pad documentation. |
Number of characters |
30 |
|
UTG PinPad max lines |
Maximum number of line items supported by PIN pad, including last line with tax and total amount. If set to a number greater than supported by your PIN pad, the display may not work as intended. Refer to your PIN pad documentation for the maximum lines allowed. |
Number of lines |
10 |
|
UTG PinPad line item display enabled |
Enable PIN pad to display line items. |
Check to enable, clear to disable |
Cleared |
Credit or Debit Card default setting for Shift4 UTG PIN pads
You can set the default card type accepted at your Shift4 UTG PIN pad - credit, debit or both. The default is both (blank), with the PIN pad prompting the customer to select the card type. Setting the default card type on one register will populate registers across your network during the next synchronization cycle.
To set the default card type:
-
Log in to any NSPOS register as an administrator.
-
Go to Universal Settings (Ctrl+F10).
-
Search for Shift4.
-
Enter the Default card type.
-
Tap Done.
|
Setting |
Description |
Value |
Default Value |
|---|---|---|---|
|
Default card type |
Default card type for all transactions. If card type is not specified, PIN pad prompts user to select Debit or Credit. If card type is specified, PIN pad will not prompt user to select. Instead the default is assumed. |
CC - All cards are credit cards DB - All cards are debit cards (blank) - PIN Pad prompts user to select Debit or Credit Note:
|
(blank) - No value entered |