FreedomPay
NetSuite Point of Sale (NSPOS) includes EMV credit and debit card support for the Freedom Pay gateway provider. This provider's services are available in the United States and in Canada. For the United States only, the support includes an optional FreedomPay Token Tender setup to allow future charges.
To get started with FreedomPay, please contact your FreedomPay Account Manager first. Then, review and follow the sections in this topic.
FreedomPay for the Canadian market requires NSPOS 2020.1.10 and later.
If you opt to use FreedomPay Token Tender, the NetSuite ERP Payment Instruments feature must be set to disabled. Otherwise, your FreedomPay integration will fail due to incorrect tokens.
-
Additional (optional) functionality
Integration Data Flow
The FreedomPay integration requires a small application called Freeway Commerce Connect (FCC) that is installed on each register. The FCC app manages connectivity with NSPOS registers to process payments through the PIN pad.
The following is the default data-flow diagram for NSPOS payment processing with FreedomPay:
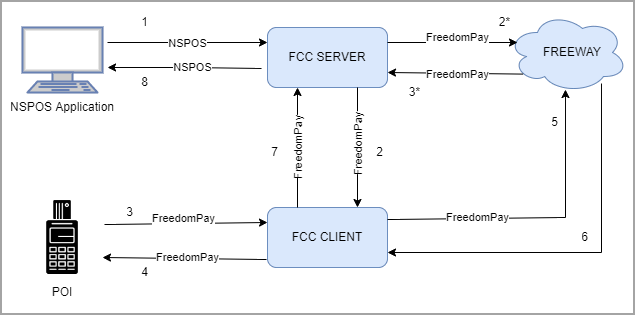
The NSPOS application sends an HTTP request to the FCC Server service. The NSPOS request does not contain card data (1).
If the NSPOS request contains some card data (such as a RequestID while performing VOIDs or RETURNS), the FCC server will send the request directly to Freeway (2*, 3*). If the request does not contain card data, the FCC server connects with the FCC Client (2), which then wakes up the Point of Integration device and prompts the customer for card data (3,4).
When the card data has been entered by swiping, inserting, tapping, or manual keying, the FCC Client sends the request to Freeway (5). After FreedomPay has relayed the payment request to the processor and received a response, it returns the response to the FCC Client (6), which forwards the result back to the FCC Server (7). The NSPOS application can expect a POS response back from the FCC Server service with the decision, as well as other useful data points (8).
Setup and Configuration
Use the steps in this topic to set up FreedomPay with NSPOS. The setup includes updating the RA-Workstation record in NetSuite ERP for each register that will use FreedomPay.
The RA-Workstation record update required to integrate with FreedomPay includes fields for Merchant number and Terminal ID. FreedomPay will provide you with values to enter in these fields.
-
Install and configure Freeway Commerce Connect (FCC)
-
FreedomPay will work with you on the FCC for Windows installation and device management setup. Contact your FreedomPay account manager for more information.
-
For Canada - At a minimum, the Ingenico Lane 7000 is supported for use with NSPOS
-
For United States - At a minimum, the Ingenico ISC 250 and Equinox L5300 are supported for use with NSPOS
If you want to use a different device with FreedomPay integration, please contact a FreedomPay representative to confirm it's supported.
-
-
Configure NSPOS to connect and work with FCC
To configure NSPOS to connect and work with FCC:
-
Log in to NetSuite as an administrator.
-
Go to Customization > Lists, Records, & Fields > Record Types.
-
Locate the RA-Workstation row and click List.
-
Click Edit for the first workstation to update.
-
For Payment Provider, select FreedomPay Canada for Canadian integration or FreedomPay for integration in the United States.
-
Enter the Merchant number.
-
Enter the Terminal ID.
-
Optionally enter the FreedomPay FCCAddress.
This field is the IP address of the computer where the FreedomPay FCC application is installed, plus the port where it is listening. The value is usually the localhost IP 127.0.0.1 + port 1011, entered as 127.0.0.1:1011. If not entered manually, we default to 127.0.0.1:1011.
-
Click Save.
-
Repeat for the next workstation.
FreedomPay requests include the Workstation ID value to uniquely identify the terminal sending the request. NSPOS automatically populates this value in the request data. To locate this ID, review the terminal's RA-Workstation record.
Integration Troubleshooting
If you have issues with FreedomPay, first check the FreedomPay Status on their website: https://status.freedompay.com/.
When NSPOS sends transactions to FreedomPay, the responses return an Error Code. The code and message appears in NSPOS similar to this example:

The following table lists the NSPOS error/warning messages displayed when FreedomPay returns an error code other than 100. Use it as a guide to interpreting common error messages. You can download a copy of the FreedomPay Error Codes Guide from the FreedomPay website.
|
Error Code |
Description |
Action |
Notes |
|---|---|---|---|
|
201 |
Call issuing bank for authorization |
Call the support number listed in the FreedomPay response / NSPOS message. |
Additional authorization required. The NSPOS message with the FreedomPay response includes a telephone number for getting additional authorization from the issuing bank. |
|
3021 |
Offline Accept - Request was accepted while the connection was offline |
None |
Although the gateway connection was offline, the transaction payment was authorized because the amount was less than the authorization limit. |
|
3022 |
Offline Decline - Request was declined while the connection was offline. |
Use a different payment method or try to get an authorization over the telephone. Use the telephone number shown in the message. |
Decline was likely due to the payment being over the authorization limit. |
|
Other message codes |
-- |
See the error codes guide. |
NSPOS displays the message from the gateway. See the FreedomPay Error Codes Guide for descriptions and corrective actions. |
If you need further assistance, see Contacting Customer Support.
If you are not able to resolve the issue with NSPOS Customer Support, reach out to FreedomPay's Tech Support Team:
-
1.888.495.2446 (US) / +44-2030148966 (UK)
-
techsupport@freedompay.com
-
Status Page: https://status.freedompay.com
When contacting FreedomPay Tech Support, have this important information ready for the team:
-
Name of POS - NSPOS
-
Integration Type - Windows FCC
-
FCC Logs (if applicable)
-
RequestIDs (if available)
-
Error codes you are receiving
-
Description of what you are doing and what is happening
-
Confirmation that you have contacted NSPOS Customer Support first
Automatic in-store refunds to a credit or debit card
The NSPOS FreedomPay integration includes a validated return option for automatic refunds to a card holder's account. The credit or debit card to be automatically refunded is the card used to make the purchase. Under this option, customers making a return at a register using FreedomPay are not required to have the original card available to swipe or give to the cashier. FreedomPay uses the purchase Transaction ID and FreedomPay reference ID to process the refund.
-
Cashier scans the purchase receipt or looks up the transaction to be refunded.
-
Cashier is prompted 'Do you want to put money to same card CARD TYPE, CARD NUMBER? YES/NO"
-
If YES, refund is applied to the purchase card without the customer having to swipe the card.
Automatic refunds are only available in the store where the purchase was made.
Swipe-free refunds require that the original FreedomPay Reference ID from the purchase is available on any register in the store. If a register was restaged after the purchase, you can't process an automatic refund from that register. However, you can use a different register in the same store.
To enable swipe-free refunds in NSPOS with FreedomPay, you must enable either or of these flags. For the steps and flag descriptions, see Flags and Settings.
-
Returns: Refunds Require Original Tender
-
Returns: Refunds Use Original Tender Thresholds
Also note that if original tender or original tender thresholds are enabled, and a credit or debit card was used, NSPOS cannot tender the refund in cash.
Floor-limit Overrides in Offline Mode
FreedomPay includes the option to set floor limits for offline transaction processing. A floor limit is a set amount that the FreedomPay will accept automatically in offline mode without additional authorization. If the amount of an offline transaction is greater than the defined floor limit, FreedomPay provides a voice-authorization method for overriding the floor limit. For more information, review the FreedomPay documentation or contact FreedomPay Tech Support.
NSPOS supports FreedomPay's voice-authorization override method for offline floor limits by prompting the cashier or store manager to call FreedomPay for an authorization code. The code is sent to the FreedomPay client for processing and recorded with the transaction.
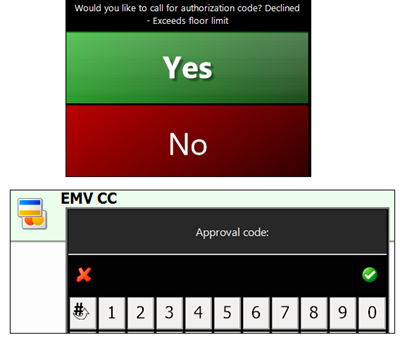
NSPOS includes the option to set tender floor limits for credit card purchases. Floor limits help control fraud by setting a limit amount, for example $500, on credit card tenders. To proceed with tendering a credit card purchase that exceeds the floor limit, the cashier must receive store manager approval. Credit card tenders below the floor limit do not require manager approval.
If a register goes offline, our integration with FreedomPay ensures that floor limit restrictions and authorizations can occur.
If a register is offline and the purchase to be tendered using a credit card will exceed the floor limit, NSPOS displays a message to call FreedomPay for an authorization code. Before tendering out the transaction, the cashier or manager must enter the code in NSPOS. The code is sent to the FreedomPay client and recorded with the transaction.
FreedomPay Token Tender
The NSPOS integration with the FreedomPay payment gateway includes a token feature to permit a future charge against a credit card. Tokens are created from the register and stored in NetSuite ERP.
A typical example of token usage is in rental transactions. The rental agreement might state that if the property is not returned on time, is lost or becomes damaged, then the renter is liable for an extra fee. The fee is held in the form of a FreedomPay token that can authorize a future credit card transaction.
Using a token provides the retailer with security similar to requiring a rental deposit, but does not place an immediate financial burden on the renter.
Enabling FreedomPay Token Tender
Besides the standard gateway setup for your workstations in NetSuite ERP, enabling the token feature requires linking the Token Create function to a new tender button on your NSPOS registers.
To enable creating tokens from your registers:
-
Sign in to any NSPOS register as an administrator (9090 level operator).
-
Press Ctrl+F12 on the keyboard to open the Function List.
-
Enter
Button Editin the search field. -
Tap Button Edit.
-
Tap Side and Pages.
-
Tap the Tender row in the Button Page list.
-
Tap Activate so that you can see the changes immediately.
-
Tap Buttons.
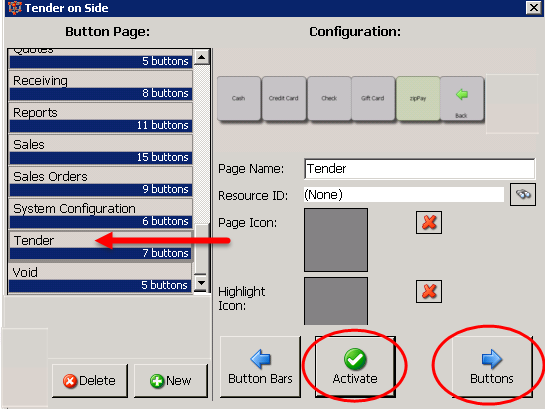
-
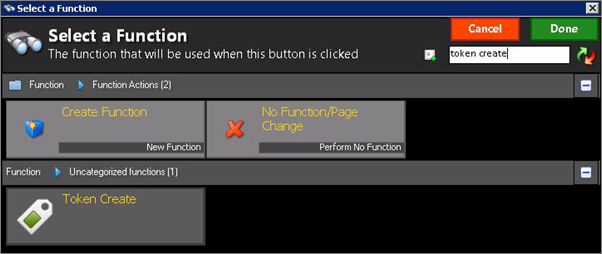
Tap New.
-
Search for the function by entering
Token Create. -
Tap the Token Create function.
-
If desired, enter a different button name in the Caption field, such as
FreedomPay Token.Otherwise the button defaults to
Token Create.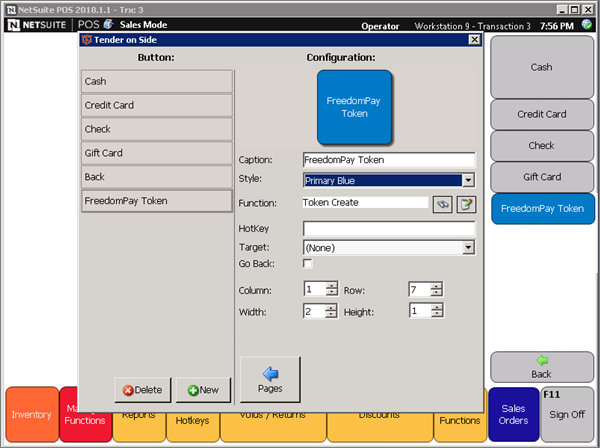
-
Choose a color from the Style list.
-
If desired, adjust where your button appears in the tender list by changing the Column and Row fields. (Otherwise, it appears last in the list.)
-
If you want to make your button smaller or larger, adjust the Width and Height.
Tip:For a button size that matches your default tender buttons, set the Width to 2.
-
Close the Button Edit form when your setup is complete.
Repeat these steps for one register in each Workstation Group.