Creating Icons for Custom Records

You can create custom icons to represent custom records in the NetSuite user interface.

To use a custom record icon:

  1. Create an image file for your icon.

  2. Open the custom record for which you want to add the icon.

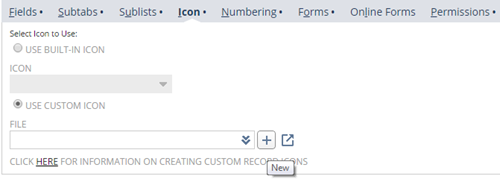
  3. On the Icon subtab, select the Use Custom Icon option.

  4. Click the New button next to the File field.

    Sample Icon subtab showing New option.
  5. In the File popup window, select an icon image.

  6. Click Save. Then save the custom record.

    Important:

    Custom icons must meet the specific requirements detailed in the following sections. You should read these requirements thoroughly and give yourself enough time to test your icon. You will need at least a basic understanding of an image-editing application like Adobe Photoshop or another application that enables you to edit artwork and save the icons as transparent .png files.

The Four Icon Versions

A custom record icon is made up of a set of four slightly varied versions of your icon, ranging from grayscale to full-color. These four versions are required so that the icon can be displayed with maximum clarity and contrast on a variety of backgrounds.

Example of four versions of an icon.

Image 1: Grayscale icon for dark backgrounds. This icon is an outline version of the full-color icon, used on dark color themes. Because the default color theme is dark-colored, this version is used most often.

Image 2: Grayscale icon for light backgrounds. This is another outline version of the icon, used on light color themes. This version is not used as often because few color themes have a light background color.

Image 3: Color icon for dark backgrounds. This is a full-color version of the icon, optimized for use on dark backgrounds. This version is used as the color icon that replaces the grayscale version when a cursor is nearby.

Image 4: Color icon for light backgrounds. This is another full-color version of the icon, optimized for use on light backgrounds. This version is used in menus, which always have a light background.

The Icon Sprite Image File

The four icon versions reside, side-by-side, in a single image file known as a sprite. Using coordinates and other data stored in CSS, NetSuite displays the proper icon version needed and crops out and hides the rest of the sprite image. Therefore, for your icons to display properly, they must be an exact size and at an exact location within the image file.

Each icon must be no larger than 16 pixels by 16 pixels. Any artwork that goes beyond the 16x16 boundary will not be displayed.

Sample Icon Sprite Image file.

Each icon version must be located at the following locations within the image file, as measured from the upper-left corner of the image:

Icon Version

x Coordinate

y Coordinate

Grayscale icon for dark backgrounds

25

25

Grayscale icon for light backgrounds

50

25

Color icon for dark backgrounds

75

25

Color icon for light backgrounds

100

25

Most image-editing applications have guides that you can set up to help you keep track of these spacing requirements. You can also download the sample icon file pack at the bottom of this topic, which contains various template files that will help keep your icons in order.

File Format

Save the icon image file as a 24-bit .png file with an 8-bit alpha channel for the transparent background. Your image editing application may refer to this file format as PNG-24. You should always use the PNG-24 format when saving your icon image file. Using .gif or .jpeg formats is discouraged due to their limited (or lack of) transparent backgrounds. Other image file formats are not accepted.

Sample PNG format icon image.

Constructing Your Icon File, Step-by-Step

  1. You can create the icon yourself or obtain one from a royalty-free source. When you have the icon, the first step in creating the final icon image file is to create an outline of it. This outline drawing is used to construct the two grayscale icon versions.

    Sample icon image.

    The outline version of your icon should be plain, but it should also have sufficient detail so that it can be recognized when it appears on your dashboard's New Bar. Start by using a 1-pixel pencil tool in your image editing application, and trace an outline of your icon. In addition to the outline, trace some of your icon's internal components so that it will be easier to recognize.

  2. Take the outline tracing of your icon and follow these directions to create your grayscale icon for dark backgrounds:

    Three versions of outlined icon in grayscale for dark backgrounds.
  3. Take the outline tracing of your icon and follow these directions to create your grayscale icon for light backgrounds:

    Three versions of outlined icon in grayscale for light backgrounds.
  4. After the two grayscale versions are complete, create the color versions. This involves placing the color icon that you already have on a variety of background colors to check its appearance. Try the following colors:

    • #5A759C - default color for the New Bar

    • #F1F4F9 - default color for the Recent Records menu

    • #EBECEF - default color for the Create New menu

    Try other colors, such as light and dark reds and then test the colors of your NetSuite color theme. After you see how your color icon looks on various background colors, you can create the last version of your icon.

    If you believe that your color icon looks fine regardless of background color, make a copy of it to be placed in the fourth slot of your .png image.

  5. Place the four versions of your icon in a single PNG image, using the proper spacing previously described. Save your icon image file as a PNG-24 file, and upload it to your NetSuite account.

Sample Icons

Click here to download our sample set of custom icons (.zip archive, 14 KB), designed to help you get started.

Related Topics

General Notices