Select Reference Types
A reference type lets you map a column in your CSV to a NetSuite field that has list values, like dropdowns or multi-selects. You set reference types on the Field Mapping page by clicking the edit icon next to a mapped dropdown or multi-select field.

Not all fields support reference types.
Possible reference types include External ID, Internal ID, Name and Script ID.
-
External ID. If you select External ID as the reference type, the Assistant finds and references an identification string as defined by you (such as 'CashSale_' or 'Employee_') in the mapped field.
-
Use External ID especially if you're using the Add or Add or Update options in the Import Assistant.
-
External ID is also best for records with parent-child relationships or auto-generated numbers.
-
External ID works well for ongoing integration with external databases, since you can store the foreign key in NetSuite and use it for repeated imports or data migration.
-
You can update External IDs through a CSV import or through SOAP web services. Your organization should use a single method for maintaining External IDs to avoid conflicting updates through the two separate methods.
-
Some record types, such as custom lists or custom records, don't support External IDs as reference types.
-
-
Internal ID. If you select Internal ID as the reference type, the Assistant finds and references numbers (such as '123') in the mapped field.
-
Use Internal ID if you're using the Update option in the Import Assistant.
-
Internal ID is good for data you export, change outside NetSuite, and then reimport.
-
To include the Internal ID in your data, add it as a results column in a saved search of the data, and then export the search results to CSV.
-
You can set a preference to display internal IDs in the NetSuite user interface. For instructions, see Displaying Internal IDs.
-
-
Name. If you select Name as the reference type, the Assistant finds and references text strings (such as 'Joe Public') for the mapped field.
-
Name references can be prone to error.
-
For names that contain spaces, HTML rendering can sometimes distort the number of spaces included, causing mismatches between CSV file values and existing records, that result in import errors. To verify the number of spaces in names, you can create a saved search with a list of names and export it.
-
If you are unsure or unable to verify the name reference for a record, you should use the External ID field instead. For updates, you can use the Internal ID.
-
-
The requirements for name references are affected by the auto-generated numbering preference that you set in NetSuite. For information, see Effects of Auto-Generated Numbers during Imports.
-
If you use a name reference type, each child record in the CSV file must include a value for the parent name for the import to successfully update records.
-
Name matching isn't case sensitive.
-
-
Script ID. You can use Script ID as a reference type for a NetSuite field that can have one or more custom list or custom record values.
-
For example, consider this scenario: You create a custom list with values, where each value has a Script ID or you create a custom record to which you assign a Script ID. Then, you create a custom field on a Sales Order. This field is of the List/Record type and it is referencing the custom list or the custom record you created earlier. When you import a Sales Order next time, you can reference each value of the list or the record by its Script ID.
-
To find the Script ID of custom list values, you must perform in the UI an advanced search on the custom list and include the Script ID column in the search results.
-
To find the Script ID of custom record type instances, you must perform in the UI an advanced search on the record type and include the Script ID column in the search results.
-
You can only assign a Script ID to a custom record when you create it with SuiteScript. You can't add a Script ID to an existing custom record during an update.
-
Displaying Internal IDs
You can configure NetSuite to show internal IDs. During development, internal IDs help you verify that the internal ID values submitted for import match those in the existing records.
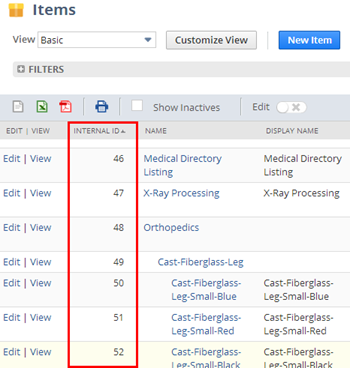
Go to Home > Set Preferences and under Defaults on the General subtab, check the Show Internal IDs box. Lists will then show the Internal ID column, as shown in the following screenshot. This change affects the current user only.
If lists show Internal IDs, you can usually export them to a CSV file using the Export to CSV button on list pages.
Internal IDs are assigned in order, but the sequence doesn't tell you when or in what order records were added. This is true even within specific record groups where internal IDs are unique. So, don't assume that lower internal IDs mean a record was added first or that higher ones were added last.
If you need to know when data was entered, use the Date Modified or Date Created fields, as they're always chronological. For transactions with auto-generated numbers, the sequence number (like 'tranid') is also in order by date. Never use internal IDs to figure out when data was entered, and don't build anything that relies on their sequence to work.
The user preference setting specifies the display of the internal ID, however, some records have an ID that cannot be hidden. For example, customer J Wolfe has an ID of 87 and an internal ID of 18834. The ID column cannot be removed from the customer list page.