Projects (Jobs) Import
You use the project record to manage company initiatives.
To use the project record, you must have the Projects feature enabled at Setup > Company > Enable Features, on the Company subtab. If you plan to do advanced project tracking, you must also enable Project Management. If you don't see the Project Management box, your company must first purchase the Project Management add-on from NetSuite.
To access the project record in the UI, choose Lists > Relationships > Projects (or Jobs). For help working with projects manually, see Projects.
You can import project tasks from a CSV export of Microsoft Project plan data. For more information, see Project Tasks Import.
As of Version 2008, Release 2, the Jobs feature and the Advanced Job Tracking feature have been renamed to Projects and Project Management, and Job records may be labeled Project records, depending on your account's settings at Setup > Company > Rename Records/Transactions.
Project Body Fields
This section describes some of the important body fields on the project record.
Subsidiary
If your account is using NetSuite OneWorld, the Subsidiary field is required for project imports. CSV file values for subsidiaries should be hierarchical names, in the following format - grandparent : parent : child, for example, Consolidated Parent Company : UK Subsidiary : Euro Subsidiary.
Customer
Imported projects can be standalone or associated with an entity such as customer. You may want to use project imports to associate externally maintained project information with NetSuite customer records on an ongoing basis. However, note that you can't use the Import Assistant to update the Customer field on a project record. This restriction is consistent with user interface business rules. If the customer for a project changes, you need to create a new project record rather than update an existing one.
Project Sublist Fields
The following sublist data is supported for import:
-
Address - Available when Project Management is disabled.
-
Resource - Available when Project Management is enabled.
See the following sections for more detail.
Working with Addresses
By default, the sublist Address field is read-only, and data from other sublist fields is copied into it. If you map the Override field and set it to Yes (meaning true), you can import data for the Address field.
This sublist is selectively updatable based on Internal ID or Label key field.
Working with Resources
When using the Import Assistant, the behavior of the Resources sublist differs slightly from the behavior in the UI. Specifically, in the UI, each line must have a unique value in the Name field. Further, in the UI, you can select more than one role for each resource.
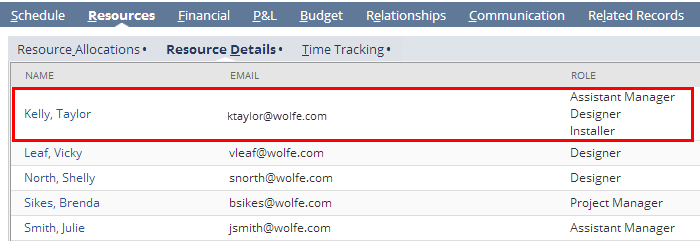
With the Import Assistant, if you want to add a resource that has two different roles, you set up your CSV file as if you're adding two sublist records for that resource - one for each role. The Name values aren't required to be unique, as shown in the table below. This example shows how to add two unique resources to the sublist. But because one resource has two roles, the file is set up as if adding three sublist records.
|
External Id |
Company |
Job 1: Name |
Job 1: Role |
Job 2: Name |
Job 2: Role |
Job 3: Name |
Job 3: Role |
|---|---|---|---|---|---|---|---|
|
101A |
Launch |
John Smith |
Installer |
John Smith |
Designer |
Jane Johnson |
Staff |
Note that after you complete the add operation, the Resources sublist in the UI looks the same as it would if you had manually added one line for the resource, with multiple roles specified on that line, as shown in the illustration above.
For More Information
For details about additional body and sublist fields that can be mapped in the project record, refer to the SOAP Schema Browser's job reference page. You can use the field definitions here as a basis for creating your own CSV import template file. For information about working with the SOAP Schema Browser, see SOAP Schema Browser.
The Import Assistant is available at Setup > Import/Export > Import Tasks > Import CSV Records. After you select the record type for import, choose the import character encoding. For more information, see Select a Record Type for Import and Choose Import Character Encoding.