Adding an Account in SuiteCloud IDE Plug-in for WebStorm
Follow these steps to add an account. The WebStorm plug-in sends your account information to NetSuite during authentication.
For more information, see OAuth 2.0 Authentication for SuiteCloud SDK.
To add an account:
-
Depending on your operation system, do one of the following in WebStorm:
-
If you're on Windows OS, select File > Settings > Tools > NetSuite > Account Management.
-
If you're on macOS, select WebStorm > Preferences > Tools> NetSuite.
-
-
Click
 , then pick one of these options from the dropdown:
-
Through browser-based authentication - This opens a new window or tab in your default browser so you can authenticate your account-role combination.
-
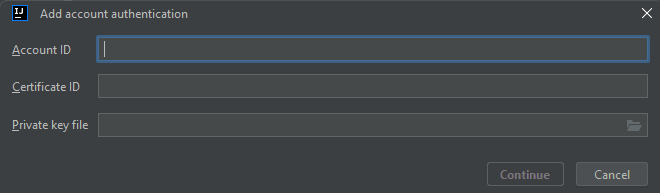
Through machine-to-machine authentication - This opens a window so you can authenticate your account-role combination. Here's what you'll need:
-
Account ID - References the NetSuite account ID.
-
Certificate ID - References the certificate ID you get from NetSuite after uploading the public key file.
-
Private key file - References the local path to the private key file that matches the certificate in NetSuite. For example:
d:/path/private-key.pem.Important:To get the certificate ID, you need to generate an RSA certificate. The RSA certificate has two parts: the public key and the private key.
Upload the public key in the OAuth 2.0 Client Credentials Setup by choosing SuiteCloud Development Integration in the Application field and selecting the entity and role to map. This will generate a new row with the certificate ID value.
The private key path value is the location where the private key is saved.
For more information about how to generate the RSA certificate, see Certificate Conditions.
For more information about how to upload the public key, follow the steps in OAuth 2.0 Client Credentials Setup.
After you enter the machine-to-machine authentication details, click Continue.
-
-
-
After authenticating your role, it gets added to the accounts table.