Setting Up the Agency Springboard
You set up the Agency Springboard by defining the different elements on the page.
You can add these elements to the Agency Springboard by configuring the menu navigation attributes:
Alerts banner
Quick actions (I Want To) bar
Task lists element
Springboard area with tiles
For information about setting up the banner image see Applying Branding Images.
For information about the global header and the page footer, see Configuring Header and Footer Navigation Features.
Defining Alerts for Agency Staff
You can display alert messages on the Agency Springboard in an alerts banner.
For more information about setting up alerts messages, see Defining Alerts.
Configuring the Quick Actions Section
The quick actions section includes I Want To actions in a drop-down list on both the Registered User Landing Page and Agency Springboard. Each link provides access to relevant pages and functionality. You can show or hide the I Want To bar and include the link provided in the I Want To Content folder.
This example illustrates the quick actions element on the Agency Springboard.

To show the quick actions section on the Agency Springboard:
Select .
On the Configure Menu Structure page, select the Products menu.
Click Open Menu.
Expand the Agency Springboard Data folder.
Select the I Want To link:
Menu Link
Description
I Want To
Show available actions for agency staff in the quick actions drop-down list. These are the delivered actions that agency staff can access:
Start an Application: Select to start an application behalf of a registered public user.
Estimate Fees: Select to calculate an approximation of actual application fees.
Schedule an Inspection: Select to open the supervisor Inspection List page, where you can schedule an inspection.
Report an Issue: Select to report a code enforcement issue.
Pay Citation Select to pay a code enforcement citation on behalf of a public user.
The actions for agency staff and registered public users are determined by security setup.
Select the desired menu item and click the Edit button.
On the Link Details page, go to the Show On field and select an option:
All devices, Tablets and larger, or Smartphones only - Displays the quick actions (I Want To) bar.
None - Hides the I Want To actions bar.
Note: When you configure the quick actions section to appear on the Agency Springboard, it also appears on the Registered User Landing Page.Click Close.
Configuring the Task List Element
The Task List element provides access to different lists of assigned tasks for agency staff.
This example illustrates the task list element on the Agency Springboard.

To show the Task List element on the Agency Springboard:
Select .
On the Configure Menu Structure page, select the Products menu.
Click Open Menu.
Expand the Agency Springboard Data folder.
Select the Agency Task List link:
Menu Link
Description
Agency Task List
Select to display the element that contains delivered links to the Task Management page, where a predefined filter is applied. The delivered links include:
My Workflow
Group Workflow
My Plan Reviews
My Inspections
A number appears next to the link to display the task count for the applied filter.
Note: The items that appear on the Agency Springboard are determined by the security roles assigned. For example, agency roles specific to the permits service display all of the items above, whereas, roles specific to the planning and zoning service do not display My Inspections or My Plan Reviews.Select the desired menu item and click the Edit button.
On the Link Details page, go to the Show On field and select an option:
All devices, Tablets and larger, or Smartphones only - Displays the Task List element.
None - Hides the Task List element.
Click Close.
Configuring the Tiles on the Springboard
You can show or hide tiles, or modify the tile labels on the springboard, but you cannot delete delivered menu links. For more information about configuring tiles and the menu navigation, see Configuring Menu Structure.
This example illustrates tiles on the Agency Springboard.
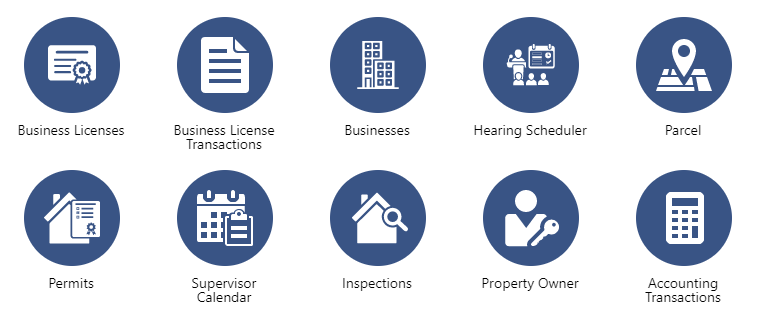
To configure the tiles on the springboard area of the Agency Springboard:
Select .
On the Configure Menu Structure page, select the Products menu.
Click Open Menu.
Expand the Agency Springboard Data folder.
To create the springboard area for the tiles, click the Agency Springboard menu link.
Click the Edit button.
On the Link Details page, go to the Show On field and select an option:
None - Hides the springboard area.
All devices, Tablets and larger, or Smartphones only - Shows the springboard area.
To add individual tiles to the springboard, select from delivered menu links in a variety of folders.
Select the desired menu item and click the Edit button.
On the Link Details page, turn on the Show on Springboard switch.
For example, when you enable the Show on Springboard property for the Parcel menu link, the Parcel tile with a link to the associated page—the Parcel page—appears in the springboard area.
Note: The tile appears only on the Agency Springboard and not on any other landing pages when you select this option.You can change the delivered label on the tile by editing the value in the Label field on the Link Details page.
Click Close.