Redwood: Secure Catalogs and Categories Using Access Control Lists
You can now create your own data access groups to control which users can view or manage catalogs and categories using criteria-based access control. Access can be granted according to roles, to individual users, or users based on filtered lists. You can control access to each catalog or category by creating conditions based on basic and descriptive flexfield attributes and assigning permissions to various catalogs or categories.
The functional area catalogs aren’t secured through access control lists.
You can give access to specific data to select users in your organization. For example:
-
Some users need mange access to the catalogs and categories.
-
Others might just need view access to the catalogs and categories.
To enable criteria-based access control, you must perform these configuration tasks.
-
Configure teams.
-
Create permission sets with data access conditions.
-
Create teams, add roles, users or filtered lists, and apply permission sets.
You can add the following members (or users) in your team.
-
Roles: These are users assigned to roles created in Security Console.
-
Users: These are individual users created in Security Console.
-
Filtered Lists: These are workers added to a group using a condition on the Worker attribute.
If you're assigning roles or users directly, there's no need to convert users into workers. However, if you plan to use filtered lists, then the users must be converted to workers. For details on how to create filtered list refer to Redwood: Secure Manufacturers Using Access Control Lists.
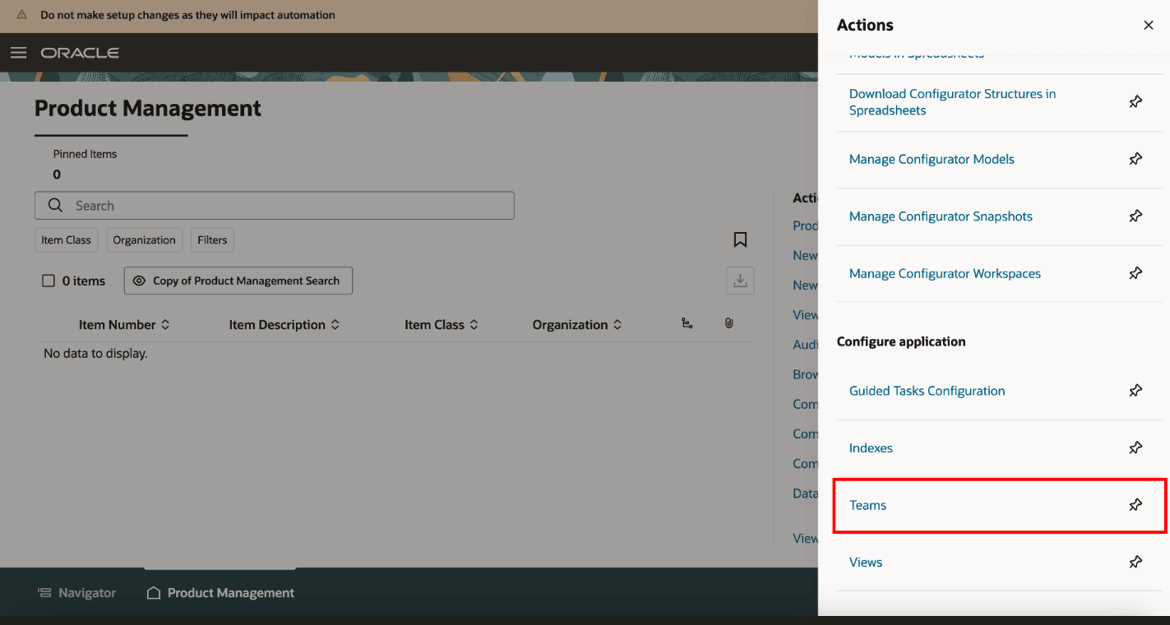
Link for Teams on Product Management Landing Page
Configure Teams
Navigate to Product Management landing page > In Actions > click Teams.
On the Search Teams page, you can search for existing teams or create new teams. For each team, you can add users and select the applicable permission sets.
To create a new team:
-
In the Search Teams page, click Create.
- In the New Team page, provide these details:
-
Name- Unique name for the team.
-
Description- A short description of the team.
-
Status- Set the status of the team to Active.
-
In Members tab:
-
Add roles that you want in your team.
-
Add individual users you want in your team.
-
Add members based on the membership conditions defined for your filtered list.
-
-
In the Permission Sets tab:
-
Add the permissions you created in the Permission Set page.
-
-
Click Save and Close.
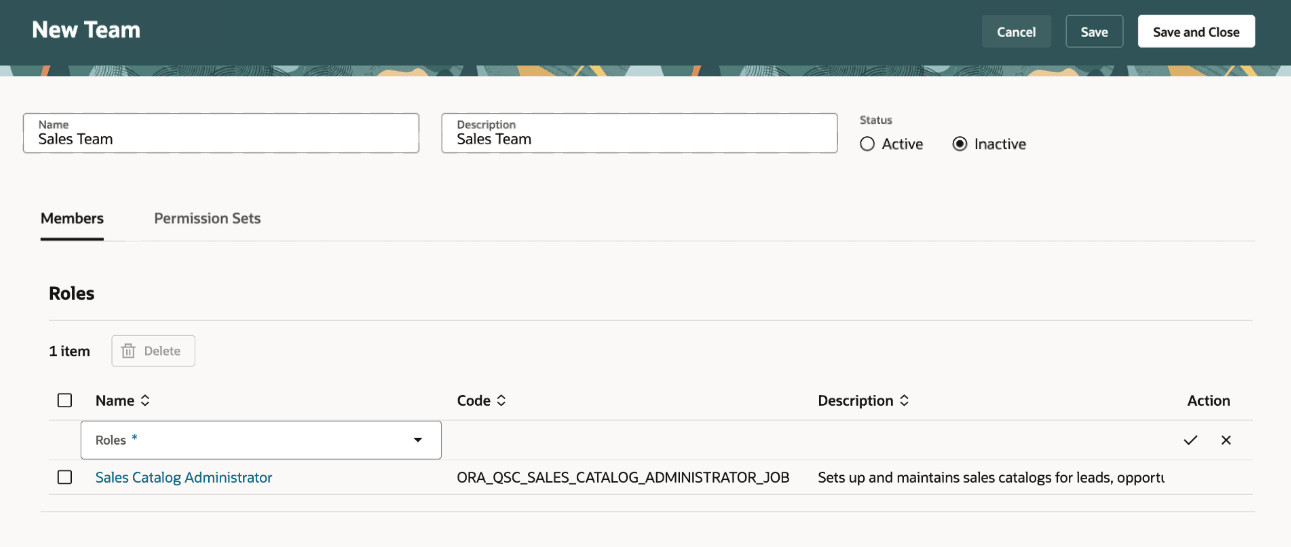
Members Tab on the New Team Page
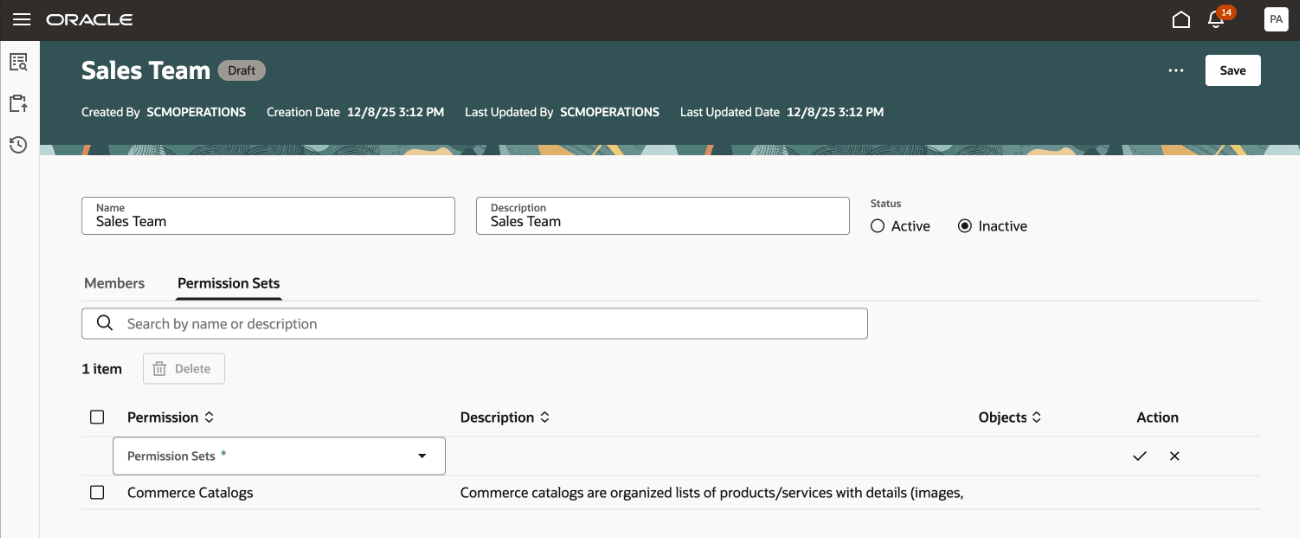
Permission Sets Tab on a Team Page
Create a Condition
Users can create condition to define restrictions on catalogs or categories based on the basic and descriptive flexfield attributes of catalogs or categories.
Click Create Condition on the Search Condition page and select Catalog.
Add these details:
-
Rule Name- A unique name for the condition.
-
Description- A short description of the condition
-
Active- By default, this is set to Yes.
-
Add Rule
-
Attribute- Select the attribute on which you want the rule to be set up. You can add a rule on basic attributes or descriptive flexfield attributes of the catalogs or categories.
-
Operator- Select an operator such as equals, is, or not equal to.
-
Value- Provide the attribute value.
-
Create Permission Sets with Access Conditions
Permission sets enable you to define access on catalogs and categories. In each of the permission set you can add multiple permissions on catalogs and categories granting access for the team members.
You can provide access to catalogs and categories conditionally using permissions such as view or manage.
On the Search Permission Sets page, you will see a listing of the permission sets that have already been created. Here’s what you can do:
-
Search for specific permission sets.
-
See details of the permission set by clicking the name of the permission set .
-
Sort the permission sets by the columns.
To create a permission set, click Create on the Search Permission Sets page and add these details:
-
Name- Unique name of the permission set.
-
Description- Short description on the permission set.
-
Add permissions:
-
Object- contains a list of objects in the application. Select Catalog.
-
Condition- helps narrow down to the object by applying filters on object attributes. Select a condition from the list of available conditions.
-
Permission- select one of View or Manage, depending on what the team should be able to do.
-
View Permission- allows the user to see the catalog and category attributes in a read-only format.
-
Manage Permission- allows the user to view and edit a catalog or category.
-
-
It is recommended to create conditions with either catalog attributes or category attributes, and to avoid combining both in a single condition.
How Security is Applied on the Catalog and Category
A Catalog is a collection of Categories used to classify items, and access can be granted on catalogs or categories.
When the View or Manage permissions are applied to catalogs or categories, here’s what you must know:
-
Catalog-level security: Assigning the View or Manage permissions at the catalog level automatically applies those permissions to all categories within that catalog.
-
Category-level security: Assigning the View or Manage permissions to a specific category extends the same permission to all of its child categories. In addition, the ancestor categories and the catalog above it automatically receive the View permission.
When a category is shared with another catalog, here’s what you must know:
-
Security on category sharing: Security permissions from the source catalog aren’t extended to the target catalogs with which a category is shared.
-
Child category inheritance: When a category is shared from a source catalog to a target catalog, its child categories are automatically shared as well; however, their security permissions aren’t extended to the target catalog.
Here’s an example to understand how the security applies in a category.
Example of an electronics catalog and its category hierarchy.
Electronics
-
Smartphones
-
Phone X Series
-
Phone X Pro
-
Phone X Pro max
-
-
-
Laptops
-
Laptop Air
-
Laptop Pro
-
-
Audio and Wearables
-
Earphones X
-
Smartwatch Y
-
In this example, Electronics is a catalog that contains multiple categories.
If a user has the View or Manage permission on the Electronics catalog, the user has access to all categories within the catalog.
If a user has the Manage permission on the Phone X Series category, the user will also have Manage permission on its child categories Phone X Pro and Phone X Pro Max. Additionally, the user will inherit View permission on the ancestor, including the Smartphones category and the Electronics catalog. As a result, the user will see the following hierarchy:
Electronics
-
Smartphones
-
Phone X Series
-
Phone X Pro
-
Phone X Pro max
-
-
If a user has shared the Smartphones category in catalog Holiday Sales, then only the users with access to Holiday Sales catalog will be able to see the shared category.
To share a category from a source to a target catalog, the user will require at least the View permission on source catalog and the Manage permission on the target catalog.
Generate Catalog Instance Report
You can now generate the catalog instance report from the Search Teams page to view which users have access to the Catalog. Here’s how:
-
Select Generate Object Instance Report from Actions menu on the Search Teams page.
-
In the Generate object instance report drawer:
-
Object Type: Select Catalog.
-
Select the catalog for which you want to generate the and click the + (plus) icon.
-
Click Generate.
The scheduled process job ID appears.
-
-
Navigate to Scheduled Processes Page.
-
Search for Generate Oracle Analytics Publisher Report and download the report.
-
In the report download the attachment TeamsCatalogInstanceReport.
Here are some details shown in the instance report for catalogs:
- Catalog name and Category Name
- List of users having access to the catalog and the corresponding privileges.
- Permission sets created for the catalog.
- Fields, tabs, and attributes on the catalog for which access is granted.
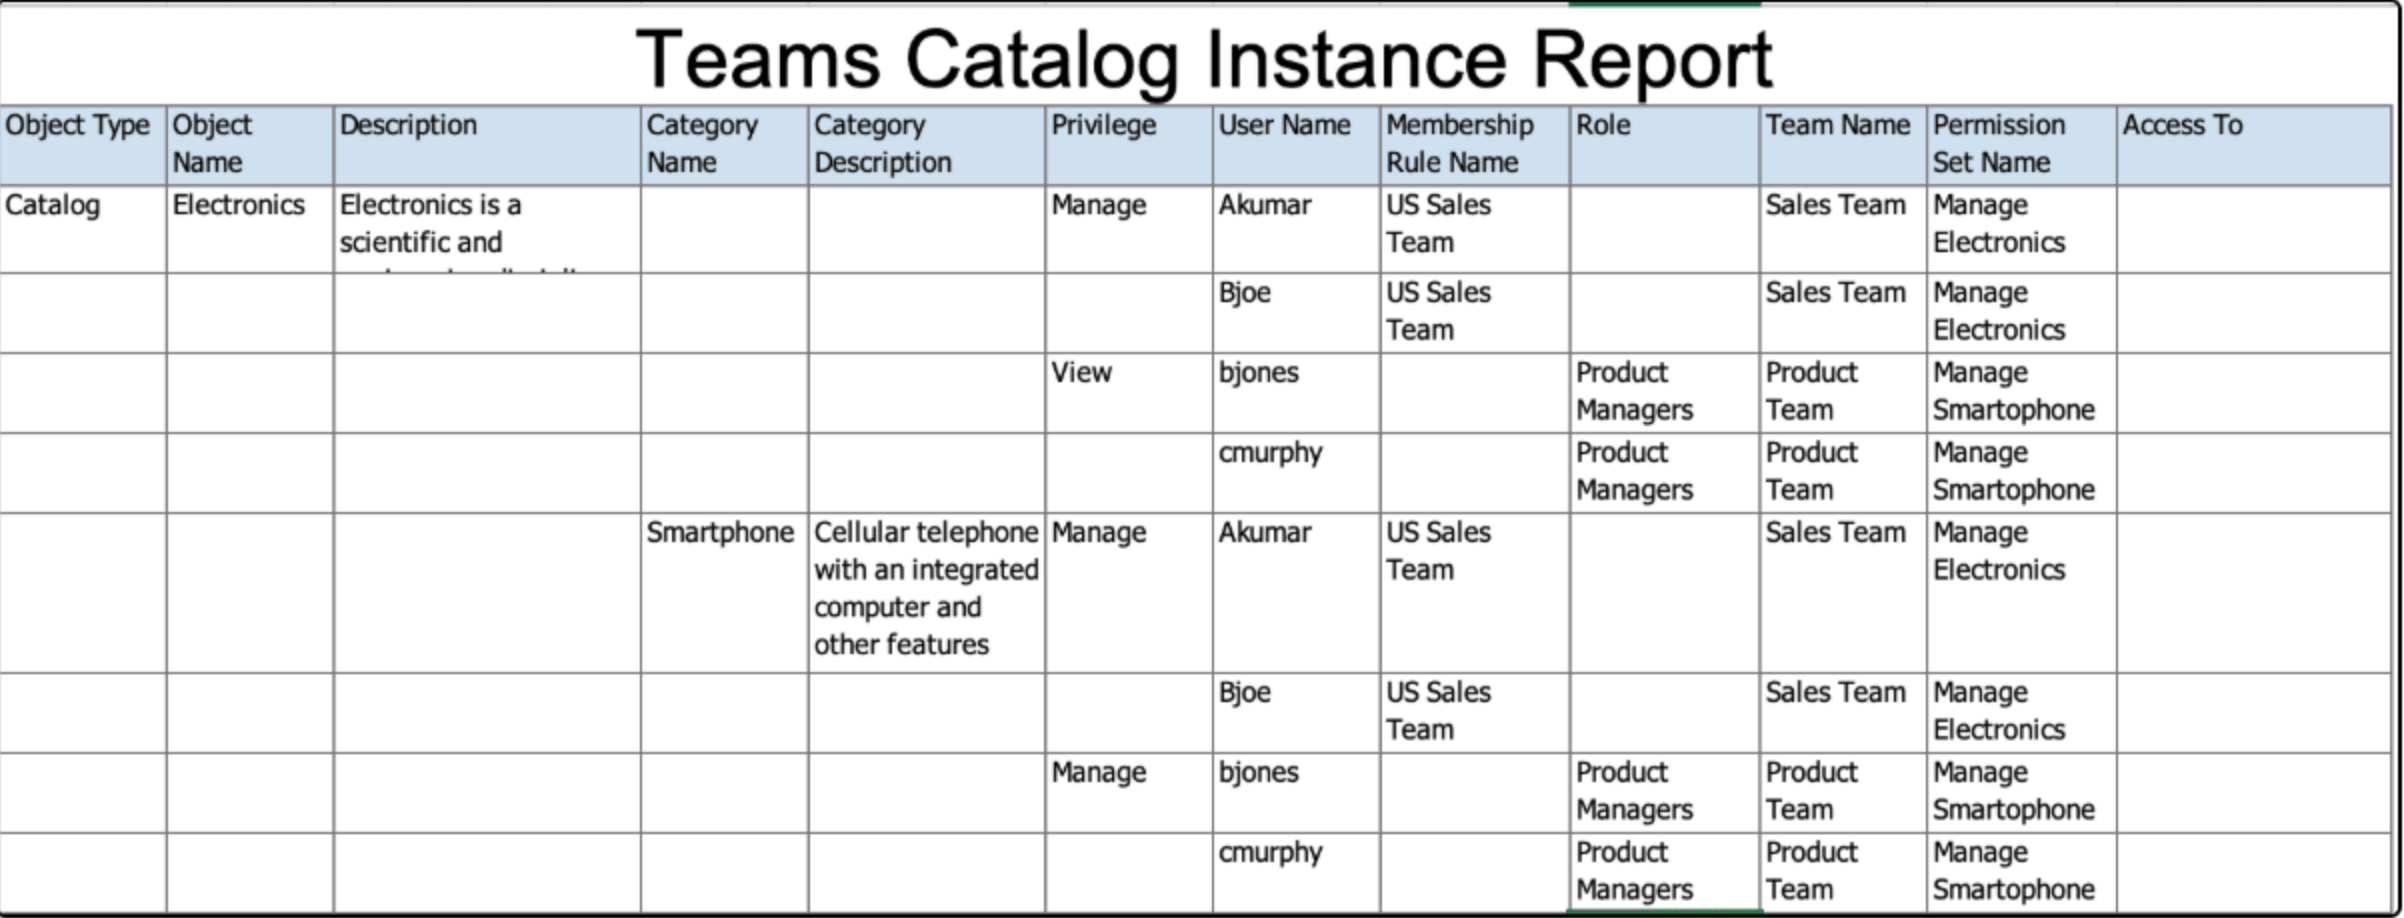
Sample Report Showing the Access Control List for Catalogs and Categories
Here’s how this feature benefits your business:
-
Allows administrators to define granular access control such as view or manage and provides control to define who has access to a catalog or a category.
-
Provides flexible user management to manage permissions in multiple distinct manners such as assigning users, roles, conditions, and so on.
-
Enables easy identification and readability of privileges that are assigned to each user.
-
Leverages pre-existing roles and enables faster security implementation by adding them to teams.
Steps to enable and configure
To use criteria-based access control for catalogs, you must enable the profile option Enable Access Control List for Catalog. By default, the profile option is set to No.
On enabling the profile option, the catalogs continue to honor the existing security settings till you create a permission and permission set which is added to an active team
Once the profile option is enabled and a permission is created for a catalog and added to an active team, all catalogs in the application will become private, regardless of their current public or private settings. You must manually assign user permissions to these catalogs.
Tips and considerations
-
The functional area catalogs aren't secured through access control lists.
-
It is recommended to create conditions with either catalog attributes or category attributes, and to avoid combining both in a single condition.
-
You can only generate the instance report for a catalog. There is no option to generate report directly for a category.
-
To share a category from a source to a target catalog, the user requires the View permission on the source and the Manage permission on the target.
-
To provide access to common catalogs after you opt in to this feature, you must create a condition to filter the common catalogs, create a permission set, and assign the permission set to a team that has the required users.
Key resources
-
Oracle Supply Chain Management Cloud: Implementing Product Management guide, available on the Oracle Help Center.
-
The feature Redwood: Create and Edit Catalogs, available on the Oracle Help Center.
Access requirements
Users who are assigned a configured job role that contains these privileges can access this feature:
To configure conditions for catalogs or categories using a filtered list:
-
Use REST Service - Identity Integration (ASE_REST_SERVICE_ACCESS_IDENTITY_INTEGRATION_PRIV)
-
Use Atom Feed - Employees Workspace (PER_ATOM_WORKSPACE_ACCESS_EMPLOYEES_PRIV)
-
Manage HCM Lists (HRC_MANAGE_HCM_LISTS_PRIV)
-
Human Capital Management Application Administrator (ORA_HRC_HUMAN_CAPITAL_MANAGEMENT_APPLICATION_ADMINISTRATOR_JOB)
To configure teams, permission sets, and conditions:
-
Manage Landing Page Layout (EGP_MANAGE_LANDING_PAGE_LAYOUT_PRIV)
-
Access Clipboard (ACA_ACCESS_CLIPBOARD_PRIV)
-
Access HCM Common Components (HRC_ACCESS_HCM_COMMON_COMPONENT)
-
Manage Search Consumer Applications Rest (EGP_MANAGE_SEARCH_CONS_REST_PRIV)
-
Monitor Product Development (ACA_MONITOR_PRODUCT_DEVELOPMENT_PRIV)
-
Configure Access Control Teams, Permission Sets, and Conditions (EGP_ACCESS_CONTROL_TEAMS_PRIV)
-
Use REST Service - Identity Integration (ASE_REST_SERVICE_ACCESS_IDENTITY_INTEGRATION_PRIV)
-
Use Atom Feed - Employees Workspace (PER_ATOM_WORKSPACE_ACCESS_EMPLOYEES_PRIV)
-
Manage HCM Lists (HRC_MANAGE_HCM_LISTS_PRIV)
-
Manage HCM Rules (HRC_MANAGE_HCM_RULES_PRIV)
-
Run Scheduled Processes (HEY_RUN_SCHEDULED_PROCESSES_PRIV)
-
Manage Scheduled Processes (FND_MANAGE_SCHEDULED_PROCESSES_PRIV)
-
Access Product Management Landing Page (EGP_ACCESS_LANDING_PAGE_PRIV)
-
Manage Scheduled Job Definition (FND_MANAGE_SCHEDULED_JOB_DEFINITION_PRIV)
-
Access Users (EGP_ACCESS_USERS_PRIV)
Users who are assigned a configured job role that contains these privileges can access this feature:
-
Access Redwood Catalogs (EGP_RW_READ_ONLY_CATALOGS_PRIV): Give access to users that have read only access.
-
Manage Redwood Catalogs (EGP_RW_MANAGE_CATALOGS_PRIV): Gives full access to users.
To access journeys setup and configure the roles in role hierarchy:
-
Manage Journey (ORA_PER_MANAGE_JOURNEY_TEMPLATE)
-
Manage Guided Journeys (ORA_PER_MANAGE_GUIDED_JOURNEYS)
-
Use REST Service - Guided Journeys Read Only (ORA_PER_REST_SERVICE_ACCESS_GUIDED_JOURNEYS_RO)
-
Use REST Service - Journey Categories List of Values (ORA_PER_REST_SERVICE_ACCESS_JOURNEY_CATEGORIES_LOV)
To access business rules:
-
Administer Sandbox (FND_ADMINISTER_SANDBOX_PRIV)
Additionally, add the following to access an object report:
-
Product Catalog Transaction Analysis Duty (FBI_PRODUCT_CATALOG_TRANSACTION_ANALYSIS_DUTY)
-
Product Transaction Analysis Duty (FBI_PRODUCT_TRANSACTION_ANALYSIS_DUTY)
-
BI Consumer Role (BIConsumer)
The duty role Redwood Item Catalogs (ORA_EGP_RW_ITEM_CATALOGS_DUTY) contains both the Access Redwood Catalogs and Manage Redwood Catalogs privileges and can be used directly with Administration users or modified to use with other job roles.