How Authoring a Customer Contract Works
You can author a customer contract in the Contracts work area. Here's the procedure to create, validate, and submit the contract for approval.
-
In the Create Contract window, you enter the basic information required to create the customer contract.
Selecting the contract type determines what additional information you can enter. This creates the contract which you can then edit.
-
Enter additional contract details.
-
Depending on the contract type, you can:
-
Add contract lines.
If the contract lines are related to projects, enter project information.
If the contract lines are related to products, enter the product type information.
If the contract lines are related to services, enter the service type information.
-
Author contract terms and review contract deviations.
-
Designate contacts as signers on the contract.
-
-
Validate the contract and correct any errors.
-
Submit the contract for approval.
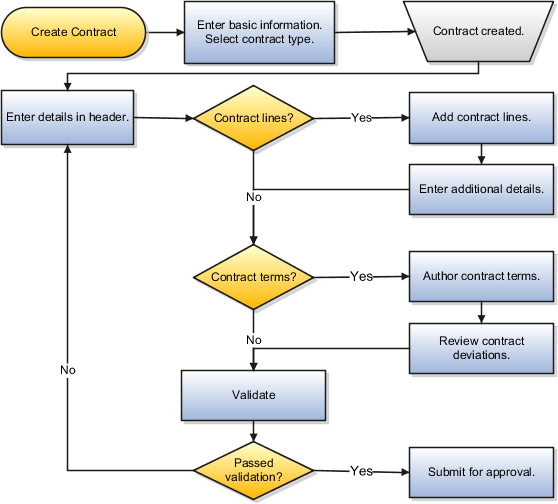
Here's the figure that outlines the process described in the sections of this topic.
Entering Basic Contract Information
In the Create Contract window, you enter the basic information to create the contract. This includes:
-
Business Unit
The business unit where you're creating the contract. Selecting the business unit determines the contract types you can select. If your contract isn'tproject-based, you can also select a business unit with no assigned ledger or legal entity.
-
Legal Entity
The internal legal entity entering into the contract. This field is required only for project-based contracts.
-
Type
A contract type is a contract category that determines the nature of the contract. For example, the type determines if the contract is a project contract, a purchasing contract, a service contract, or simple nondisclosure or employment agreement. A contract type also specifies what kind of information you can enter and the contract lines, parties, and party contacts are permitted.
-
Primary Party
The primary customer entering into the contract.
Contract Start Date
The date on which the contract begins.
Note: When you create a contract from the Create Contract UI or from a contract template, the default start date is the system date. This date is based on the time zone set up in the legal entity selected for the contract. You can override the default date.The creation date in the History tab of contract is displayed in the user-preferred time zone. You can choose your preferred time zone in the General Preferences: Regional page.
Defaulting the contract start date based on legal entity gives a consistent user experience during contract authoring. You can easily track and view the different statuses of your contracts by displaying the creation date in your own user-preferred time zone.-
Contract End Date
For service contracts, you must enter the duration - the numeric value of the validity of the contract, and the period - day, month, or year which corresponds to the duration. This value generates the end date of the contract. The end date is always calculated as start date + duration - 1 day. For example, if you enter the start date as 2/28/2018 (last date of the month) and duration as 1 year, the application calculates the end date as 2/27/2019. But, If you enter the start date as 2/28/2019 (last date of the month) and duration as 1 year, the application calculates the end date as 2/28/2020 because 2020 is a leap year and the last date of the month is 2/29/2020.
-
Contract Currency
Depending on the business unit and contract type you selected, you might also be asked to enter:
-
Number
This field appears only if you're required to enter the contract number manually. The number you enter can include any alphanumeric characters and must be unique.
-
Item Master
If the contract type includes item-based lines, then you must enter the item master inventory organization, associated with the contract business unit, that will be used to select the inventory items you're selling.
-
Pricing Effective Date
This field appears in contracts related to services. It's the date the application uses to get pricing information for a contract.
-
Pricing Strategy
This field is displayed as a read-only field created during setup. It's the strategy to price the contract based on the tiered pricing segment of the contract. The pricing strategy can include Price, Discount, Currency, Cost, and so on.
You can't change the business unit, the legal entity, the currency, the contract type, and the contract number after the contract is created.
Adding Contract Information to the Contract Header
On the contract header tab, add additional information depending on the contract type you selected. This might include:
-
Additional contract parties and contacts
-
Billing information related to projects and services, such as bill plans, revenue plans, and purchase order number
-
Information about possible contract risks and their probabilities
-
Contract documents
-
List of related contracts
-
Notes
Adding Contract Lines
If the Lines tab is visible, add contract lines to specify what you're selling. Depending on the contract type, you might enter one or more of the following line types:
-
Item
For items selected from inventory based on the item master you selected for the contract.
-
Free Form
For goods or services you're selling that aren't tracked in inventory, such as consulting services, for example.
-
Subscription
For a recurring sale of items associated with the service contract over a period of time, such as backup services, for example.
-
Coverage
Services that are provided on covered assets, such as maintenance, for example.
If the type of line you added is related to projects, then you can add project and billing information in the Line Details region. If the type of line you added is related to services, then you can add billing and renewal information.
For item, project-based contract lines, the item master, inventory item identifier, and unit of measure are all passed to the receivables invoice staging tables.
For project-based contract lines, if no purchase order number is entered at the header level, there's no default value at line level. In this case, enter the purchase order number for the line. This number is passed as a reference on Receivables invoices.
Authoring Contract Terms
If the Contract Terms tab is visible, you can add and edit contract terms and conditions.
Just what actions you can take during contract terms authoring depends on your implementation, your privileges, and contract type. Some contracts might have their contract terms already populated from a contract terms template and permit you only to add and delete clauses from the Contract Terms Library. Other contracts might allow you to create nonstandard clauses or require you to answer questions to determine if additional clauses are required. For some contracts, you might attach the contract terms in a separate document and not use the authoring capabilities of the application at all.
If you do author contract terms for your contract, select the Review Contract Deviations action on the Contract Terms tab to determine if your contract deviates from your company standards. You can add any explanations for the deviations in the report which can be attached to the notification sent to the contract approvers.
Validating and Submitting the Contract for Approval
The contract must pass validation before it's sent for approval. To validate the contract, select Validate from the Actions menu. Clicking the Submit button to submit the contract for approval also triggers the same validation process. You must fix all errors for the contract to pass validation. Resolving warnings is optional.
You can now configure the contract validation rules of type Warning and enable or disable them as required. You can also choose to change the severity of the validation from Warning to Error to prevent the contract progressing through to approval until the error is resolved.