Add New Sales Contacts and Tasks and Set Contact Preferences
Salespeople can add contacts and tasks to Oracle Sales from the add-in. They can also set the communication preferences for contacts.
Here are some other tasks that, as a salesperson, you can do in the add-in:
- Get complete sales information for emails and appointments.
- Create contacts identified by the add-in as contacts not in Sales.
- Capture Outlook emails in Sales as conversation messages, including any internal exchanges related to an account.
- Capture exchange meetings in Sales as appointments.
- Create follow-up tasks for Outlook meetings and emails.
- Prepare for meetings with a full 360-degree-view of accounts you're meeting with today.
- Act on sales tasks that need attention.
- Wrap up today’s completed meetings and get a preview of accounts you're meeting tomorrow.
- Search quickly for any type of Sales record.
Using the add-in side panel, salespeople can identify, from an email or a meeting, which of their contacts exist in Sales and which they need to add. This topic contains details about how to:
- Add contacts to Sales.
- Understand how the add-in displays contacts who aren't part of Sales.
- Set the communication preference for a contact.
- Add tasks to Sales.
Add Contacts to Sales
If the contact already exists in Sales, the side panel displays the name of the contact. If the contact doesn't exist in Sales, the Oracle Sales for Outlook home page prompts the salesperson to add the contact.
Here's how to add a contact to the sales application:
- Open an email in Oracle Sales for Outlook.
- Contacts who aren't in Sales show up separately in the side panel under Contacts
not in Sales. To add the contact to the sales application, click
Create next to the contact name, as highlighted in
the following screenshot:
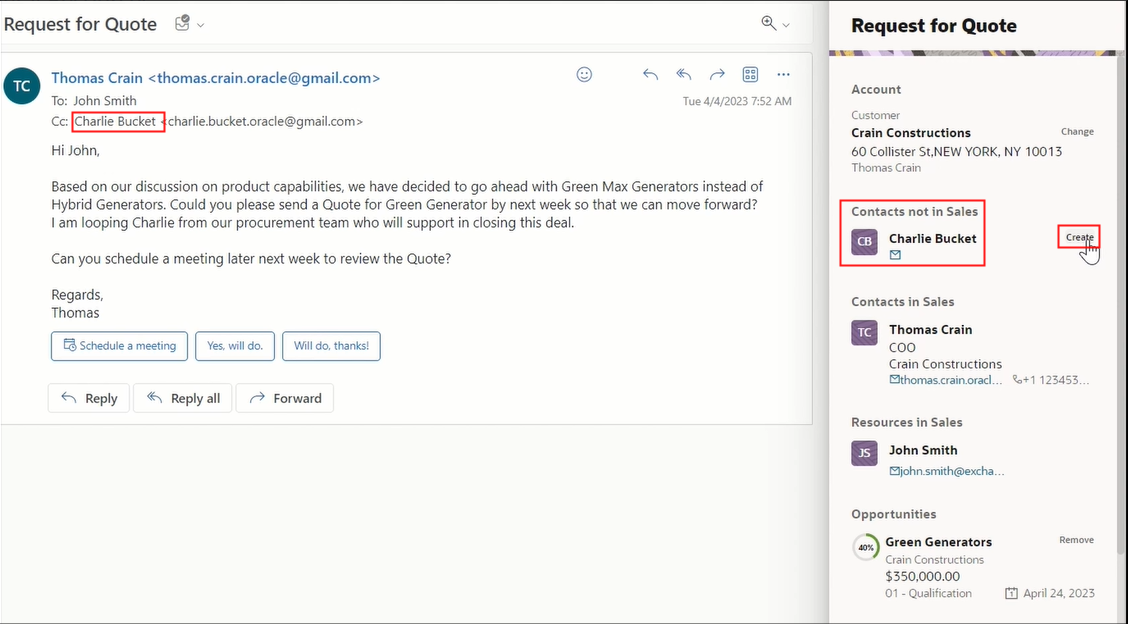 .
. - In the New Contact page, details such as first name and last name are automatically entered for you. The Email field already shows the sender's email.
- Often, the contacts you add are business contacts. So, you may want to associate
the contacts with the accounts they belong to.Note: The default account is based on the context of the email. If the account is already available on the Home page, then the application sets the account field to the same account.
- Enter other details, such as job title, affinity, and mobile or work phone.
- For the address fields, use the account address of the contact instead of typing in their personal address. To do so, select the Use Account Address check box.
- Save the contact. The full name of the contact you just added appears in the
side panel, confirming that the contact is added to Sales.Note: All the contacts you add appear in the Contacts list view. If your contact list is too long to fit on the list, you can use the search option to find a contact. When searching, enter the first name of the contact and press the Enter key on your keyboard, so that the add-in searches for the contact details on the server as well.
To edit or open the contact in the sales application, click More options (the ellipsis icon) on the home page and select the option you want.
About Users Who Aren't Part of Sales
You may have internal users who aren't part of the Sales application, that you want to list as contacts. For these contacts, you register their email domains in the Alternate Microsoft Domains field Synchronization Settings page. After the contact domains sync to Sales, they appear in a separate section named Resources in the contacts list.
See Configure Overall Sync for more information.
Set Communication Preference for a Contact
Some contacts may not want to be called on the phone, emailed, or get mail to their home or office address. Salespeople can indicate the communication preference as Do Not Call, Do Not Email, or Do Not Mail from the Microsoft 365 add-in. If the do-not-contact preferences is set in the Sales application, then the add-in indicates such preferences in the Contacts list view.
Here's how to enable communication preferences from the add-in:
- Open Contacts from the menu.
- For an existing contact, edit the record. For a new contact, set the preference
when creating the contact.
- Do Not Call is available on the contact number fields. Once you set this, the indicator reflects the preference for all the contact numbers.
- Do Not Email is available on the Email fields. Once you set this, the indicator reflects the preference for all the email IDs of the contact.
- Do Not Mail is available on the Address fields. Once you set this, the indicator reflects the preference for all the addresses of the contact.
- Save the contact.
Add Tasks to Sales
Salespeople must have an email open in Oracle Sales for Outlook to create and add tasks to the sales application.
Here's how:
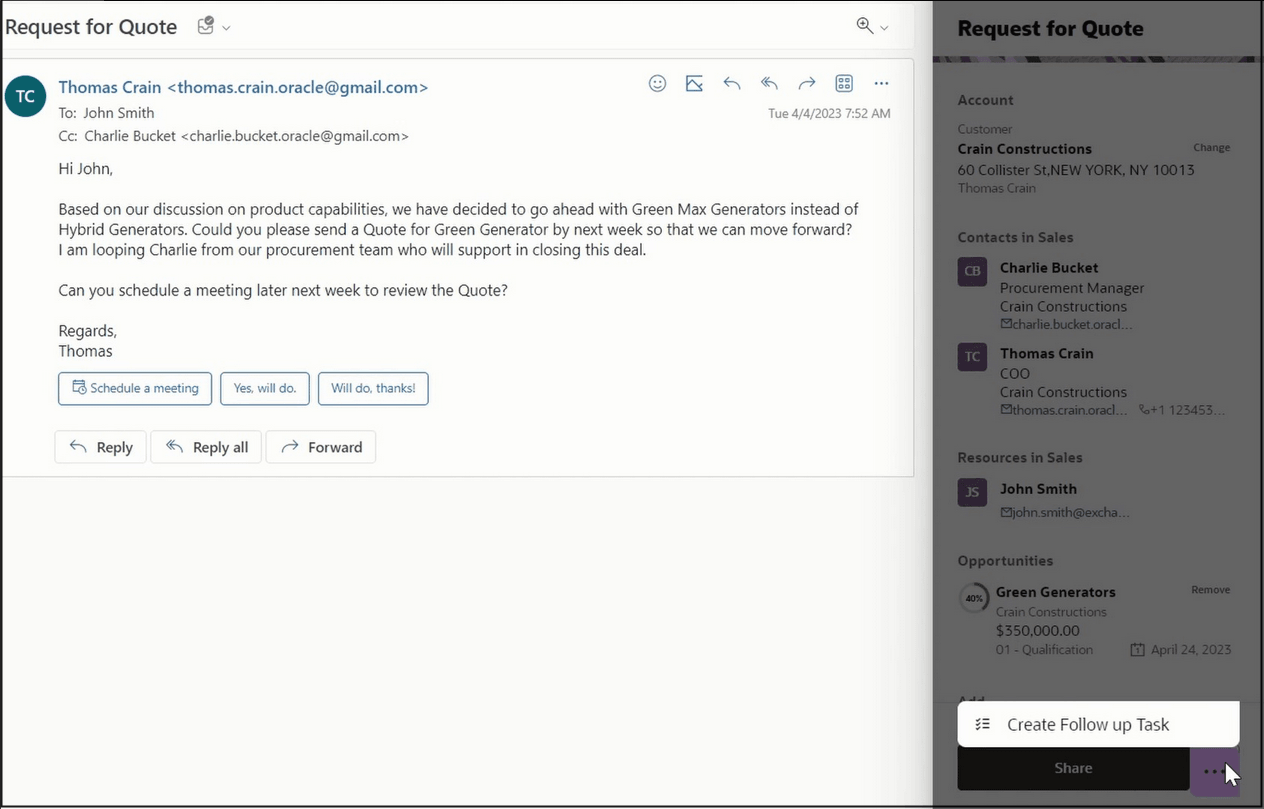
- Open the Oracle Sales for Outlook add-in.
- Click More options and select Create Follow up
Task as shown in this sample image:
- In the New Task page, details such as Subject, Type, and Description are
populated based on the email or appointment being viewed. Here's a sample image
of the Edit Task page:
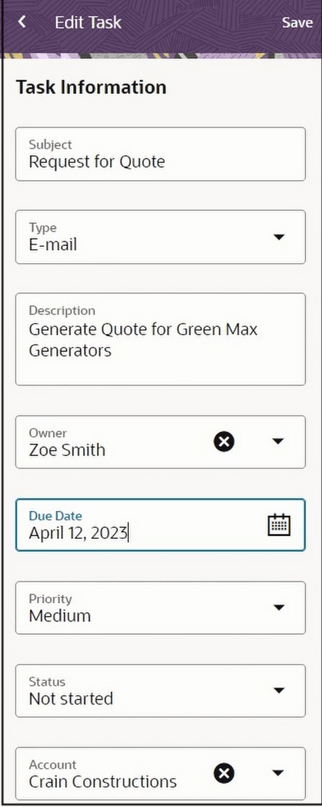
- Add other details, such as Due Date, and assign the task to the appropriate owner of the task.
- Save the task.
Salespeople can view their tasks from the Tasks card on the Insights page.