Navigate Around the Add-In
After the integration of Oracle Sales and Oracle Sales for Outlook, salespeople can access cloud data, such as contacts and appointments, through the add-in side panel. Salespeople can also manage synchronization settings for contacts and activities using the add-in side panel.
As long as salespeople have pinned the add-in, they see the add-in home page when they open or preview an email. The add-in displays relevant information about all the known and unknown contacts and resources associated with the email.
Here are the main regions of the add-in panel:
-
Home Page
-
Insights
-
Global Search
-
Navigation Bar
Home Page
The home page displays contextual pertinent sales information in the context of the email or appointment salespeople are viewing. Using the information of the sales contacts who are the recipients of the email or appointment, the add-in identifies and displays information about the associated account and its related opportunity or lead.
If no accounts are matched, then salespeople can can select Account from the Add section and select the relevant records to associate with the email or appointment.
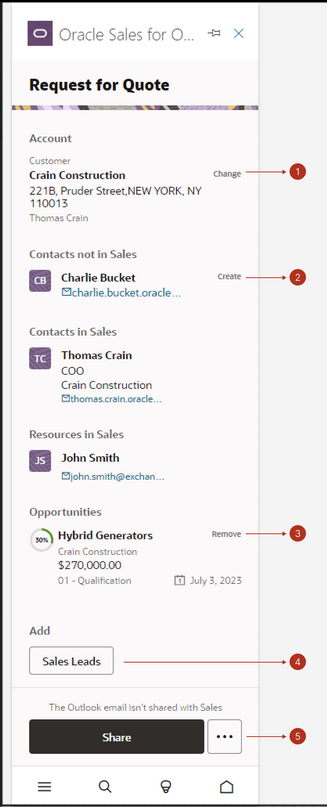
If salespeople drill into records and want to get back to the home page, they can either use the Home icon or the back button. Salespeople can get to the home page from anywhere by clicking on the Home icon on the navigation bar, as highlighted in this sample image:
![]()
This table explains the callouts in the image that follows it:
| Callout | Description |
|---|---|
| 1 |
If the automatically associated account isn't correct, salespeople can click Change from the Account section and select the relevant account. |
| 2 |
The add-in automatically identifies email and appointment recipients whose contact information isn't available in Sales. These recipients are displayed in the Contacts not in Sales section. To add them as Contacts, salespeople simply click Create. |
| 3 | If they want to remove any automatically associated opportunities from the account, salespeople click Remove from the appropriate Opportunities or Leads sections. |
| 4 |
To manually associate an email or appointment with an account, opportunity, or lead, salespeople click the relevant account, opportunity, or sales lead buttons in the Add section to pick the relevant record from Sales. |
| 5 |
Once salespeople have identified the relevant records to associate with an email or appointment, they can share it with Sales or create follow-up tasks directly from the home page. |
Insights
The Insights page offers salespeople valuable insights into activities that need attention and enables them to keep track of sales activities and log calls with ease. Salespeople can access the Insights page from anywhere by clicking on the Insights (bulb icon) on the navigation bar, as highlighted in this sample image:

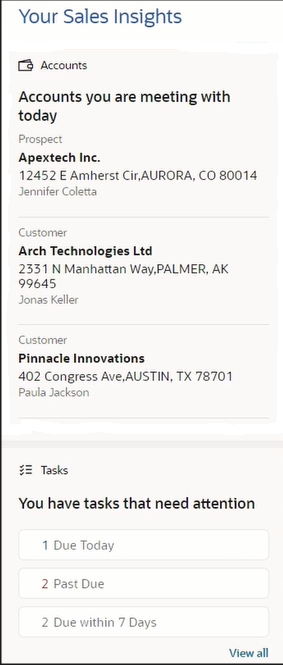
Here's a sample image of the sales Insights portion of the add-in which contains two sections: Accounts and Tasks.
Accounts
The Accounts card on the Insights page lists all the accounts salespeople are scheduled to meet with that day, ordered by their appointments' scheduled times. They can obtain a brief overview of any account by selecting it on the card. If they require more information, they can select Open in CX Sales on the account summary page to access the record in Sales through a new browser window.
![]()
After they've finished all of their appointments for the day, the Accounts card shows the accounts salespeople are scheduled to meet with the following day, allowing them to prepare beforehand.
Tasks
The Tasks card on the Insights page displays all sales tasks that are due the same day, that are past due, or that are due within the next 7 days. Salespeople can click any of the categories to see a list of tasks that require their attention, and then they can select any task to view more details. Once they complete a task, they can select a check box to mark the task complete.
To arrange the list of tasks in either ascending or descending order, salespeople can use the Sort By feature and select any field available from the task list view. When they reopen the task list later, the same sort preference persists. They can simply click View all to view all tasks in the list.
Summary of Calls to Log
The Calls To Log card enables salespeople to follow up on the day's meetings with a summary of the calls to log from the Insights page. For example, they can capture notes for the meeting outcome or create follow-up activities. Salespeople have the option to dismiss if no follow-up activity is needed. In addition, they get proactive notifications when a meeting starts. Clicking on the notification opens a page allowing them to take notes on the currently running meeting.

Global Search
The Global Search in the add-in provides powerful search capabilities for easy access to any sales record. Salespeople can quickly search across objects in a single place and view their recently accessed records when they open the Global Search. Salespeople can use multi-keyword search across multiple fields for faster and easier access to desired information. Type-ahead shows results as soon as they begin typing. They can also filter results by object types to perform targeted searches.
Salespeople can access the Global Search from anywhere by clicking the Search icon on the navigation bar, as highlighted in this sample image:

Navigation Bar
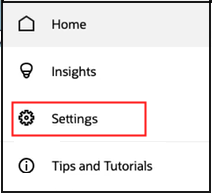
From the navigation bar, salespeople can access the Home, Tips and Tutorials, Insights, and Settings pages. For example, they can view their sync preferences from the Settings icon as highlighted in these sample images:

For more details about synchronizing records, see Overview of the Sync Between Sales and Exchange.