Set Up the Integration in Application Composer
To complete the setup for the integration, go to Application Composer. You don't need to enter a sandbox.
- Sign in to the Sales application as a setup user.
- Navigate to .
- Navigate to .
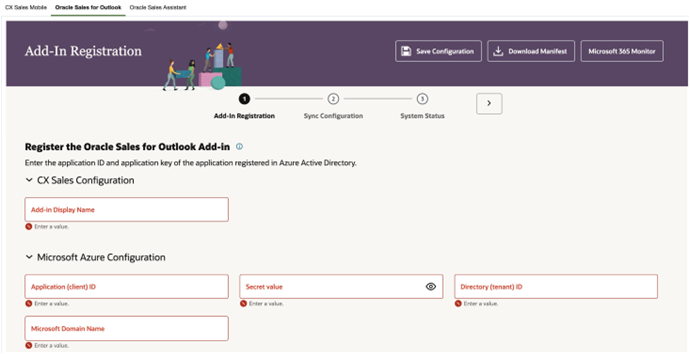
- In the Add-In Registration page, enter a Display Name. This value is the name of the add-in that users see in Outlook.
- Next, enter the values that you got from the Set Up the Application in Microsoft Azure step:
- Application (client) ID
- Client Secret Value: Remember, this is the generated Client Secret Value in Azure; it's not the generated Secret ID.
- Client Secret Expires: Copy the client secret value expires date in the application in Azure.
- Directory (tenant) ID
- Primary Microsoft Domain: You can find this by signing in to Microsoft
Azure. Go to the Microsoft Entra ID; this launches the Overview page. Copy
the Primary Domain value from the overview page.Important: If you have multiple email domains for your tenant, mark the application as multi-tenant. To mark it as multi-tenant, go to your Microsoft Azure application and go to App Registrations. Click the app you created. Select Authentication. In Supported Account Types, select Accounts in any organizational directory (Any Azure AD directory - Multitenant).
This image shows an example of the Add-In Registration page with the fields you need to enter.
- Save your changes.
- Download the manifest file: Click the Download Manifest
button and save the file for later use. You'll use the manifest file in Deploy the Add-In in Microsoft.Note: If you've changed the add-in Display Name, Application (client) ID, Directory (tenant) ID, or the Primary Microsoft Domain, then you need to re-download the manifest file and re-deploy the add-in to ensure that the new configurations are applied. This is also the case if you migrate your configurations from another environment. See: Deploy the Add-In in Microsoft.
- Click step 2 in the train to continue to set up the data synchronization settings for the integration. See Review and Modify Data Synchronization Settings for more information.