Two Ways of Creating Guidance Steps
There are two ways you can create the guidance steps. You can create them as a diagram or you can create the steps individually as a list.
Creating Guidance Steps as a Diagram
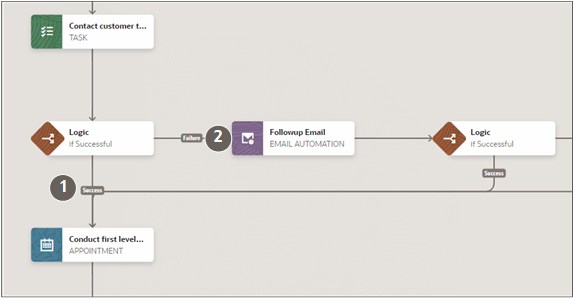
The Diagram tab makes it easy to view the different branches of your guidance and understand the whole guidance flow. You add steps by clicking Add (the plus sign) on a step or on a link between steps. Doing so automatically links steps together in the success path.
The success path, the steps salespeople take if everything goes according to plan, shows vertically.
To add the failure path, the steps that should be taken when things don't go as planned, you add a Logic node and create the failure path from that. The failure path steps are displayed horizontally.
This screenshot shows a part of the vertical success path (callout 1) and the horizontal failure path (callout 2).
Creating and Viewing Guidance Steps as a List
You can also create or edit steps individually on the Steps tab. Because the Steps tab lists the steps, you can link the steps only by editing each step individually and entering the next steps. The Steps tab doesn't include the Logic node because all the branching information is captured in the steps themselves.
You can now use Guidance Step Templates to efficiently create and edit guidances. Step templates lets you build cadence flows that leverages the best practices in the industry. This saves time when creating and rolling out your guidances.
Key Difference Between the Two Authoring Modes
You enter success criteria and the next success and next failure steps differently in the two authoring modes. When you create the guidance as a diagram, you create the branches by adding a Logic node. The Logic node makes it possible to create the next failure step right away and also stores the success criteria for the preceding step. By contrast, when you create steps in the Step tab, the success criteria and the next success and next failure steps are stored in the step itself. There's no Logic step.
Commonalities
In both UIs, you create each step it two parts:
-
You add the step.
You enter the step name and description that appears in the guidance setup UIs, select the step type, and select an action.
For manual steps (steps that ask salespeople to take action), you must either select task or appointment type. It's the addition of a smart action to manual steps that determines which buttons or windows appear for users.
-
You click Edit Properties in the Actions menu to enter information specific for the step type you added.
For the manual steps (tasks and appointments), the information you enter in properties is what salespeople see in the Guidance panel at runtime. It also provides the template for the task or appointment that's being created in the background.
For automatic steps, you specify details of the automation. For the Wait step, you enter the wait time, for example. For the Email Automation step, you specify the email template to be used, and so on.
Note: As a best practice, click Edit Properties right after you add each step. This way you won't forget to enter required information and save time troubleshooting during testing.