Add New Companies and Contacts to Oracle Sales
You can add a contact to Oracle Sales only after exporting that contact's corresponding company with DaaS. Even if the company already exists in Sales, you must re-export or match the contact's company with DaaS before you can import the contact in Sales.
Topics:
Add New Companies to Sales
To add companies to Sales:
DaaS provides the Sales and Service template type, as well as the following mappings:
-
CXCompanyExport
-
CXContactExport
-
CXCompanyMatch
-
CXContactMatch
Mappings created with the Sales and Service template type create a ZIP file, which
contains the individual CSV files for import. See DaaS Files for Import Management in Sales. Download and extract
the ZIP file to a local folder, and then import each CSV file. The
Account.csv file (the parent file) must be imported first, before
the child files.
- Search for Data in DaaS
-
The first step to finding data is to search DaaS with the search box.
- Export Data from DaaS
-
When you export data from DaaS, you must select a mapping between the attributes in the export file that you create and those in Sales. You can use a provided mapping or you can create a new mapping. Then, you export the company data into a file for later import.
-
From your search results, click Select Companies to Export.
-
Choose Export All for everything listed in the Results section.
-
Choose Export Selected for selected items in the Results section.
-
-
In the Export dialog, enter information in the following table:
Field
Description
Name
Enter a unique name for your export mapping. Consider a name that matches the name of the company or contact you are targeting; for example,
company_company_exportorcompany_contact_export.If you don't specify a name, then
DAAS_COMPANY_EXPORT_year_month_day_timeis applied to a company mapping andDAAS_CONTACT_EXPORT_year_month_day_timeis applied to a contact mapping.Description
Optionally, enter a description for the mapping.
Mapping
Select a mapping from the list. You can select a default mapping for most import jobs into Sales.
To add the data using Import Management in Sales (recommended), select CXCompanyExport or CXContactExport. Skip to Step 6 to continue with the procedure.
Default mappings set by the administrator cannot be edited or deleted. If you need different attributes in the mapping, you can create a new map based on a default map to edit the attributes: click Create Mapping, and from the Template Type list select Sales and Service.
Note: You may want to create a new mapping if you only need a subset of the provided attributes, or if you created a custom attribute in Sales that you need to map to a DaaS attribute.
Include Company Hierarchies If you have an Oracle Account Enrichment subscription, you can select to export company hierarchies, to show all relationships (headquarters, subsidiaries, branches, and so on) within the company family. The Create Mapping page displays with the attributes discovered in your search of DaaS. Now, you must map those attributes to the attributes in Sales.
-
Use the following elements to complete the mapping:
Note: When data is exported from DaaS with the Sales and Service template, Import Management auto-maps all the mappable fields. To map and import unmapped fields to custom attributes, use the Save As feature on the Import Map page. Custom attributes must be created separately using a sandbox in Application Composer.Element
Description
Name
Enter a unique name for your export mapping.

Click this icon to remove any attributes you don't want.
Add Attribute
Use this to add any attributes you extended in Sales. Or, add an attribute mapping that you accidentally removed but that you still want added. For each drop-down list displayed, select the attribute or object.
See Edit Sales Mappings for information about the Sales attributes.
-
Click Save & Select. The Select Mapping dialog displays.
-
Save the file to your local drive.
-
- Import Data into Sales
-
To import the company or contact data that you downloaded from DaaS into Sales, create an import activity.
To import the files into Sales:
Note: Mappings created with the Sales and Service template type create a ZIP file, which contains the individual CSV files for import. Download and extract the ZIP file to a local folder, and then import each CSV file. TheAccount.csvfile (the parent file) must be imported first, before the child files (Address.csv,Classification.csv,AdditionalIdentifier.csv,AdditionalName.csv).-
From the Navigator, click Tools > Import Management.
-
On the Manage Imports page, click the Create Import Activity button.
-
On the Enter Import Options page, provide values for each field as shown in the following table:
Field
Description
Name
Name of the import. Object
Select Account for companies. Select Contact for contacts.
File Name
Browse and select a text file in CSV format. Provide a file name within 40 characters. Note: If your source file has more than 50,000 records, then you must manually split the file into several smaller files with less than 50,000 records each. The file import page only permits 50,000 records for each import job. Alternatively, you can use the External Cloud Data Loader Client, which can accept files with more than 50,000 records. See the My Oracle Support (support.oracle.com) document External Data Loader Client. Enable High Volume Import DaaS imports should select this option (under Advanced Options). -
Click Next. The Map Fields page shows the first row of the data from your source file. By default, the application tries to automatically map each of the source file columns to the appropriate target object attribute. If some of the columns in your file couldn't be mapped, then drag the target attribute onto the Attribute Name column under the Source File region.
The data in unmapped columns aren't imported.
-
Select a predefined mapping from the list of available mappings under the Import Mapping drop-down list. If you're reusing an import mapping, then both the source and target columns are already populated.
Leave the Attribute Name field blank for any column that you don't want to import.
-
Click Validate Data to check the field mapping.
-
Click Next. On the Review and Submit page, review the import activity configuration. If you didn't run the prevalidation on the Map Fields page, then you get a notification message to run the validation process.
-
Click Validate Data to check the data in your source file. Any validation errors display on the Mapping Validation screen. If you get warnings about unmapped columns, then you can ignore these columns, and proceed to submit the import job.
-
Click Submit to queue the import. Repeat this for all child CSV import files.
-
- Verify the Import of Data into Sales.
-
To check that the company or contact data from DaaS was imported successfully into Sales:
-
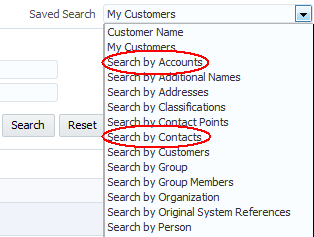
On the Manage Customers page, from the Saved Search list, select Search by Accounts or Search by Contacts.
-
In the Name field, enter the name of one of the companies or contacts in the file that you imported, and then use the other fields to further narrow your search (such as, Customer Type Equals Prospect). Click Search.

-
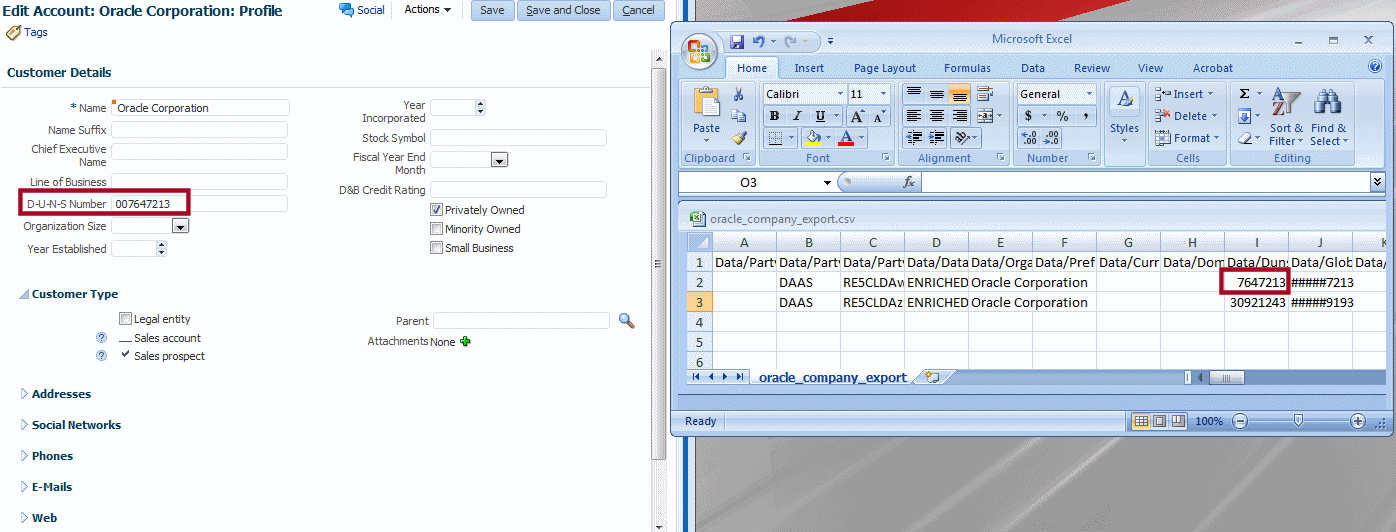
In the Search Results table, click the company name to see details of the imported data. For contacts, click the company name associated with the customer name that you entered to see details of the imported data.
-
Verify that the following fields match the information for the company or contact in the file. For example, confirm that the D-U-N-S numbers match.
-
Add New Contacts to Sales
To add new contacts to companies that already exist in your Sales application, first either export the contact's company data (see Add New Companies to Sales) or match the contact's company data (see Match Data in Sales). Then, you can add new contacts the same way you add new companies.