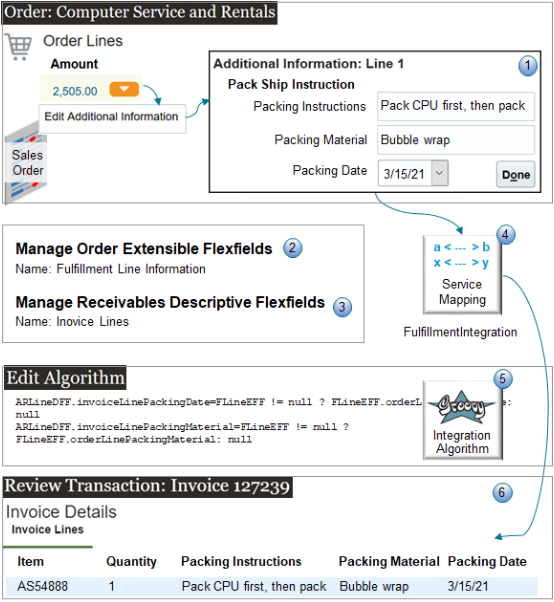
Integrate Your Own Order Line Attributes between Order Management and Oracle Receivables
Use an extensible flexfield in Order Management to capture your own order line details, then send them to a descriptive flexfield so you can see these details on invoices in Oracle Receivables.
Note
-
Assume you need to add your own shipping details when you create an order line for a new sales order in Order Management. The Order Entry Specialist clicks the down arrow in the Amount column on the order line, clicks Edit Additional Information, then uses it to add the details.
-
Packing instructions
-
Packing material
-
Packing date
-
-
You will add these attributes to the Fulfillment Line Information extensible flexfield.
-
You edit the Invoice Lines descriptive flexfield so you can display shipping details on the invoice line.
-
You modify the FulfillmentIntegration service mapping to map the extensible flexfield between Order Management and the descriptive flexfield in Accounts Receivable.
-
You create an integration algorithm that specifies the data to communicate.
-
You use the Billing work area to examine the invoice that contains the shipping details.
Summary of the Setup
-
Prepare your setup.
-
Edit extensible flexfield.
-
Edit service mapping for extensible flexfield.
-
Edit descriptive flexfield.
-
Edit service mapping for descriptive flexfield.
-
Create integration algorithm.
-
Test your set up.
This topic uses example values. You might need different values, depending on your business requirements.
Prepare Your Setup
-
Enable the Invoice option in the Enable Custom Payloads for Downstream Integration feature.
For details, see Get Started with Integrating Order Management with Other Oracle Applications.
-
Create a sand box, and activate the Service Mappings tool and the Flexfields tool in the sand box.
For details, see Create a Sandbox So You Can Edit Service Mappings.
-
Create a spreadsheet that you can use as a memory jogger.
Memory Jogger
|
Row |
Attribute |
Value |
|---|---|---|
|
1 |
View object |
|
|
2 |
View object attribute for packing instructions on the order line |
|
|
3 |
View object attribute for packing material on the order line |
|
|
4 |
View object attribute for packing date on the order line |
|
|
5 |
SdoNameSpace |
|
|
6 |
View object attribute for packing instructions on the invoice line |
|
|
7 |
View object attribute for packing material on the invoice line |
|
|
8 |
View object attribute for packing date on the invoice line |
You will use this spreadsheet to help you remember some of the values that you need during the procedure. Add values while you do the setup, such as when you create the flexfields. We'll provide you reminders at the appropriate points.
Memory Jogger for This Example
Here's the spreadsheet with the values that you will use in this example.
|
Row |
Attribute |
Value |
|---|---|---|
|
1 |
View object |
FulfillLineEffBShipment__InstructionsprivateVO |
|
2 |
View object attribute for packing instructions on the order line |
orderLinePackingInstructions |
|
3 |
View object attribute for packing material on the order line |
orderLinePackingMaterial |
|
4 |
View object attribute for packing date on the order line |
orderLinePackingDate |
|
5 |
SdoNameSpace |
http://xmlns.oracle.com/apps/flex/financials/receivables/transactions/autoInvoices/TransactionLineDff/ For details, see Use Descriptive Flexfields to Integrate Order Management with Other Oracle Applications. |
|
6 |
View object attribute for packing instructions on the invoice line |
invoiceLinePackingInstructions |
|
7 |
View object attribute for packing material on the invoice line |
invoiceLinePackingMaterial |
|
8 |
View object attribute for packing date on the invoice line |
invoiceLinePackingDate |
Edit Extensible Flexfield
Create the extensible flexfields that your Order Entry Specialist will use to enter shipping details on the order line.
-
In the Setup and Maintenance work area, go to the task.
-
Offering: Order Management
-
Functional Area: Orders
-
Task: Manage Order Extensible Flexfields
-
-
On the Manage Order Extensible Flexfields page, search for the value.
Attribute
Value
Name
Fulfillment Line Information
This is a predefined extensible flexfield that you can use on the order header.
-
In the search results, click Actions > Edit.
-
Create the context.
-
On the Edit Extensible Flexfield page, click Manage Contexts.
-
On the Manage Contexts page, click Action > Create.
-
On the Create Context page, set the values.
Attribute
Value
Name
Pack Ship Instructions
Code
Pack Ship Instructions
API Name
PackShipInstructions
Enabled
Contains a check mark.
Behavior
Single Row
-
In the Context Usages area, click Actions > Create, then set the value.
Attribute
Value
Name
Additional Fulfillment Line Information
-
Click Save.
-
-
Create the segment for the packing instructions.
-
In the Context Sensitive Segments area, click Actions > Create.
-
On the Create Segment page, set values, then click Save and Close.
Attribute
Value
Name
Order Line Packing Instructions
Code
Order Line Packing Instructions
API Name
orderLinePackingInstructions
Data Type
Character
Enabled
Contains a check mark.
Table Column
Select any value that's available.
Value Set
30 Characters
Prompt
Packing Instructions
Display Type
Text Box
-
-
Create the segment for the packing material.
-
In the Context Sensitive Segments area, click Actions > Create.
-
On the Create Segment page, set the values, then click Save and Close.
Attribute
Value
Name
Order Line Packing Material
Code
Order Line Packing Material
API Name
orderLinePackingMaterial
Data Type
Character
Enabled
Contains a check mark.
Table Column
Select any value that's available.
Value Set
30 Characters
Prompt
Packing Material
Display Type
Text Box
-
-
Create the segment for the packing date.
-
In the Context Sensitive Segments area, click Actions > Create.
-
On the Create Segment page, set the values, then click Save and Close.
Attribute
Value
Name
Order Line Packing Date
Code
Order Line Packing Date
API Name
orderLinePackingDate
Enabled
Contains a check mark.
Data Type
Date
Table Column
Select any value that's available.
Value Set
Standard Date
Prompt
Packing Date
Display Type
Date/Time
-
-
Click Save and Close on the current page and subsequent pages until you're on the Edit Extensible Flexfield page.
-
Deploy your flexfield.
-
Click Deploy Flexfield.
-
Sign out of Oracle Applications, then sign back in.
-
Navigate back to the Manage Order Extensible Flexfields page, then search the Name attribute for Fulfillment Line Information.
-
Identify Your View Object and View Attributes
-
Download and open the extensible flexfield.
-
Click Actions > Download Flexfield Archive, wait for processing to finish, then, in the Confirmation dialog, click Download.
-
In the dialog that displays, save the file to your preferred location.
-
Use your browser's download feature to navigate to the archive.
For example, if you're using Firefox, click the down arrow on the top banner, then navigate to the 10008_DOO_FULFILL_LINES_ADD_INFO file, such as C:\Users\user_name \Downloads\10008_DOO_FULFILL_LINES_ADD_INFO.zip.
-
Unzip 10008_DOO_FULFILL_LINES_ADD_INFO.zip.
-
Navigate to the folder.
C:\Users\user_name \Downloads\10008_DOO_FULFILL_LINES_ADD_INFO\oracle\ oracle\apps\scm\doo\processOrder\flex\fulfillLineContextsB\view -
Use an XML editor to open the FulfillLineEffBShipment__InstructionsprivateVO.xml file.
-
-
Identify the name of the view object.
-
Find the Name attribute of the view object, then note its value. It should be on about the 3rd or 4th line of code.
<ViewObject xmlns="http://xmlns.oracle.com/bc4j" Name="FulfillLineEffBShipment__InstructionsprivateVO" -
In this example, the value is FulfillLineEffBShipment__InstructionsprivateVO. Add this value to row 1 of the memory jogger.
-
-
Identify the names of your custom attributes.
Search the File for the Value
Edit Your Memory Jogger
<ViewAttribute Name="orderLinePackingInstructions"
Add orderLinePackingInstructions to row 2 of your memory jogger.
<ViewAttribute Name="orderLinePackingMaterial"
Add orderLinePackingMaterial to row 3 of your memory jogger.
<ViewAttribute Name=" orderLinePackingDate"
Add orderLinePackingDate to row 4 of your memory jogger.
You will use these values in your service mapping.
Edit Service Mapping for Extensible Flexfield
Edit a service mapping so Order Management can send attribute details to Oracle Receivables.
-
Go to the Pricing Administration work area.
Use order administrator privileges so you can access the integration algorithm and service mappings that you use in the Pricing Administration work area to set up the integration.
-
Click Tasks, then, under Order Management Configuration, click Manage Service Mappings.
-
Enter your sand box.
-
On the Manage Service Mappings page, in the Name column, click FulfillmentIntegration.
-
Add an entity.
-
On the Edit Service Mappings page, on the Entities tab, click Actions > Add Row, then set the values.
Attribute
Value
Entity
PackingInstructions_Custom
Description
Context for an extensible flexfield on the order line. It contains details about packing instructions.
-
In the details area, add your attributes, then click Save.
Attribute
Type
Primary Key
FulfillLineId_Custom
Long
Contains a check mark.
OrderLinePackingInstructions_Custom
String
Doesn't contain a check mark.
OrderLinePackingMaterial_Custom
String
Doesn't contain a check mark.
OrderLinePackingDate_Custom
Date time
Doesn't contain a check mark.
Note
-
You must use the same Type for each attribute that you specify for the corresponding attribute in the descriptive flexfield. If you don't use the same data type, then your service mapping might not fail when compiling but will fail in your runtime environment. The runtime failure might be difficult to troubleshoot because you might not encounter any errors but your set up might not work as you expected.
-
Make sure Allow Null contains a check mark for each attribute that you add.
-
Leave other attributes empty.
-
-
-
Modify the source.
-
Click Sources.
-
In the Sources list, click the row that has the value.
Attribute
Value
Source
InvoiceSources
-
In the InvoiceSources Details area, click View > Columns, then enable Joined Entity, and Joined Entity Attribute.
-
On the Entity Mappings tab, click Actions > Add Row, set the values, then click Save.
Attribute
Value
Entity
PackingInstructions_Custom
Scroll all the way to the end of the list. Pricing Administration adds your custom attributes at the end of the list.
Type
View Object
View Object
FulfillLineEffBShipment__InstructionsprivateVO
Get the value from your memory jogger. Recall that this is the name of the view object that you noted earlier in this procedure when you downloaded the flexfield archive.
Query Type
Join
Query Attribute
FulfillLineId
Joined Entity
FulfillLine
If you can't pick the value, select another line in the Entity Mappings list, then go back to your PackingInstructions_Custom line.
Joined Entity Attribute
FulfillLineId
-
On the Attribute Mappings tab, add your custom attributes, then click Save.
Attribute
View Object Attribute
FulfillLineId_Custom
FulfillLineId
OrderLinePackingInstructions_Custom
OrderLinePackingInstructions
This is the value from your memory jogger.
OrderLinePackingMaterial_Custom
OrderLinePackingMaterial
This is the value from your memory jogger.
OrderLinePackingDate_Custom
OrderLinePackingDate
This is the value from your memory jogger.
-
-
Map your custom attributes to the service that Order Management uses to communicate with Oracle Receivables.
-
Click Services.
-
In the Services list, click the row that has the value.
Attribute
Value
Service
InvoiceService
-
In the InvoiceService Details area, click Actions > Add Row, set the values, then click Save.
Attribute
Value
Entity
PackingInstructions_Custom
Alias
Leave empty
Read
Enabled
Write
Enabled
Leave the other attributes at their default values.
-
At the bottom of the page, in the PackingInstructions_Custom Entities area, add your custom attributes so Order Management can communicate them through the InvoiceService.
Attribute
Alias
FulfillLineId_Custom
FulfillLineId
OrderLinePackingInstructions_Custom
OrderLinePackingInstructions
OrderLinePackingMaterial_Custom
OrderLinePackingMaterial
OrderLinePackingDate_Custom
OrderLinePackingDate
Enable the Read attribute and Write attribute for each of the attributes that you add.
-
Click Save and Close, then click Done.
-
Edit Descriptive Flexfield
Create the descriptive flexfields that Oracle Receivables will use to store the data that it receives from Order Management.
-
In the Setup and Maintenance work area, go to the task.
-
Offering: Financials
-
Functional Area: Receivables
-
Task: Manage Receivables Descriptive Flexfields
-
-
On the Manage Receivables Descriptive Flexfields page, search for the value.
Attribute
Value
Name
Invoice Lines
-
In the search results, click Actions > Edit.
-
Create the Global Segment for the packing instructions.
-
In the Global Segments area, click Actions > Create.
-
On the Create Segment page, set values.
Attribute
Value
Name
Invoice Line Packing Instructions
Code
Invoice Line Packing Instructions
API Name
invoiceLinePackingInstructions
Enabled
Contains a check mark.
Data Type
Character
Table Column
Select any one that's available.
Value Set
120 Characters
Prompt
Packing Instructions
Display Type
Text Box
-
Click Save and Close.
-
-
Create the Global Segment for the packing material.
-
In the Global Segments area, click Actions > Create.
-
On the Create Segment page, set values.
Attribute
Value
Name
Invoice Line Packing Material
Code
Invoice Line Packing Material
API Name
invoiceLinePackingMaterial
Enabled
Contains a check mark.
Data Type
Character
Table Column
Select any one that's available.
Value Set
30 Characters
Prompt
Packing Material
Display Type
Text Box
-
Click Save and Close.
-
-
Create the Global Segment for the packing date.
-
In the Global Segments area, click Actions > Create.
-
On the Create Segment page, set values.
Attribute
Value
Name
Invoice Line Packing Date
Code
Invoice Line Packing Date
API Name
invoiceLinePackingDate
Enabled
Contains a check mark.
Data Type
Date
Table Column
Select any one that's available.
Value Set
Standard Date
Prompt
Packing Date
Display Type
Date/Time
-
Click Save and Close.
-
-
On the Edit Descriptive Flexfield page, click Save and Close.
-
Deploy your flexfield.
-
On the Manage Receivables Descriptive Flexfields page, click Deploy Flexfield.
-
Sign out of Oracle Applications, then sign back in.
-
Navigate back to the Manage Receivables Descriptive Flexfields page, then search the Name attribute for Invoice Lines.
-
Identify Your Name Space and Attributes
-
Download the descriptive flexfield.
-
Click Actions > Download Flexfield Archive, wait for processing to finish, then, in the Confirmation dialog, click Download.
-
In the dialog that displays, save the file to your preferred location.
-
Use your browser's download feature to navigate to the archive.
For example, if you're using Firefox, click the down arrow on the top banner, then navigate to the navigate to the 222_RA_CUSTOMER_TRX_LINES file, such as C:\Users\user_name\Downloads\222_RA_CUSTOMER_TRX_LINES.zip.
-
-
Unzip 222_RA_CUSTOMER_TRX_LINES.zip.
-
Navigate to the folder.
C:\Users\user_name\Downloads\222_RA_CUSTOMER_TRX_LINES.zip\oracle\apps\flex\financials\receivables\transactions\autoInvoices\TransactionLineDff\view -
Use an XML editor to open the TransactionLineFLEXVO.xml file.
-
Search for the SdoNameSpace attribute, then copy the value of this attribute to row 5 of the memory jogger.
For this example, assume SdoNameSpace in your XML contains this value.
SdoNameSpace="http://xmlns.oracle.com/apps/flex/financials/receivables/transactions/autoInvoices/TransactionLineDff/". -
Identify the names of your custom attributes.
Search the File for the Value
Edit Your Memory Jogger
<ViewAttribute Name="invoiceLinePackingInstructions"Add invoiceLinePackingInstructions to row 6 of your memory jogger.
<ViewAttribute Name="invoiceLinePackingMaterial"Add invoiceLinePackingMaterial to row 7 of your memory jogger.
<ViewAttribute Name="invoiceLinePackingDate"Add invoiceLinePackingDate to row 8 of your memory jogger.
You will use these values in your service mapping.
Edit Service Mapping for Descriptive Flexfield
Edit the service mapping so Oracle Receivables can receive the attribute details that Order Management sends.
-
Go to the Pricing Administration work area.
Use order administrator privileges so you can access the integration algorithm and service mappings that you use in the Pricing Administration work area to set up the integration.
-
Click Tasks, then, under Order Management Configuration, click Manage Service Mappings.
-
Enter your sand box.
-
On the Manage Service Mappings page, in the Name column, click FulfillmentIntegration.
-
Modify the entity.
-
On the Edit Service Mappings page, on the Entities tab, click the row that contains the value.
Attribute
Value
Entity
TransactionLineDff
-
In the details area, verify that you have the attributes you need. If any are missing, add them now.
Attribute
Type
FulfillLineId
Long
NameSpace
String
XsiType
String
__FLEX_Context
String
Note
-
Make sure the Primary Key doesn't contain a check mark for any of the attributes you add.
-
Make sure Allow Null contains a check mark for each attribute that you add.
-
Make sure the Referenced Entity attribute for FulfillLineId contains ARInterfaceLine.
-
Leave other attributes empty.
-
-
In the details area, add your attributes, then click Save.
Attribute
Type
InvoiceLinePackingMaterial_Custom
String
InvoiceLinePackingDate_Custom
Date
InvoiceLinePackingInstructions_Custom
String
Note
-
Make sure the Primary Key doesn't contain a check mark for any of the attributes you add.
-
Make sure Allow Null contains a check mark for each attribute that you add.
-
Leave all other attributes empty.
-
-
-
Modify the source.
-
Click Sources.
-
In the Sources list, click the row that has the value.
Attribute
Value
Source
InvoiceSources
-
In the InvoiceSources Details area, on the Entity Mappings tab, click the row that has the value.
Attribute
Value
Entity
TransactionLineDff
-
In the TransactionLineDff Details area, add your attributes.
Attribute
View Object Attribute
Expression
FulfillLineId
FulfillLineId
-
NameSpace
-
"http://xmlns.oracle.com/apps/flex/financials/receivables/transactions/autoInvoices/TransactionLineDff/"Note
-
Get this value from row 5 of your memory jogger. Recall that this is the value of the SdoNameSpace attribute that you copied from the TransactionLineFLEXVO.xml file.
-
Enclose the value with double quotation marks.
XsiType
-
"TransactionLineFLEX"Enclose the value with double quotation marks.
__FLEX_Context
-
Enter the value of the context code from the XML file you downloaded for your flexfield archive. This example uses GlobalSegment1, so you can leave _FLEX_Context empty. If you didn't include a global segment in this example, you would enter "ItemPriceForSupplier".Enclose the value with double quotation marks.
InvoiceLinePackingMaterial_Custom
-
-
InvoiceLinePackingDate_Custom
-
-
InvoiceLinePackingInstructions_Custom
InvoiceLinePackingInstructions
-
Note
-
FulfillLineId should already exist, but if it doesn't, add it.
-
The dash ( - ) means to leave the value empty.
-
Capitalization is important. For example, use InvoiceLinePackingInstructions in the View Object Attribute, don't use invoiceLinePackingInstructions.
-
Click Save.
-
-
-
Map your custom attributes to the service that Order Management uses to communicate with Oracle Receivables.
-
Click Services.
-
In the Services list, click the row that has the value.
Attribute
Value
Service
InvoiceService
-
In the InvoiceService Details area, click the row that has the value.
Attribute
Value
Entity
TransactionLineDff
-
At the bottom of the page, in the TransactionLineDff Entities area, add your custom attributes so Order Management can communicate them through the InvoiceService.
Attribute
Alias
FulfillLineId
FulfillLineId
NameSpace
-
XsiType
-
__FLEX_Context
-
InvoiceLinePackingMaterial_Custom
InvoiceLinePackingMaterial
InvoiceLinePackingDate_Custom
InvoiceLinePackingDate
InvoiceLinePackingInstructions_Custom
InvoiceLinePackingInstructions
Note
-
FulfillLineId should already exist, but if it doesn't, add it.
-
Enable the Read attribute and Write attribute for each of the attributes that you add except don't enable Write for FulfillLineId.
-
Use the memory jogger when you set the Alias for your custom attributes. Its the same value as the API Name attribute from the segment that you created for the descriptive flexfield.
-
-
Click Save and Close, then click Done.
-
Create Integration Algorithm
To implement the logic you need, you will modify the integration algorithm from another help topic.
-
Go to the Pricing Administration work area.
Use order administrator privileges so you can access the integration algorithm and service mappings that you use in the Pricing Administration work area to set up the integration.
-
Click Tasks, and then, under Order Management Configuration, click Manage Algorithms.
-
On the Manage Algorithms page, click Actions > Create.
-
On the Create Algorithm page, set values.
Attribute
Value
Name
Integrate_OM_and_AR Custom
You can use any text, except you must suffix the name with a space, then the word Custom.
-
Click Save.
-
Click Variables, click Actions > Add Row, set the values, then click Save.
Attribute
Value
Name
ARIntegration
Data Type
Data Object
Required
Contains a check mark.
Input/Output
Input and Output
Internal Service Schema
FulfillmentIntegration.InvoiceService
-
Click Algorithm.
-
Click Add Step > Conditional Action.
-
In the Data Sets area, click Add Row, then set the values.
Attribute
Value
Name
FLine
Variable Path
ARIntegration.FulfillLine
Primary
Contains a check mark.
-
In the Execute Condition area, click Add Condition > Default Action.
-
In the Actions window, add the code, then click Save.
ARLineDFF.invoiceLinePackingDate=FLineEFF != null ? FLineEFF.orderLinePackingDate: null
ARLineDFF.invoiceLinePackingMaterial=FLineEFF != null ? FLineEFF.orderLinePackingMaterial: null
Here's what the code does.
Code
Description
ARLineDFF.invoiceLinePackingDate=FLineEFF
!= null ? FLineEFF.orderLinePackingDate: null
If the value of the orderLinePackingDate attribute on the extensible flexfield.
-
Contains a value. Set the value of the invoiceLinePackingDate attribute on the descriptive flexfield to the value that orderLinePackingDate contains.
-
Doesn't contain a value. Set the value of invoiceLinePackingDate to empty.
ARLineDFF.invoiceLinePackingMaterial=FLineEFF
!= null ? FLineEFF.orderLinePackingMaterial: null
If the value of the orderLinePackingMaterial attribute on the extensible flexfield.
-
Contains a value. Set the value of the invoiceLinePackingMaterial attribute on the descriptive flexfield to the value that orderLinePackingMaterial contains.
-
Doesn't contain a value. Set the value of invoiceLinePackingMaterial to empty.
-
-
Test your algorithm, then click Save and Close.
-
Add your integration algorithm to the service mapping.
-
In the Pricing Administration work area, click Tasks, then, under Order Management Configuration, click Manage Service Mappings.
-
On the Manage Service Mappings page, in the Name column, click FulfillmentIntegration.
-
On the Edit Service Mapping page, click Services.
-
In the Services list, modify the row that contains the InvoiceService service.
Service
Implementation Type
Implementation
InvoiceService
Algorithm
Integrate_OM_and_AR Custom
This the name of the integration algorithm that you just created.
-
Click Save and Close.
-
Test Your Setup
-
Create a sales order.
-
Go to the Order Management work area and create a sales order.
Attribute
Value
Customer
Computer Service and Rentals
-
Add an order line and set the values on the line.
Attribute
Value
Item
AS54888
Quantity
1
-
Click the down arrow on the order line, then click View Additional Information.
-
In the Additional Information dialog that displays, click Ship Instructions, then verify that the Ship Instructions area contains your Packing Material and Packing Date flexfield attributes.
-
Add some test values in your flexfield attributes, then click Done.
Attribute
Value
Packing Instructions
Test value for packing instructions.
Packing Material
Test value for packing material.
Packing Date
Test value for packing date.
-
Click Submit.
Assume your order number is 55748.
-
-
Verify that Order Management correctly sends your data to Accounts Receivable.
-
Make sure you have the privileges that you need to manage Accounts Receivable. For details, see Privileges That You Need to Implement Order Management.
-
Go to the Billing work area, then click Tasks > Manage Transactions.
For details, go to Using Receivables Credit to Cash, then search for Requirements for Completing a Receivables Transaction.
-
On the Manage Transactions page, search for the transaction.
Attribute
Value
Business Unit
Vision Operations
Transaction Source
Distributed Order Orchestration
Reference
55748
-
On the Review Transaction page, in the Invoice Details area, verify that the invoice contains attributes and attribute values for packing instructions, packing material, and packing date.
-
Another Example
Assume you set up two items in the Product Information Management work area:
- AS54888
- AS54888-1
These items are identical except the Description attribute is different for the AS54888-1.
You want to use the description for the AS54888 throughout order fulfillment except you want to use the description from AS54888-1 on the invoice in Accounts Receivable.
Here's your solution.
- Create an extensible flexfield on the fulfillment line and use it to store the description for the AS54888-1 from the Product Information Management work area.
- Create a descriptive flexfield on the invoice.
- Use a service mapping to map the extensible flexfield to the descriptive flexfield.
Create an integration algorithm to integrate the extensible flexfield in Order Management with the descriptive flexfield in Oracle Receivables.