Use Integration Algorithms to Implement Complex Logic
Use an integration algorithm to implement specialized behavior when you integrate Order Management.
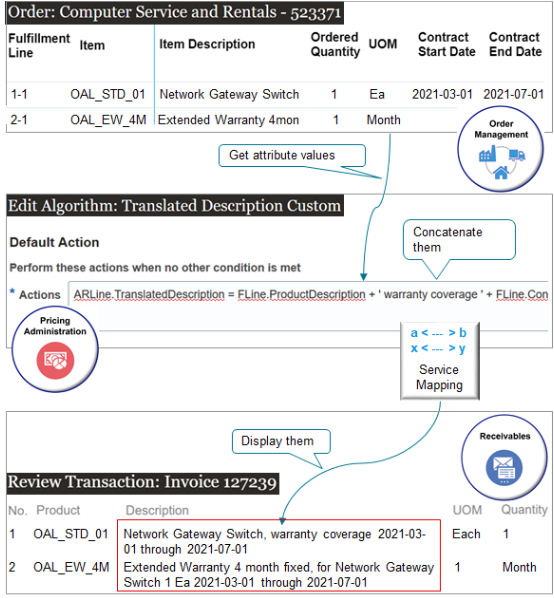
Here's an example.
Note
-
You get attributes value on the fulfillment line from Order Management, including the Item Description, Quantity, Unit of Measure, Contract Start Date, and Contract End Date.
-
You use an integration algorithm in the Pricing Administration work area to concatenate the values for the attributes into a single string of text, and then use a service mapping to map it to Accounts Receivable.
-
The Description on the invoice in Accounts Receivable displays the string.
-
If the sales order contains a coverage item, such as a warranty, then you create another concatenated string for the description of the coverage item. This string includes the description of the coverage item plus the same attribute values that the string for the covered line has.
Your mapping requirement is too complex to meet with only a service mapping, so you set up an integration algorithm that creates the concatenated string and gets the data you'll need from the order line that has the covered item.
Here are the items that you use in this example.
-
The OAL_STD_01 Network Gateway Switch is the covered item.
-
The OAL_EW_4M_Fixed Extended Warranty is a coverage item that covers the gateway switch.
Summary of the Setup
-
Create integration algorithm.
-
Add functions to your integration algorithm.
-
Add a step to your integration algorithm.
-
Manage service mapping.
-
Test your setup.
For a multimedia demonstration of a similar set up, go to Order Management Enhancements. The demonstration starts at 49:35 and ends at 59:03.
Create Integration Algorithm
-
Create your algorithm.
-
Make sure you have the privileges that you need to administer Order Management.
-
Go to the Pricing Administration work area.
-
In the Pricing Administration work area, click Tasks.
-
Under Order Management Configuration, click Manage Algorithms.
-
On the Manage Algorithms page, create a new algorithm.
Attribute
Value
Name
Translated Description Custom
Description
Get the description for a covered line, and then add it to the description for the coverage line on the invoice.
-
-
Click Variables, click Actions > Add Row, then set the values.
Attribute
Value
Name
ARIntegration
Data Type
Data Object
Required
Contains a check mark.
Input/Output
Input and Output
Internal Service Schema
FulfillmentIntegration.InvoiceService
This value instructs the algorithm to get the attribute values you need from the invoice service.
This variable will store the object definition that you need to integrate with Accounts Receivable.
-
Click Save.
Add Functions to Your Integration Algorithm
Try it.
-
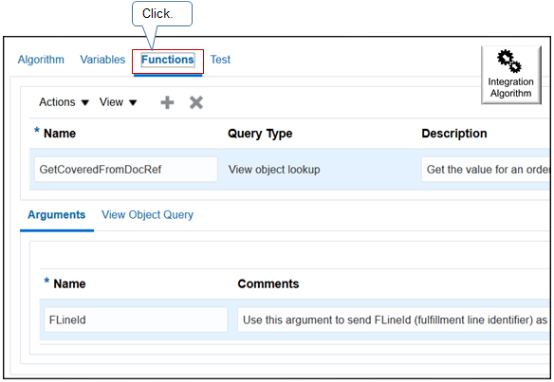
Add a function.
-
Click Functions, click Actions > Add Row, then set the values.
Attribute
Value
Name
GetCoveredFromDocRef
Query Type
View Object Lookup
Description
Get the value that identifies the order line that has the covered item.
-
In the Arguments area, click Add Row, then add an argument.
Attribute
Value
Name
FLineId
Comments
Use this argument to send the FLineId (fulfillment line identifier) that identifies the fulfillment line that contains the coverage item, and then return a value that identifies the covered item.
-
Click View Object Query, then add a new query.
Attribute
Value
Application Module
oracle.apps.scm.doo.common.process.model.applicationModule. DooExtensibleMapperAM
This is a predefined value. You must not use any other value.
Application Configuration
DooExtensibleMapperAMLocal
This is a predefined value. You must not use any other value.
View Object
DocumentReferenceVO
This view object contains mapping values from coverage item and the covered item.
View Criteria
getCoveredLine
The getCoveredLine view criteria on the DocumentReferenceVO view object helps the algorithm identify the fulfillment line that has the covered item.
Single Row
Contains a check mark.
-
In the Bind Variables area, create a new bind variable.
Attribute
Value
Bind Variable Name
flineId
Bind Variable Value
FLineId
-
Click Save.
-
-
Add another function.
Attribute
Value
Name
GetCoveredFLine
Query Type
View Object Lookup
Application Module
oracle.apps.scm.doo.common.process.model.applicationModule.DooExtensibleMapperAM
This is a predefined value. You must not use any other value.
Application Configuration
DooExtensibleMapperAMLocal
This is a predefined value. You must not use any other value.
View Object
FulfillLineVO
View Criteria
getFLineByFLineId
Single Row
Contains a check mark.
Bind Variable Name
FLineId
Bind Variable Value
FLineId
-
Add another function.
Attribute
Value
Name
GetItemDesc
Query Type
View Object Lookup
Application Module
oracle.apps.scm.doo.common.process.model.applicationModule.DooExtensibleMapperAM
This is a predefined value. You must not use any other value.
Application Configuration
DooExtensibleMapperAMLocal
This is a predefined value. You must not use any other value.
View Object
oracle.apps.scm.productModel.items.publicView.ItemPVO
View Criteria
GetItem
Single Row
Contains a check mark.
Bind Variable Name
InventoryItemId,OrganizationId
Bind Variable Value
InventoryItemId,OrganizationId
-
Click Save.
Add a Step to Your Integration Algorithm
Add a conditional step that runs differently depending on whether the order line that the algorithm is currently processing contains a covered item or a coverage item.
Try it.
-
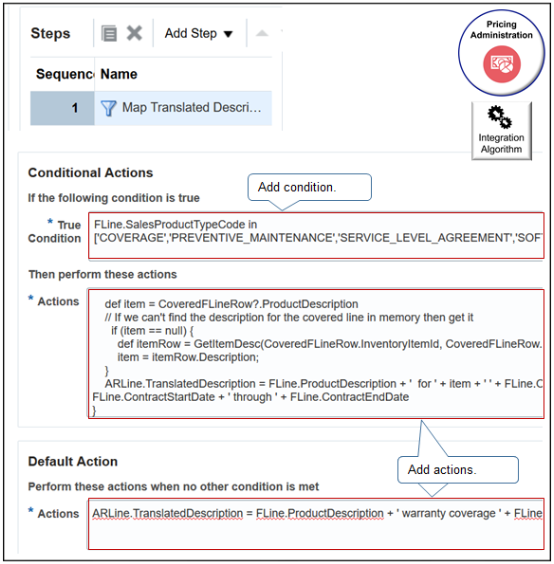
Click the Algorithm tab, click Add Step > Conditional Action, then set the values.
Attribute
Value
Name
Map Translated Description
Description
Concatenate the descriptions for the covered item and the coverage item.
-
In the Data Sets area, add three new data sets.
Name
Variable Path
Primary
Cardinality
Data Set Join
FLine
ARIntegration.FulfillLine
Contains a check mark.
Leave empty.
Leave empty.
ARLine
ARIntegration.ARInterfaceLine
Doesn't contain a check mark.
One
FulfillLineId:{Fline.FulfillLineId}
AllFLines
ARIntegration.FulfillLine
Doesn't contain a check mark.
Many
Leave empty.
The data sets help the algorithm to filter and find the data that it can access.
-
FLine. Will contain details from the fulfillment line that the algorithm will use to write the description onto the covered item.
-
ARLine. Identifies the destination where the algorithm will write the concatenated string.
-
AllFLines. Use data from the coverage line to go and get the description from the fulfillment line that contains the covered item. AllFLines allows the algorithm to traverse all fulfillment lines in the sales order until it finds the line that has the covered item.
-
-
In the Execute Condition area, click Add Condition > Add Local Variable, then add two local variables.
Variable Name
Default
CoveredFlineDocRefRow
Leave empty.
CoveredFlineRow
Leave empty.
You will use these variables to store temporary values that the algorithm needs while processes data.
-
In the Execute Condition area, click Add Condition > Default Action.
You will add the code that creates the concatenated string for the covered item.
In the Default Action area, add code in the Actions window.
ARLine.TranslatedDescription = FLine.ProductDescription + ' warranty coverage ' + FLine.ContractStartDate + ' through ' + FLine.ContractEndDatewhere
Code
What it Does
ARLine.TranslatedDescription =Create a variable named TranslatedDescription and add it to the ARLine data set.
Store the value of the concatenated string in the TranslatedDescription variable.
FLine.ProductDescriptionGet the value of the description for the fulfillment line that we're currently processing. This is the description for the covered item from the FLine data set.
FLine.ContractStartDateGet the value of the contract start date for the covered item from the FLine data set.
If you add coverage to a covered item, then you use the Contract Start Date and Contract End Date on the covered item, not the coverage item. The coverage item provides coverage for a duration, such as 1 Year, but not for the specific start date and end date. Instead, you set the start date and end date on the covered item. This way, you can use the coverage item for a variety of covered items.
FLine.ContractEndDateGet the value of the contract end date for the covered item from the FLine data set.
+ ' ' +Concatenate the value of one string to another. Insert a space between these concatenated strings.
+ ' warranty coverage ' ++ ' through ' +Concatenate the value of one string to another. Insert text between these concatenated strings. For example, insert the phrase
warranty coveragebetween these concatenated strings.This action applies to fulfillment lines that contain a standard item or shippable item.
This code specifies how to concatenate the attribute values. Here's an example of the run time value that this code renders.
Network Gateway Switch, warranty coverage 2021-03-01 through 2021-07-01 -
Add the code that creates the concatenated string for the coverage item.
You will add a new conditional action that applies only if the item is a coverage item. The concatenation is slightly different for a coverage item than it is for a covered item. You also need to get some details from the line that has the covered item.
-
In the Execute Condition area, click Add Condition > True Condition.
-
In the Conditional Actions area, add code in the True Condition window.
FLine.SalesProductTypeCode in ['COVERAGE','PREVENTIVE_MAINTENANCE','SERVICE_LEVEL_AGREEMENT','SOFTWARE_MAINTENANCE','INCLUDED_WARRANTY']The SalesProductTypeCode attribute on the fulfillment line specifies whether the line contains a coverage item, such as a maintenance agreement, warranty, and so on. So this code specifies to do this conditional action only if the line contains a coverage item.
-
Add code in the Actions window.
CoveredFlineDocRefRow = GetCoveredFromDocRef(FLine.FulfillLineId)
if (CoveredFlineDocRefRow?.DocSublineId != null) {
  // Locate the covered line according to DocSublineId
  CoveredFLineRow = AllFLines.locate([FulfillLineId: Long.parseLong(CoveredFlineDocRefRow?.DocSublineId)])

  // If we can't find the covered line in memory then get it
  if (CoveredFLineRow == null)
    CoveredFLineRow = GetCoveredFLine(CoveredFlineDocRefRow?.DocSublineId)

  def item = CoveredFLineRow?.ProductDescription
  // If we can't find the description for the covered line in memory then get it
  if (item == null) {
    def itemRow = GetItemDesc(CoveredFLineRow.InventoryItemId, CoveredFLineRow.InventoryOrganizationId)
    item = itemRow.Description;
  	}
  ARLine.TranslatedDescription = FLine.ProductDescription + '  for ' + item + ' ' + FLine.OrderedQty.toString() + ' ' + FLine.OrderedUom + ' ' + FLine.ContractStartDate + ' through ' + FLine.ContractEndDate
}
where
Code
Description
CoveredFlineDocRefRow = GetCoveredFromDocRef(FLine.FulfillLineId)Use the GetCoveredFromDocRef function that you created earlier on the algorithm to get the value the identifies the fulfillment line that contains the covered item.
Store the value in the CoveredFlineDocRefRow variable that you created earlier on the algorithm.
if (CoveredFlineDocRefRow?.DocSublineId!=null)Ask whether
DocSublineIdcontains a value. If it does contain a value, then it means the sales order contains a covered line and we need to process it.CoveredFLineRow = AllFLines.locate([FulfillLineId: Long.parseLong(CoveredFlineDocRefRow?.DocSublineId)])Set the value of the CoveredFLineRow attribute that you created earlier on the algorithm to the fulfillment line that contains the covered item.
CoveredFlineDocRefRow?.DocSublineIdmeans to get this value from theDocSublineIdattribute of the AllFLines data set.if (CoveredFLineRow == null) CoveredFLineRow = GetCoveredFLine(CoveredFlineDocRefRow?.DocSublineId)If we can't find the covered line in memory then get it. Use the
DocSublineIdattribute with the GetCoveredFLine function that you created earlier to find it, then use the results to set the value for CoveredFLineRow to the line that contains the covered item.def item = CoveredFLineRow?.ProductDescriptionDefine a variable named
itemand set its value to the contents of the ProductDescription attribute. Get the value of ProductDescription from the fulfillment line that CoveredFLineRow identifies.if (item == null){ def itemRow = GetItemDesc(CoveredFLineRow.InventoryItemId, CoveredFLineRow.InventoryOrganizationId) item = itemRow.Description; }If your
itemvariable is empty, then it means we still need to find the description for the covered line in memory.Define a variable named itemRow.
Use the GetItemDesc method that you added earlier to the algorithm to get the values of the InventoryItemId attribute and the InventoryOrganizationId attribute from the fulfillment line that CoveredFLineRow contains. Use these values to verify that the row contains the item, then set the value of itemRow to this fulfillment line.
Set the
itemvariable to the value of the Description on the fulfillment line that itemRow identifies.ARLine.TranslatedDescription = FLine.ProductDescription + ' for ' + item + ' ' + FLine.OrderedQty.toString() + ' ' + FLine.OrderedUom + ' ' + FLine.ContractStartDate + ' through ' + FLine.ContractEndDateCreate a variable named TranslatedDescription and add it to the ARLine data set. Store the value of the concatenated string in TranslatedDescription.
FLine contains attribute values for the line that we're currently processing, which is the coverage item.
-
FLine.ProductDescriptionis the description of the coverage item. -
itemis a variable that contains the description of the covered item, such as Desktop Computer. -
FLine.OrderedQty.toString()is the quantity of the coverage item, converted to a string. -
FLine.ContractStartDateis the start date of the coverage item. -
FLine.ContractEndDateis the end date of the coverage item.
This description is going on the invoice line that has the coverage item, so its useful to identify the item that the coverage covers.
Here's an example of the run time value that this code renders.
Extended Warranty 4 month fixed, for Network Gateway Switch 1 Ea 2021-03-01 through 2021-07-01 -
-
Click Save and Close, then close the Manage Algorithms tab.
-
Manage Service Mapping
Modify the service mapping so it provides the data attributes that your new integration algorithm.
-
Create a sand box. For details, see Create a Sandbox So You Can Edit Service Mappings.
-
In the Tasks pane, under Order Management Configuration, click Manage Service Mappings.
-
On the Manage Service Mappings page, click FulfillmentIntegration.
-
Click Sources.
-
Click the row that contains InvoiceSource in the Source column.
-
Add an attribute that you will use to send the translated description to Accounts Receivable.
-
In the Entity Mappings list, click the row that contains ARInterfaceLine in the Entity column.
-
In the ARInterfaceLine Details area, click Actions > Add Row, then set the value.
Attribute
Value
Attribute
TranslatedDescription
View Object Attribute
Leave empty
Expression
Leave empty
-
-
Add attributes for the fulfillment line.
-
In the Entity Mappings list, click the row that contains FulfillLine in the Entity column.
-
In the FulfillLine Details area, add new attributes.
Attribute
View Object Attribute
SalesProductTypeCode
SalesProductTypeCode
ProductDescription
ProductDescription
OrderedQty
OrderedQty
OrderedUom
OrderedUom
ContractStartDate
ContractStartDate
ContractEndDate
ContractEndDate
-
-
Set attributes on the service so it calls your algorithm.
-
Click Services.
-
Click the row that contains InvoiceService in the Service column.
-
Set the values.
Implementation Type
Implementation
Algorithm
Translated Description Custom
This is the name of the integration algorithm that you created earlier in this procedure.
-
-
Add your attributes to the service so the service includes them in the payload that it sends to Accounts Receivable.
-
In the Entities list, click the row that contains ARInterfaceLine in the Entity column.
-
In the ARInterfaceLine Entities area, add an attribute.
Attribute
Read
Write
Translated Description
Contains a check mark.
Contains a check mark.
-
In the Entities list, click the row that contains FulfillLine in the Entity column.
-
In the FulfillLine Entities area, add your attributes.
-
SalesProductTypeCode
-
ProductDescription
-
OrderedQty
-
OrderedUom
-
ContractStartDate
-
ContractEndDate
Make sure the Read attribute and the Write attribute contain a check mark for each attribute that you add.
-
-
Click Save and Close
-
-
Publish your algorithm.
-
Click Tasks, and then under Order Management Configuration, click Manage Algorithms
-
On the Manage Algorithms page, click the row that contains Translated Description Custom in the Name column.
-
Click Actions > Publish.
-
Test Your Setup
-
Create a sales order.
-
Go to the Order Management work area, create a sales order, then add two order lines.
Item
Quantity
OAL_STD_01 Network Gateway Switch
1
OAL_EW_4M_Fixed Extended Warranty
1
-
Click Submit
-
Notice the sales order number. For this example, assume its 529986.
-
-
Verify that Order Management correctly sends your data to Oracle Receivables.
-
Make sure you have the privileges that you need to manage Accounts Receivable. For details, see Privileges That You Need to Implement Order Management.
-
Go to the Billing work area, then click Tasks > Manage Transactions.
For details, see Requirements for Completing a Receivables Transaction.
-
On the Manage Transactions page, search for the transaction.
Attribute
Value
Business Unit
Vision Operations
Transaction Source
Distributed Order Orchestration
Reference
529986
-
On the Review Transaction page, click View Image.
-
On the printed invoice that displays, verify the description for the invoice line that has the network switch.
Attribute
Value
Description
Network Gateway Switch, warranty
coverage 2021-03-01 through 2021-07-01
Notice that this value is a concatenation of the description of the covered item, and then the start date and end date of the coverage. It is the result of the Default action that you created in the algorithm.
-
Verify the description for the invoice line that has the extended warranty.
Attribute
Value
Description
Extended Warranty 4 month fixed,
for Network Gateway Switch 1 Ea 2021-03-01 through 2021-07-01
Notice that this value is a concatenation of the description of the coverage item, and then the description of the covered item, and then the quantity, unit of measure, start date, and end date of the coverage item.
This line contains a coverage item, so it meets the condition from the algorithm. It is the result of the Conditional action that you created in the algorithm.
-