Integrate Order Management with Global Trade Management
Create an integration between Oracle Order Management and Oracle Global Trade Management.
You will create an ERP Cloud connection to access a Global Trade Management event. Use the connection as the source for the integration, then use Integration Cloud Service to set up an event that calls the Global Trade Management service.
This topic provides a summary of the set up. This integration is similar to the integration that you create with transportation management or trade compliance. For details, see Overview of Integrating Order Management with Transportation Management and Overview of Setting Up Trade Compliance.
Summary of the Setup
-
Set up Order Management.
-
Create connection for Order Management.
-
Create connection for Global Trade Management.
-
Map source to target.
-
Communicate attributes from Order Management to Global Trade Management.
-
Communicate attributes from Global Trade Management to Order Management.
-
Add business identifiers and activate integration.
Set up Order Management
-
Set the Check for Trade Compliance When User Submits Sales Order parameter to Yes. For details, see Manage Order Management Parameters.
-
Set up trade compliance screening so it happens when you submit a sales order in Order Management, or include the DOO_TradeCompliance task in an orchestration process.
-
Use a predefined orchestration process or create your own.
-
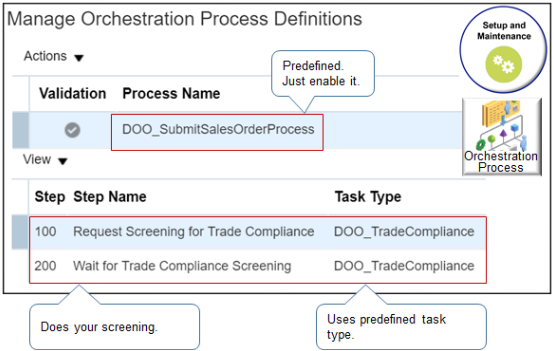
Use the predefined DOO_SubmitSalesOrderProcess orchestration process to validate the sales order during the submit. It already references the predefined DOO_TradeCompliance task type, which does screening for you. For details about orchestration processes, see Set Up Orchestration Processes.
-
If you don't use DOO_SubmitSalesOrderProcess, then add steps that call the DOO_TradeCompliance task type to some other predefined orchestration process or one that you create.
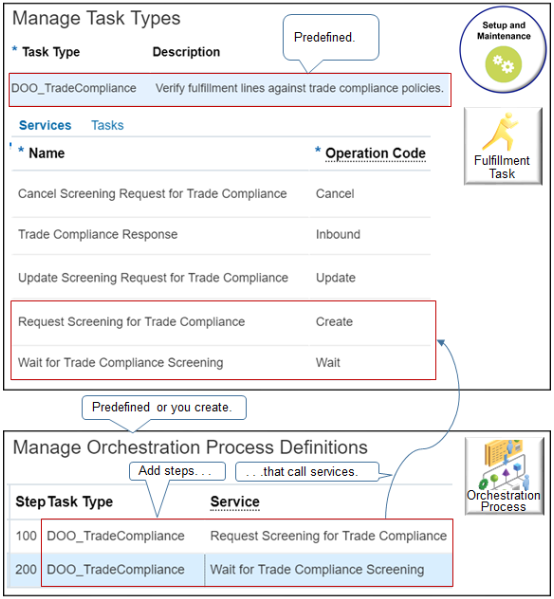
Make sure you include these steps.
Step
Task Type
Service
100
DOO_TradeCompliance
Request Screening for Trade Compliance
200
DOO_TradeCompliance
Wait for Trade Compliance Screening
It isn't necessary to use steps 100 and 200. You can place these steps anywhere in the sequence of steps. But you must request screening first, and then wait.
-
-
Route the request.
Note
-
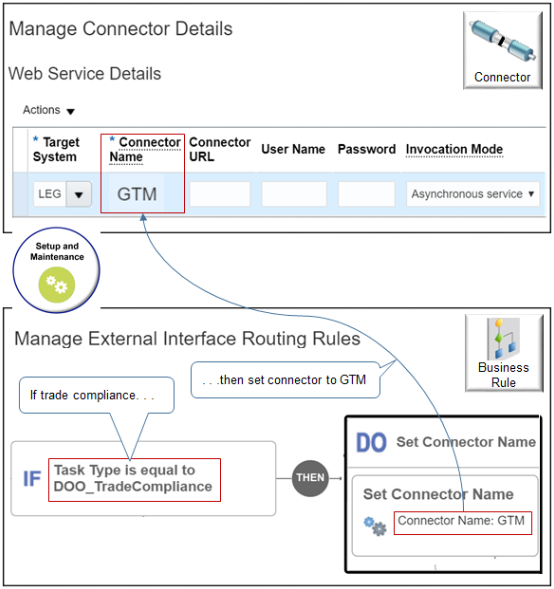
Use the Manage Connector Details page to add a connector. If you.
-
Add a routing rule. Set Invocation Mode to Asynchronous or Synchronous.
-
Don't add a routing rule. Set Invocation Mode to Event.
Learn how to add a connector. For details, see Manage Connector Details Between Order Management and Your Fulfillment System.
-
-
Create a routing rule that routes sales orders that you send to Global Trade Management according to the DOO_TradeCompliance task type.
-
Use Visual Information Builder to create a routing rule.
If Task Type is equal to DOO_TradeCompliance, then Set Connector Name to GTM.Here's your logic if you use Oracle Business Rules instead of Visual Information Builder.
If header is a Order header
  header.Task Type equals ignore case "DOO_TradeCompliance"
Then
  assert new Result (resultObj:"GTM",resultObjKey:"SERVICE_NAME")
For details, see Overview of Using Business Rules With Order Management.
-
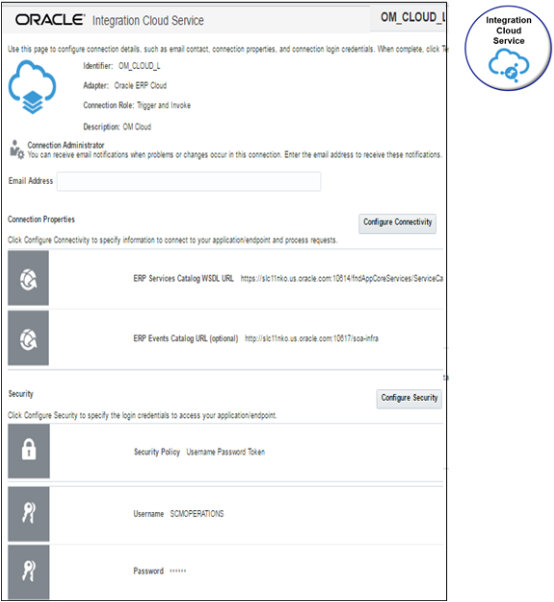
Create Connection for Order Management
-
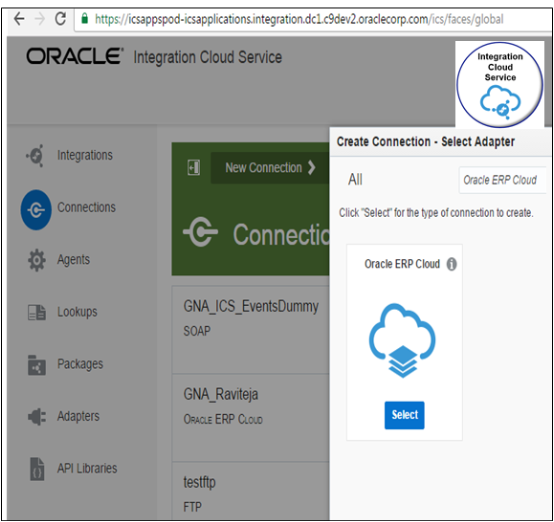
Sign into Integration Cloud Service.
-
Click Connections, search for Oracle ERP Cloud, then click Select.
-
Enter a name. For this example, enter
OMtoGTM. -
Enter the WSDL for ERP Service Catalog. For example:
<secure_protocol>://<host>:<secure_port>/fndAppCoreServices/ServiceCatalogService?WSDL -
Enter the URL for the ERP Event Catalog. For example:
<Protocol>://<host>:<port>/soa-infra -
Enter the user name and password that you use to sign into Order Management with administrative privileges.
-
Test and save the connection.
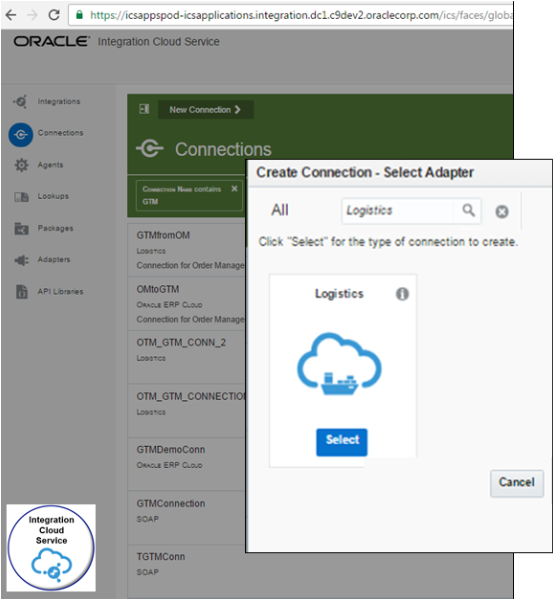
Create Connection for Global Trade Management
-
Click Connections.
-
Search for Logistics, then click Select.
-
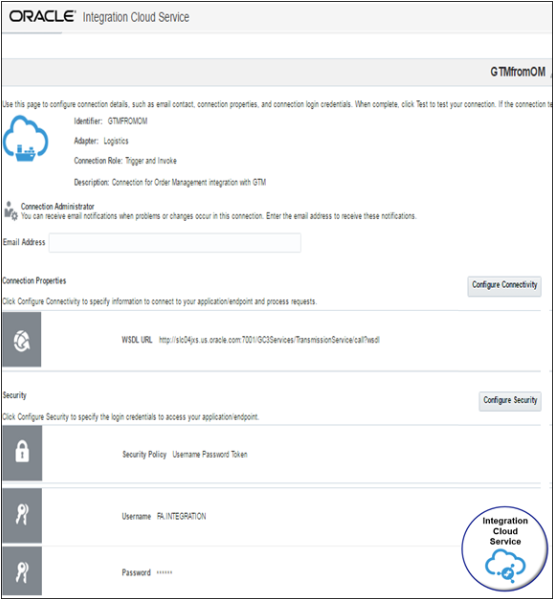
Enter a name. For this example, enter
GTMfromOM. -
Enter the URL to the WSDL for the GTM service. For example:
http://<server:port>/GC3Services/TransmissionService/call?wsdl -
Enter the user name and password that you use to access the WSDL.
The user that you enter must have this privilege.
-
Manage Orchestration Order Trade Compliance Interface Web Service
If it doesn't, you might encounter an error, during setup or in your runtime environment. The error will be something that starts with.
The caller is not authorized to call this serviceFor details, see Privileges That You Need to Implement Order Management.
-
-
Test and save the connection. You should see this page.
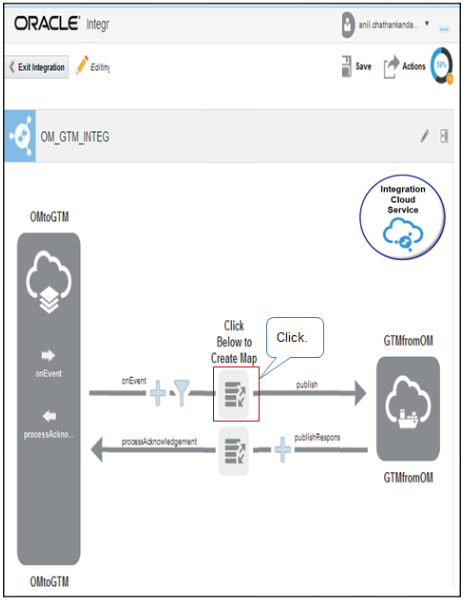
Map Source to Target
-
On the right corner, search for the OMtoGTM you just created, then drag and drop it onto the source. The source is on the left side of the integration.
-
In the dialog that displays, enter details.
-
For the Name, identify the end point, such as OM_Source.
-
On the Request tab, set the values.
Attribute
Value
Type
BusinessEvent
Name
Sales Order Trade Compliance Screening
-
on the Successful Response tab of the Response tab, set the values.
Attribute
Value
Type
Delayed
Business Object
Orchestration Order: OrderFulfillmentResponseService
Operation
processAcknowledgement
-
-
Search for the GTMfromOM connection you created earlier, then drag and drop it onto the target. The target is on right side of the integration.
-
In the dialog that displays, enter details.
Attribute
Value
Name
Identify the end point, such as GTM_Destination.
Operations attribute on the Operations tab
Publish
Business Object attribute on the Operations tab
GtmTransaction
Communicate Attributes from Order Management to Global Trade Management
-
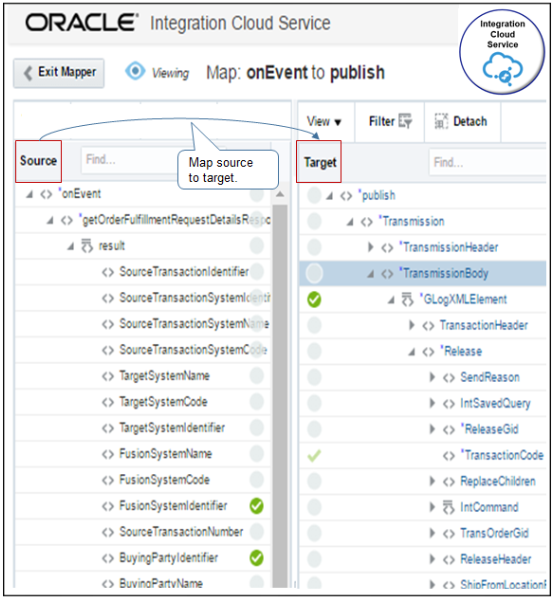
Under the text Click Below to Create Map, click the icon on the top line. Its the onEvent to publish line that points from OMtoGTM to GTMfromOM.
-
Finish the mapping, then save and close the mapper.
For example:
Communicate Attributes from Global Trade Management to Order Management
-
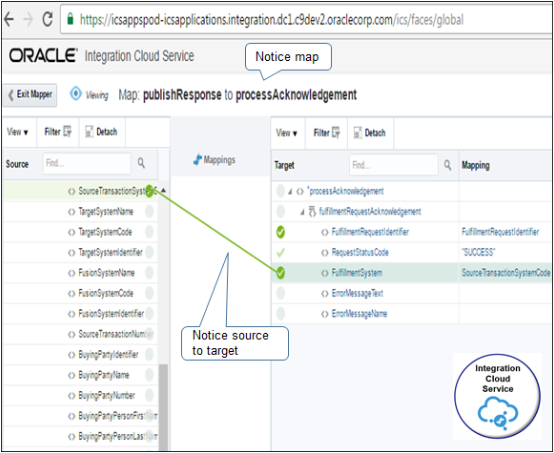
Under the text Click Below to Create Map, click the icon on the lower line. Its the publishResponse to processAcknowledgement line that points from GTMfromOM to OMtoGTM.
-
Finish the mapping, then save and close the mapper.
Use this example payload to help determine the mapping that you need to create. Global Trade Management sends this payload as a response to the call from Order Management.
<?xml version="1.0"?>
<soapenv:Envelope xmlns:soapenv="http://schemas.xmlsoap.org/soap/envelope/" xmlns:typ="http://xmlns.oracle.com/apps/scm/doo/taskLayer/commonService/types/" xmlns:com="http://xmlns.oracle.com/apps/scm/doo/taskLayer/commonService/" xmlns:mod="http://xmlns.oracle.com/apps/scm/doo/processOrder/model/">
  <soapenv:Body>
    <typ:processFulfillmentResponse>
      <typ:responseMessageHeader>
        <com:IntegrationContextCode>DOO_TradeCompliance</com:IntegrationContextCode>
        <com:FulfillmentSystemResponseIdentifier/>
      </typ:responseMessageHeader>
      <typ:fulfillLineList>
        <com:OrderNumber/>
        <com:FulfillLineIdentifier>300100175497843</com:FulfillLineIdentifier>
        <com:TradeComplianceScreeningResultCode>ORA_PASSED</com:TradeComplianceScreeningResultCode>
        <com:TradeComplianceScreeningDate>2018-11-23T12:12:12</com:TradeComplianceScreeningDate>
        <com:FulfillmentDetail>
          <com:TradeComplianceTypeCode>ORA_SANCTIONED_TERR</com:TradeComplianceTypeCode>
          <com:TradeControlCode/>
          <com:TradeComplianceComments/>
          <com:TradeComplianceScreeningResultCode>ORA_PASSED</com:TradeComplianceScreeningResultCode>
        </com:FulfillmentDetail>
        <com:FulfillmentDetail>
          <com:TradeComplianceTypeCode>ORA_RESTRICTED_PARTY</com:TradeComplianceTypeCode>
          <com:TradeControlCode/>
          <com:TradeComplianceComments/>
          <com:TradeComplianceScreeningResultCode>ORA_PASSED</com:TradeComplianceScreeningResultCode>
        </com:FulfillmentDetail>
        <com:FulfillmentDetail>
          <com:TradeComplianceTypeCode>ORA_TRADE_CONTROL</com:TradeComplianceTypeCode>
          <com:TradeControlCode/>
          <com:TradeComplianceComments/>
          <com:TradeComplianceScreeningResultCode>ORA_PASSED</com:TradeComplianceScreeningResultCode>
        </com:FulfillmentDetail>
      </typ:fulfillLineList>
    </typ:processFulfillmentResponse>
  </soapenv:Body>
</soapenv:Envelope>
Note
-
This mapping provides the input to the processAcknowledgement operation of service OrderFulfillmentResponseService. Here are the attributes that it sends.
-
TaskInstanceId
-
SourceTransactionSystemCode
-
RequestStatusCode with a value of SUCCESS
-
-
The integration uses this return mapping only when it calls processAcknowledgement, and only when Global Trade Management sends a successful response.
For example:
-
Add Business Identifiers and Activate Integration
-
Add business identifiers for tracking.
On the menu at the top right of the edit integration page, click Tracking, drag a payload field from the Source, and drop it onto the Tracking Field section.
Integration Cloud Service uses business identifiers to track messages at run time. You can use them to help identify and monitor instances of the integration.
For example:
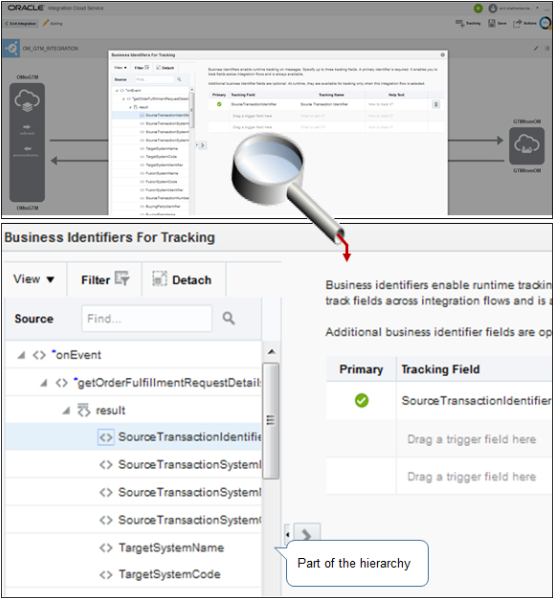
The screen print is hard to read and displays only part of the hierarchy. Here's the Source hierarchy that it displays.
onEvent getOrderRequestFulfillmentDetails result SourceTransactionIdentifier SourceTransactionSystemIdentifier TargetSystemName TargetSystemCode TargetSystemIdentifier FusionSystemName FusionSystemCode FusionSystemIdentifier SourceTransactionNumber BuyingPartyIdentifier BuyingPartyName BuyingPartyNumber -
Save and activate.
-
Click Test to test your integration, then click Save.
-
Activate the integration. As an option, in the Confirmation dialog, enable the Enable Trace option to log payloads in the runtime logs.
-