11.18 SPARQL Gateway and RDF Data
SPARQL Gateway is a J2EE web application that is included with the support for Apache Jena. It is designed to make RDF data (RDF/OWL/SKOS) easily available to applications that operate on relational and XML data, including Oracle Business Intelligence Enterprise Edition (OBIEE) 11g.
- SPARQL Gateway Features and Benefits Overview
- Installing and Configuring SPARQL Gateway
- Using SPARQL Gateway with RDF Data
- Customizing the Default XSLT File
- Using the SPARQL Gateway Java API
- Using the SPARQL Gateway Graphical Web Interface
- Using SPARQL Gateway as an XML Data Source to OBIEE
Parent topic: RDF Graph Support for Apache Jena
11.18.1 SPARQL Gateway Features and Benefits Overview
SPARQL Gateway handles several challenges in exposing RDF data to a non-semantic application:
-
RDF syntax, SPARQL query syntax and SPARQL protocol must be understood.
-
The SPARQL query response syntax must be understood.
-
A transformation must convert a SPARQL query response to something that the application can consume.
To address these challenges, SPARQL Gateway manages SPARQL queries and XSLT operations, executes SPARQL queries against any arbitrary standard-compliant SPARQL endpoints, and performs necessary XSL transformations before passing the response back to applications. Applications can then consume RDF data as if it is coming from an existing data source.
Different triple stores or quad stores often have different capabilities. For example, the SPARQL endpoint supported by Oracle AI Database, with RDF Graph support for Apache Jena, allows parallel execution, query timeout, dynamic sampling, result cache, and other features, in addition to the core function of parsing and answering a given standard-compliant SPARQL query. However, these features may not be available from another given RDF data store.
With the RDF Graph SPARQL Gateway, you get certain highly desirable capabilities, such as the ability to set a timeout on a long running query and the ability to get partial results from a complex query in a given amount of time. Waiting indefinitely for a query to finish is a challenge for end users, as is an application with a response time constraint. SPARQL Gateway provides both timeout and best effort query functions on top of a SPARQL endpoint. This effectively removes some uncertainty from consuming RDF data through SPARQL query executions. (See Specifying a Timeout Value and Specifying Best Effort Query Execution.)
Parent topic: SPARQL Gateway and RDF Data
11.18.2 Installing and Configuring SPARQL Gateway
To install and configure SPARQL Gateway, follow these major steps, which are explained in their own topics:
- Download the RDF Graph Support for Apache Jena .zip File (if Not Already Done)
- Deploy SPARQL Gateway in WebLogic Server
- Modify Proxy Settings, if Necessary
- Configure the OracleSGDS Data Source, if Necessary
- Add and Configure the SparqlGatewayAdminGroup Group, if Desired
Parent topic: SPARQL Gateway and RDF Data
11.18.2.1 Download the RDF Graph Support for Apache Jena .zip File (if Not Already Done)
If you have not already done so, download the RDF Graph support for Apache Jena file from the RDF Graph page and unzip it into a temporary directory, as explained in Setting Up the Software Environment.
Note that the SPARQL Gateway Java class implementations are embedded in sdordfclient.jar (see Using the SPARQL Gateway Java API).
Parent topic: Installing and Configuring SPARQL Gateway
11.18.2.2 Deploy SPARQL Gateway in WebLogic Server
Deploy SPARQL Gateway in Oracle WebLogic Server, as follows:
-
Go to the autodeploy directory of WebLogic Server, and copy over the prebuilt
sparqlgateway.warfile as follows. (For information about auto-deploying applications in development domains, see:http://docs.oracle.com/cd/E11035_01/wls100/deployment/autodeploy.html)cp -rf /tmp/jena_adapter/sparqlgateway_web_app/sparqlgateway.war <domain_name>/autodeploy/sparqgateway.warIn this example, <domain_name> is the name of a WebLogic Server domain.
You can customize the prebuilt application in the following ways:
-
Modify the
WEB-INF/web.xmlfile embedded insparqlgateway_web_app/sparqlgateway.waras needed. Be sure to specify appropriate values for thesparql_gateway_repository_filedirandsparql_gateway_repository_urlparameters. -
Add XSLT files or SPARQL query files to the top-level directory of
sparqlgateway_web_app/sparqlgateway.war, if necessary.The following files are provided by Oracle in that directory:
default.xslt,noop.xslt, andqb1.sparql. Thedefault.xsltfile is intended mainly for transforming SPARQL query responses (XML) to a format acceptable to Oracle.(These files are described in Storing SPARQL Queries and XSL Transformations; using SPARQL Gateway with OBIEE is explained in Using SPARQL Gateway as an XML Data Source to OBIEE.)
-
-
Verify your deployment by using your Web browser to connect to a URL in the following format (assume that the Web application is deployed at port 7001):
http://<hostname>:7001/sparqlgateway
Parent topic: Installing and Configuring SPARQL Gateway
11.18.2.3 Modify Proxy Settings, if Necessary
If your SPARQL Gateway is behind a firewall and you want SPARQL Gateway to communicate with SPARQL endpoints on the Internet as well as those inside the firewall, you probably need to use the following JVM settings:
-Dhttp.proxyHost=<your_proxy_host>
-Dhttp.proxyPort=<your_proxy_port>
-Dhttp.nonProxyHosts=127.0.0.1|<hostname_1_for_sparql_endpoint_inside_firewall>|<hostname_2_for_sparql_endpoint_inside_firewall>|...|<hostname_n_for_sparql_endpoint_inside_firewall>
You can specify these settings in the startWebLogic.sh script.
Parent topic: Installing and Configuring SPARQL Gateway
11.18.2.4 Configure the OracleSGDS Data Source, if Necessary
If an Oracle AI Database is used for storage of and
access to SPARQL queries and XSL transformations for SPARQL Gateway, then a data source
named OracleSGDS must be available.
If the OracleSGDS data source is configured and available, SPARQL Gateway servlet will automatically create all the necessary tables and indexes upon initialization.
Parent topic: Installing and Configuring SPARQL Gateway
11.18.2.5 Add and Configure the SparqlGatewayAdminGroup Group, if Desired
The following JSP files in SPARQL Gateway can help you to view, edit, and update SPARQL queries and XSL transformations that are stored in an Oracle AI Database:
http://<host>:7001/sparqlgateway/admin/sparql.jsp
http://<host>:7001/sparqlgateway/admin/xslt.jsp
These files are protected by HTTP Basic Authentication. In WEB-INF/weblogic.xml, a principal named SparqlGatewayAdminGroup is defined.
To be able to log in to either of these JSP pages, you must use the WebLogic Server to add a group named SparqlGatewayAdminGroup, and create a new user or assign an existing user to this group.
Parent topic: Installing and Configuring SPARQL Gateway
11.18.3 Using SPARQL Gateway with RDF Data
The primary interface for an application to interact with SPARQL Gateway is through a URL with the following format:
http://host:port/sparqlgateway/sg?<SPARQL_ENDPOINT>&<SPARQL_QUERY>&<XSLT>
In the preceding format:
-
<SPARQL_ENDPOINT> specifies the
eeparameter, which contains a URL encoded form of a SPARQL endpoint.For example,
ee=http%3A%2F%2Fsparql.org%2Fbooksis the URL encoded string for SPARQL endpointhttp://sparql.org/books. It means that SPARQL queries are to be executed against endpointhttp://sparql.org/books. -
<SPARQL_QUERY> specifies either the SPARQL query, or the location of the SPARQL query.
If it is feasible for an application to accept a very long URL, you can encode the whole SPARQL query and set
eq=<encoded_SPARQL_query>in the URL If it is not feasible for an application to accept a very long URL, you can store the SPARQL queries and make them available to SPARQL Gateway using one of the approaches described in Storing SPARQL Queries and XSL Transformations. -
<XSLT> specifies either the XSL transformation, or the location of the XSL transformation.
If it is feasible for an application to accept a very long URL, you can encode the whole XSL transformation and set
ex=<encoded_XSLT>in the URL If it is not feasible for an application to accept a very long URL, you can store the XSL transformations and make them available to SPARQL Gateway using one of the approaches described in Storing SPARQL Queries and XSL Transformations.
- Storing SPARQL Queries and XSL Transformations
- Specifying a Timeout Value
- Specifying Best Effort Query Execution
- Specifying a Content Type Other Than text/xml
Parent topic: SPARQL Gateway and RDF Data
11.18.3.1 Storing SPARQL Queries and XSL Transformations
If it is not feasible for an application to accept a very long URL, you can specify the location of the SPARQL query and the XSL transformation in the <SPARQL_QUERY> and <XSLT> portions of the URL format described in Using SPARQL Gateway with Semantic Data, using any of the following approaches:
-
Store the SPARQL queries and XSL transformations in the SPARQL Gateway Web application itself.
To do this, unpack the
sparqlgateway.warfile, and store the SPARQL queries and XSL transformations in the top-level directory; then pack thesparqlgateway.warfile and redeploy it.The
sparqlgateway.warfile includes the following example files:qb1.sparql(SPARQL query) anddefault.xslt(XSL transformation).Tip:
Use the file extension
.sparqlfor SPARQL query files, and the file extension.xsltfor XSL transformation files.The syntax for specifying these files (using the provided example file names) is
wq=qb1.sparql for a SPARQL query file andwx=default.xsltfor an XSL transformation file.If you want to customize the default XSL transformations, see the examples in Customizing the Default XSLT File.
If you specify
wx=noop.xslt, XSL transformation is not performed and the SPARQL response is returned "as is" to the client. -
Store the SPARQL queries and XSL transformations in a file system directory, and make sure that the directory is accessible for the deployed SPARQL Gateway Web application.
By default, the directory is set to
/tmp, as shown in the following<init-param>setting:<init-param> <param-name>sparql_gateway_repository_filedir</param-name> <param-value>/tmp/</param-value> </init-param>
It is recommended that you customize this directory before deploying the SPARQL Gateway. To change the directory setting, edit the text in between the
<param-value>and</param-value>tags.The following example specifies a SPARQL query file and an XSL transformation file that are in the directory specified in the
<init-param>element forsparql_gateway_repository_filedir:fq=qb1.sparql fx=myxslt1.xslt
-
Make the SPARQL queries and XSL transformations accessible from a website.
By default, the website directory is set to
http://127.0.0.1/queries/, as shown in the following<init-param>setting:<init-param> <param-name>sparql_gateway_repository_url</param-name> <param-value>http://127.0.0.1/queries/</param-value> </init-param>
Customize this directory before deploying the SPARQL Gateway. To change the website setting, edit the text in between the
<param-value>and</param-value>tags.The following example specifies a SPARQL query file and an XSL transformation file that are in the URL specified in the
<init-param>element forsparql_gateway_repository_url.uq=qb1.sparql ux=myxslt1.xslt
Internally, SPARQL Gateway computes the appropriate complete URL, fetches the content, starts query execution, and applies the XSL transformation to the query response XML.
-
Store the SPARQL queries and XSL transformations in an Oracle AI Database.
This approach requires that the J2EE data source
OracleSGDSbe defined. After SPARQL Gateway retrieves a database connection from the OracleSGDS data source, a SPARQL query is read from the database table ORACLE_ORARDF_SG_QUERY using the integer ID provided.The syntax for fetching a SPARQL query from an Oracle AI Database is
dq=<integer-id>, and the syntax for fetching an XSL transformation from an Oracle AI Database isdx=<integer-id>.Upon servlet initialization, the following tables are created automatically if they do not already exist (you do not need to create them manually):
-
ORACLE_ORARDF_SG_QUERY with a primary key of QID (integer type)
-
ORACLE_ORARDF_SG_XSLT with a primary key of XID (integer type)
-
Parent topic: Using SPARQL Gateway with RDF Data
11.18.3.2 Specifying a Timeout Value
When you submit a potentially long-running query using the URL format described in Using SPARQL Gateway with Semantic Data, you can limit the execution time by specifying a timeout value in milliseconds. For example, the following shows the URL format and a timeout specification that the SPARQL query execution started from SPARQL Gateway is to be ended after 1000 milliseconds (1 second):
http://host:port/sparqlgateway/sg?<SPARQL_ENDPOINT>&<SPARQL_QUERY>&<XSLT>&t=1000
If a query does not finish when timeout occurs, then an empty SPARQL response is constructed by SPARQL Gateway.
Note that even if SPARQL Gateway times out a query execution at the HTTP connection level, the query may still be running on the server side. The actual behavior will be vendor-dependent.
Parent topic: Using SPARQL Gateway with RDF Data
11.18.3.3 Specifying Best Effort Query Execution
Note:
You can specify best effort query execution only if you also specify a timeout value (described in Specifying a Timeout Value).
When you submit a potentially long-running query using the URL format described in Using SPARQL Gateway with Semantic Data, if you specify a timeout value, you can also specify a "best effort" limitation on the query. For example, the following shows the URL format with a timeout specification of 1000 milliseconds (1 second) and a best effort specification (&b=t):
http://host:port/sparqlgateway/sg?<SPARQL_ENDPOINT>&<SPARQL_QUERY>&<XSLT>&t=1000&b=t
The web.xml file includes two parameter settings that affect the behavior of the best effort option: sparql_gateway_besteffort_maxrounds and sparql_gateway_besteffort_maxthreads. The following show the default definitions:
<init-param>
  <param-name>sparql_gateway_besteffort_maxrounds</param-name>
  <param-value>10</param-value>
</init-param>

<init-param>
  <param-name>sparql_gateway_besteffort_maxthreads</param-name>
  <param-value>3</param-value>
</init-param>
When a SPARQL SELECT query is executed in best effort style, a series of queries will be executed with an increasing LIMIT value setting in the SPARQL query body. (The core idea is based on the observation that a SPARQL query runs faster with a smaller LIMIT setting.) SPARQL Gateway starts query execution with a "LIMIT 1" setting. Ideally, this query can finish before the timeout is due. Assume that is the case, the next query will have its LIMIT setting is increased, and subsequent queries have higher limits. The maximum number of query executions is controlled by the sparql_gateway_besteffort_maxrounds parameter.
If it is possible to run the series of queries in parallel, the sparql_gateway_besteffort_maxthreads parameter controls the degree of parallelism.
Parent topic: Using SPARQL Gateway with RDF Data
11.18.3.4 Specifying a Content Type Other Than text/xml
By default, SPARQL Gateway assumes that XSL transformations generate XML, and so the default content type set for HTTP response is text/xml. However, if your application requires a response format other than XML, you can specify the format in an additional URL parameter (with syntax &rt=), using the following format:
http://host:port/sparqlgateway/sg?<SPARQL_ENDPOINT>&<SPARQL_QUERY>&<XSLT>&rt=<content_type>
Note that <content_type> must be URL encoded.
Parent topic: Using SPARQL Gateway with RDF Data
11.18.4 Customizing the Default XSLT File
You can customize the default XSL transformation file (the one referenced using wx=default.xslt). This section presents some examples of customizations.
The following example implements this namespace prefix replacement logic: if a variable binding returns a URI that starts with http://purl.org/goodrelations/v1#, that portion is replaced by gr:; and if a variable binding returns a URI that starts with http://www.w3.org/2000/01/rdf-schema#, that portion is replaced by rdfs:.
<xsl:when test="starts-with(text(),'http://purl.org/goodrelations/v1#')">
   <xsl:value-of select="concat('gr:',substring-after(text(),'http://purl.org/goodrelations/v1#'))"/>
</xsl:when>
...
<xsl:when test="starts-with(text(),'http://www.w3.org/2000/01/rdf-schema#')">
   <xsl:value-of select="concat('rdfs:',substring-after(text(),'http://www.w3.org/2000/01/rdf-schema#'))"/>
</xsl:when>
The following example implements logic to trim a leading http://localhost/ or a leading http://127.0.0.1/.
<xsl:when test="starts-with(text(),'http://localhost/')">
  <xsl:value-of select="substring-after(text(),'http://localhost/')"/>
</xsl:when>
<xsl:when test="starts-with(text(),'http://127.0.0.1/')">
  <xsl:value-of select="substring-after(text(),'http://127.0.0.1/')"/>
</xsl:when>
Parent topic: SPARQL Gateway and RDF Data
11.18.5 Using the SPARQL Gateway Java API
In addition to a Web interface, the SPARQL Gateway administration service provides a
convenient Java application programming interface (API) for managing SPARQL queries and their
associated XSL transformations. The Java API is included in the RDF Graph support for Apache
Jena library, sdordfclient.jar.
Java API reference information is available in the
javadoc_sparqlgateway.zip file that is included in the SPARQL Gateway .zip
file (described in Download the RDF Graph Support for Apache Jena .zip File (if Not Already Done)).
The main entry point for this API is the oracle.spatial.rdf.client.jena.SGDBHandler class (SPARQL Gateway Database Handler), which provides the following static methods for managing queries and transformations:
-
deleteSparqlQuery(Connection, int) -
deleteXslt(Connection, int) -
insertSparqlQuery(Connection, int, String, String, boolean) -
insertXslt(Connection, int, String, String, boolean) -
getSparqlQuery(Connection, int, StringBuilder, StringBuilder) -
getXslt(Connection, int, StringBuilder, StringBuilder)
These methods manipulate and retrieve entries in the SPARQL Gateway associated tables that are stored in an Oracle AI Database instance. To use these methods, the necessary associated tables must already exist. If the tables do not exist, deploy the SPARQL Gateway on a Web server and access a URL in the following format:
http://<host>:<port>/sparqlgateway/sg?
where <host> is the host name of the Web server and <port> is the listening port of the Web server. Accessing this URL will automatically create the necessary tables if they do not already exist.
Any changes made through the Java API affect the SPARQL Gateway Web service in the same way as changes made through the administration Web interface. This provides the flexibility to manage queries and transformations using the interface you find most convenient.
Note that the insert methods provided by the Java API will not replace existing queries or transformations stored in the tables. Attempting to replace an existing query or transformation will fail. To replace a query or transformation, you must remove the existing entry in the table using one of the delete methods, and then insert the new query or transformation using one of the insert methods.
The following examples demonstrate how to perform common management tasks using the Java API. The examples assume a connection has already been established to the underlying Oracle AI Database instance backing the SPARQL Gateway.
Example 11-31 Storing a SPARQL Query and an XSL Transformation
Example 11-31 adds a query and an XSL transformation to the database backing the SPARQL Gateway. After the query and transformation are added, other programs can use the query and transformation through the gateway by specifying the appropriate query ID (qid) and XSL transformation ID (xid) in the request URL.
Note that Although Example 11-31 inserts both a query and transformation, the query and transformation are not necessarily related and do not need to be used together when accessing SPARQL Gateway. Any query in the database can be used with any transformation in the database when submitting a request to SPARQL Gateway.
String query = "PREFIX ... SELECT ..."; // full SPARQL query text
String xslt  = "<?xml ...> ...";        // full XSLT transformation text

String queryDesc = "Conference attendee information"; // description of SPARQL query
String xsltDesc = "BIEE table widget transformation"; // description of XSLT transformation

int queryId = queryIdCounter++; // assign a unique ID to this query
int xsltId  = xsltIdCounter++;  // assign a unique ID to this transformation

// Inserting a query or transformation will fail if the table already contains
// an entry with the same ID.  Setting this boolean to true will ignore these
// exceptions (but the table will remain unchanged). Here we specify that we
// want an exception thrown if we encounter a duplicate ID.
boolean ignoreDupException = false;

// add the query
try {
  // Delete query if one already exists with this ID (this will not throw an
  // error if no such entry exists)
  SGDBHandler.deleteSparqlQuery( connection, queryId );
  SGDBHandler.insertSparqlQuery( connection, queryId, query, queryDesc, ignoreDupException );
} catch( SQLException sqle ) {
  // Handle exception
} catch( QueryException qe ) {
  // Handle query syntax exception
}

// add the XSLT
try {
  // Delete xslt if one already exists with this ID (this will not throw an
  // error if no such entry exists)
  SGDBHandler.deleteXslt( connection, xsltId );
  SGDBHandler.insertXslt( connection, xsltId, xslt, xsltDesc, ignoreDupException );
}  catch( SQLException sqle ) {
  // Handle database exception
} catch( TransformerConfigurationException tce ) {
  // Handle XSLT syntax exception
}
Example 11-32 Modifying a Query
Example 11-32 retrieves an existing query from the database, modifies it, then stores the updated version of the query back in the database. These steps simulate editing a query and saving the changes. (Note that if the query does not exist, an exception is thrown.)
StringBuilder query;
StringBuilder description;

// Populate these with the query text and description from the database
query = new StringBuilder( );
description = new StringBuilder( );

// Get the query from the database
try {
  SGDBHandler.getSparqlQuery( connection, queryId, query, description );
} catch( SQLException sqle ) {
  // Handle exception
  // NOTE: exception is thrown if query with specified ID does not exist
}

// The query and description should be populated now

// Modify the query
String updatedQuery = query.toString( ).replaceAll("invite", "attendee");

// Insert the query back into the database
boolean ignoreDup = false;
try {
  // First must delete the old query
  SGDBHandler.deleteSparqlQuery( connection, queryId );
  // Now we can add
  SGDBHandler.insertSparqlQuery( connection, queryId, updatedQuery, description.toString( ), ignoreDup );
} catch( SQLException sqle ) {
  // Handle exception
} catch( QueryException qe ) {
  // Handle query syntax exception
}
Example 11-33 Retrieving and Printing an XSL Transformation
Example 11-33 retrieves an existing XSL transformation and prints it to standard output. (Note that if the transformation does not exist, an exception is thrown.)
StringBuilder xslt;
StringBuilder description;

// Populate these with the XSLT text and description from the database
xslt = new StringBuilder( );
description = new StringBuilder( );

try {
  SGDBHandler.getXslt( connection, xsltId, xslt, description );
} catch( SQLException sqle ) {
  // Handle exception
  // NOTE: exception is thrown if transformation with specified ID does not exist
}

// Print it to standard output
System.out.printf( "XSLT description: %s\n", description.toString( ) );
System.out.printf( "XSLT body:\n%s\n", xslt.toString( ) );
Parent topic: SPARQL Gateway and RDF Data
11.18.6 Using the SPARQL Gateway Graphical Web Interface
SPARQL Gateway provides several browser-based interfaces to help you test queries, navigate RDF data, and manage SPQARQL query and XSLT files.
- Main Page (index.html)
- Navigation and Browsing Page (browse.jsp)
- XSLT Management Page (xslt.jsp)
- SPARQL Management Page (sparql.jsp)
Parent topic: SPARQL Gateway and RDF Data
11.18.6.1 Main Page (index.html)
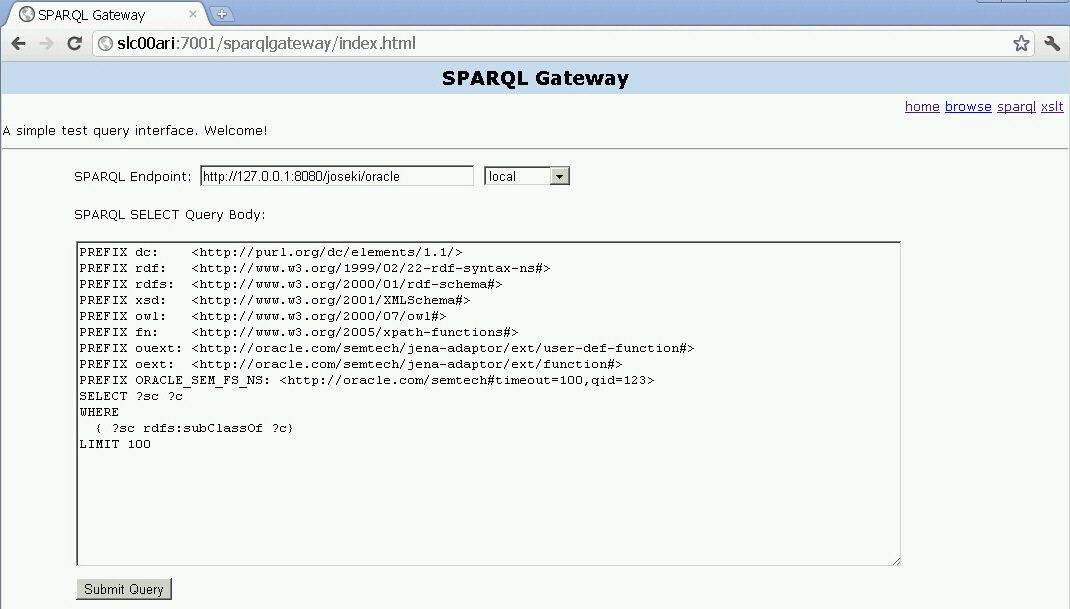
http://<host>:<port>/sparqlgateway/index.html provides a simple interface for executing SPARQL queries and then applying the transformations in the default.xslt file to the response. Figure 11-2 shows this interface for executing a query.
Figure 11-2 Graphical Interface Main Page (index.html)
Description of "Figure 11-2 Graphical Interface Main Page (index.html)"
Enter or select a SPARQL Endpoint, specify the SPARQL SELECT Query Body, and press Submit Query.
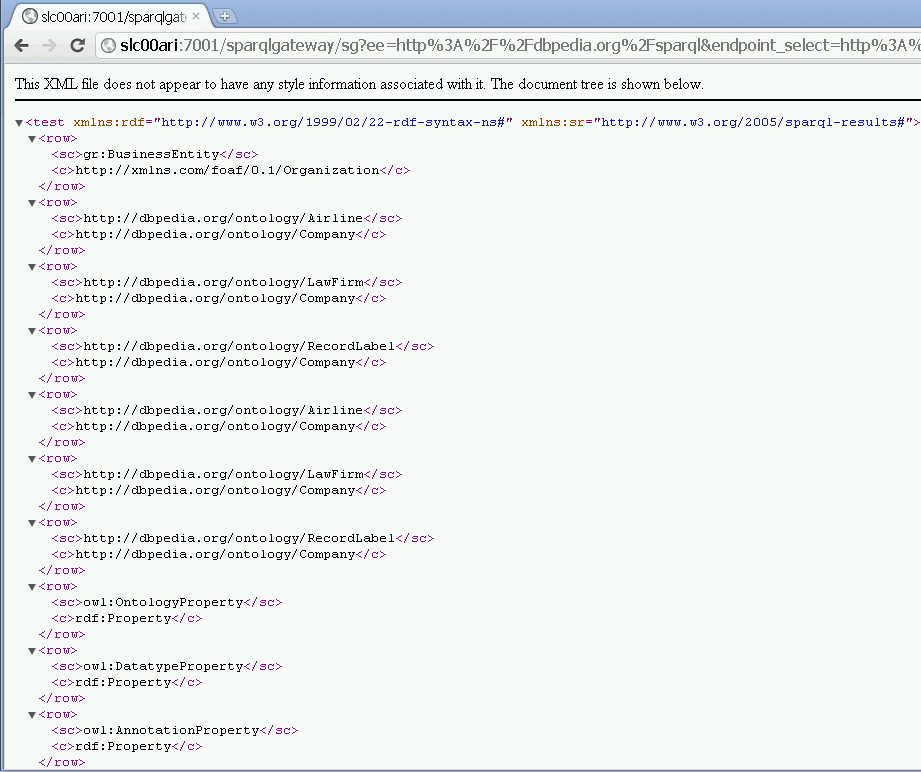
For example, if you specify http://dbpedia.org/sparql as the SPARQL endpoint and use the SPARQL query body from Figure 11-2, the response will be similar to Figure 11-3. Note that the default transformations (in default.xslt) have been applied to the XML output in this figure.
Figure 11-3 SPARQL Query Main Page Response
Description of "Figure 11-3 SPARQL Query Main Page Response"
Parent topic: Using the SPARQL Gateway Graphical Web Interface
11.18.6.2 Navigation and Browsing Page (browse.jsp)
http://<host>:<port>/sparqlgateway/browse.jsp provides
navigation and browsing capabilities for RDF data. It works against any standard
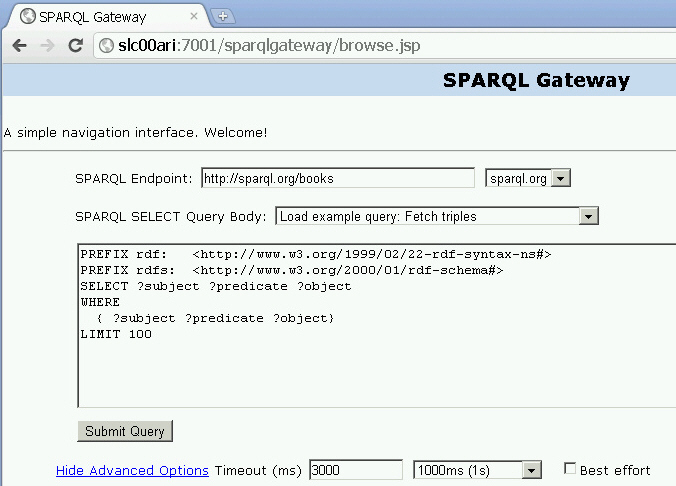
compliant SPARQL endpoint. Figure 11-4 shows this interface for executing a query.
Figure 11-4 Graphical Interface Navigation and Browsing Page (browse.jsp)
Description of "Figure 11-4 Graphical Interface Navigation and Browsing Page (browse.jsp)"
Enter or select a SPARQL Endpoint, specify the SPARQL SELECT Query Body, optionally specify a Timeout (ms) value in milliseconds and the Best Effort option, and press Submit Query.
The SPARQL response is parsed and then presented in table form, as shown in Figure 11-5.
Figure 11-5 Browsing and Navigation Page: Response

Description of "Figure 11-5 Browsing and Navigation Page: Response"
In Figure 11-5, note that URIs are clickable to allow navigation, and that when users move the cursor over a URI, tool tips are shown for the URIs which have been shortened for readability (as in http://purl.org.dc/elements/1.1/title being displayed as the tool tip for dc:title in the figure).
If you click the URI http://example.org/book/book5 in the output shown in Figure 11-5, a new SPARQL query is automatically generated and executed. This generated SPARQL query has three query patterns that use this particular URI as subject, predicate, and object, as shown in Figure 11-6. Such a query can give you a good idea about how this URI is used and how it is related to other resources in the data set.
Figure 11-6 Query and Response from Clicking URI Link
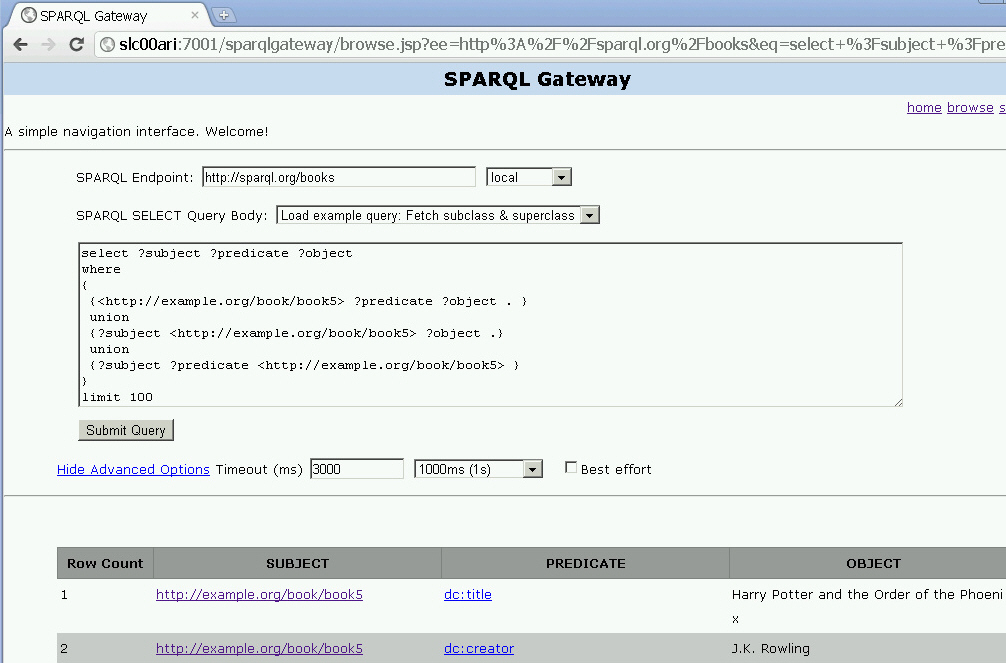
Description of "Figure 11-6 Query and Response from Clicking URI Link"
When there are many matches of a query, the results are organized in pages and you can click on any page. The page size by default is 50 results. To display more (or fewer) than 50 rows per page in a response with the Browsing and Navigation Page (browse.jsp), you can specify the &resultsPerPage parameter in the URL. For example, to allow 100 rows per page, include the following in the URL:
&resultsPerPage=100
Parent topic: Using the SPARQL Gateway Graphical Web Interface
11.18.6.3 XSLT Management Page (xslt.jsp)
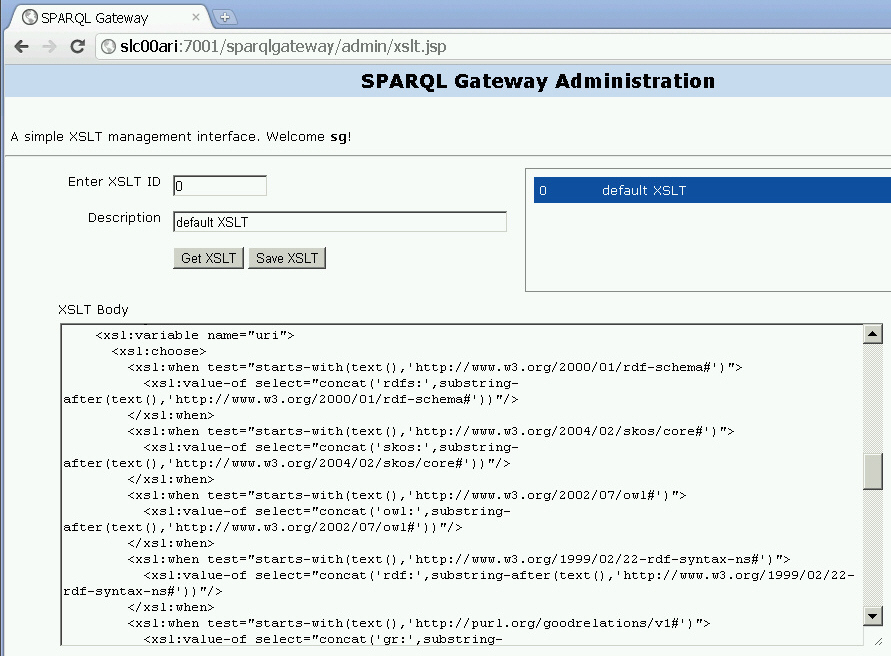
http://<host>:<port>/sparqlgateway/admin/xslt.jsp provides a simple XSLT management interface. You can enter an XSLT ID (integer) and click Get XSLT to retrieve both the Description and XSLT Body. You can modify the XSLT Body text and then save the changes by clicking Save XSLT. Note that there is a previewer to help you navigate among available XSLT definitions.
Figure 11-7 shows the XSLT Management Page.
Parent topic: Using the SPARQL Gateway Graphical Web Interface
11.18.6.4 SPARQL Management Page (sparql.jsp)
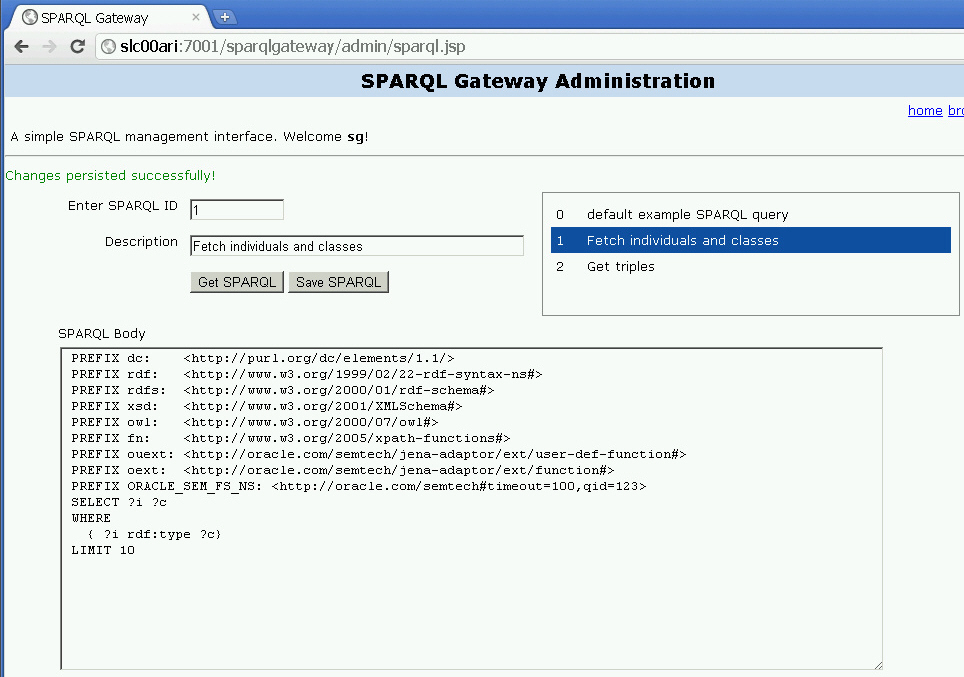
http://<host>:<port>/sparqlgateway/admin/xslt.jsp provides a simple SPARQL management interface. You can enter a SPARQL ID (integer) and click Get SPARQL to retrieve both the Description and SPARQL Body. You can modify the SPARQL Body text and then save the changes by clicking Save SPARQL. Note that there is a previewer to help you navigate among available SPARQL queries.
Figure 11-8 shows the SPARQL Management Page.
Parent topic: Using the SPARQL Gateway Graphical Web Interface
11.18.7 Using SPARQL Gateway as an XML Data Source to OBIEE
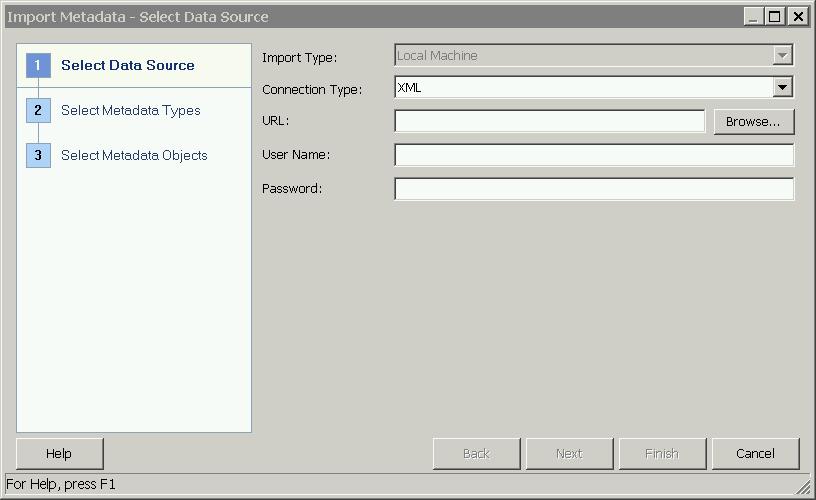
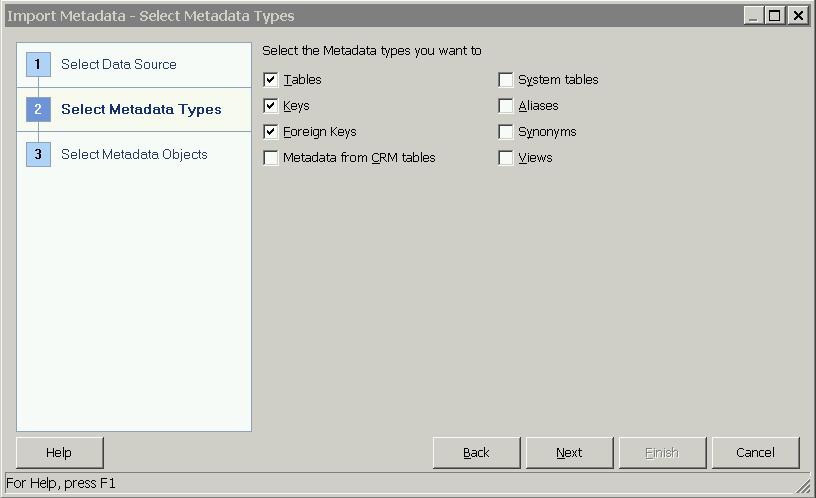
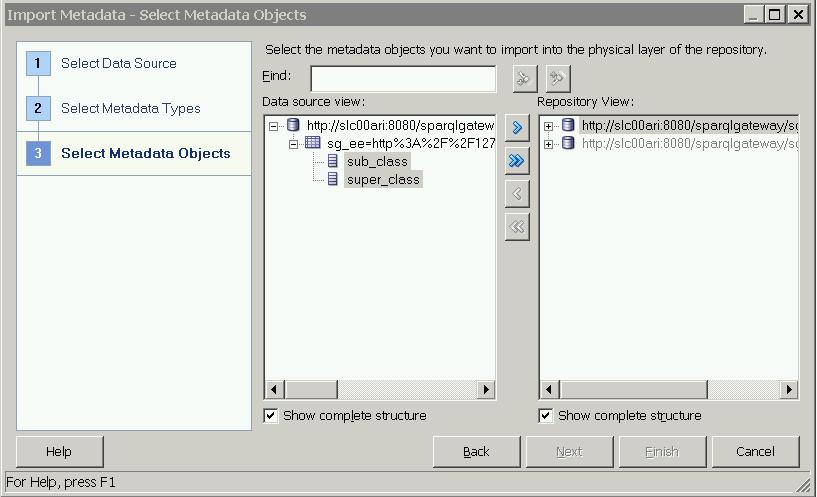
This section explains how to create an XML Data source for Oracle Business Intelligence Enterprise Edition (OBIEE), by integrating OBIEE with RDF using SPARQL Gateway as a bridge. (The specific steps and illustrations reflect the Oracle BI Administration Tool Version 11.1.1.3.0.100806.0408.000.)
Parent topic: SPARQL Gateway and RDF Data
