Specifying Task and Scheduling Options
Use the SQL Access Advisor Schedule page to set or modify the schedule parameters for the SQL Access Advisor task.
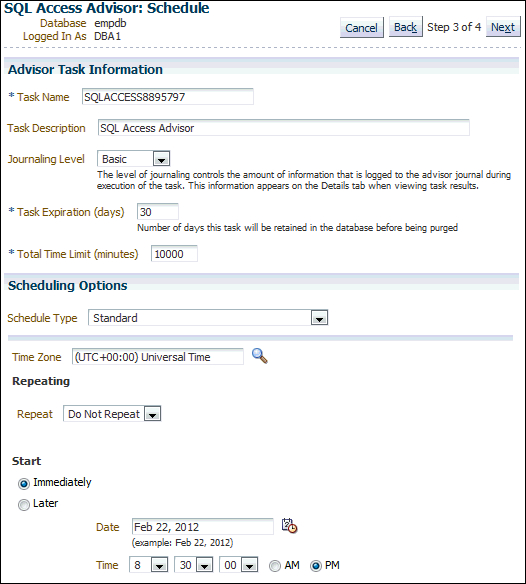
Figure 13-1 Scheduling a SQL Access Advisor Task

Description of "Figure 13-1 Scheduling a SQL Access Advisor Task"
To schedule a SQL Access Advisor task:
-
Select initial options, as described in "Selecting the Initial Options".
-
Select the workload source, as described in "Selecting the Workload Source".
-
Define the filter options, as described in "Applying Filter Options".
-
Specify the recommendation options, as described in "Specifying Recommendation Options".
-
On the SQL Access Advisor: Schedule page, under Advisor Task Information, enter a name in the Task Name field if you do not want to use the system-generated task name.
In the example in Figure 13-1,
SQLACCESS8895797is entered. -
In the Task Description field, enter a description of the task.
In the example in Figure 13-1,
SQL Access Advisoris entered. -
From the Journaling Level list, select the level of journaling for the task.
Journaling level controls the amount of information that is logged to the SQL Access Advisor journal during task execution. This information appears on the Details subpage when viewing task results.
In the example in Figure 13-1,
Basicis selected. -
In the Task Expiration (days) field, enter the number of days to retain the task in the database before it is purged.
In the example in Figure 13-1,
30is entered. -
In the Total Time Limit (minutes) field, enter the maximum number of minutes that the job is permitted to run.
You must enter a time in this field rather than use the default.
-
Under Scheduling Options, in the Schedule Type list, select a schedule type for the task and a maintenance window in which the task should run. Do one of the following:
-
Click Standard.
This schedule type enables you to select a repeating interval and start time for the task. Complete the following steps:
-
Enter your time zone code in the Time Zone field or click the search icon to locate the code for your area.
-
In the Repeat list, select Do Not Repeat to perform the task only once, or select a unit of time and enter the number of units in the Interval field.
-
Under Start, select Immediately to start the task now, or Later to schedule the task to start at a time specified using the Date and Time fields.
-
-
Click Use Predefined Schedule.
This schedule type enables you to select an existing schedule. Do one of the following:
-
In the Schedule field, enter the name of the schedule to be used for the task.
-
To search for a schedule, click the search icon.
The Search and Select: Schedule dialog box appears.
Select the desired schedule and click Select. The selected schedule now appears in the Schedule field.
-
-
Click Standard Using PL/SQL for Repeated Interval.
This schedule type enables you to select a repeating interval and an execution time period (window) for the task. Complete the following steps:
-
Enter your time zone code in the Time Zone field or click the search icon to locate the code for your area.
-
Under Available to Start, select Immediately to start the task now, or Later to schedule the task to start at a time specified using the Date and Time fields.
-
In the Repeated Interval field, enter a PL/SQL schedule expression, such as
SYSDATE+1. -
Under Not Available After, select No End Date to indicate that there is no end date for the execution window, or Specified End Date to specify an end date using the Date and Time fields.
-
-
Click Use Predefined Window.
This schedule type enables you to select an existing window. Select Stop on Window Close to stop the job when the window closes. Do one of the following:
-
In the Window field, enter the name of the window to be used for the task.
-
To search for a window, click the search icon.
The Search and Select: Window and Window Groups dialog box appears.
Select the desired window and click Select. The selected window now appears in the Schedule field.
-
-
Click Event.
Complete the following steps:
-
Enter your time zone code in the Time Zone field or click the search icon to locate the code for your area.
-
Under Event Parameters, enter values in the Queue Name and Condition fields.
-
Under Start, select Immediately to start the task now, or Later to schedule the task to start at a time specified using the Date and Time fields.
-
Under Not Available After, select No End Date to indicate that there is no end date for the execution window, or Specified End Date to specify an end date using the Date and Time fields.
-
-
Click Calendar.
Complete the following steps:
-
Enter your time zone code in the Time Zone field or click the search icon to locate the code for your area.
-
Under Calendar Expression, enter a calendar expression.
-
Under Start, select Immediately to start the task now, or Later to schedule the task to start at a time specified using the Date and Time fields.
-
Under Not Available After, select No End Date to indicate that there is no end date for the execution window, or Specified End Date to specify an end date using the Date and Time fields.
-
In the example in Figure 13-1, Standard is selected for schedule type. The task does not repeat and is scheduled to start immediately.
-
-
Click Next.
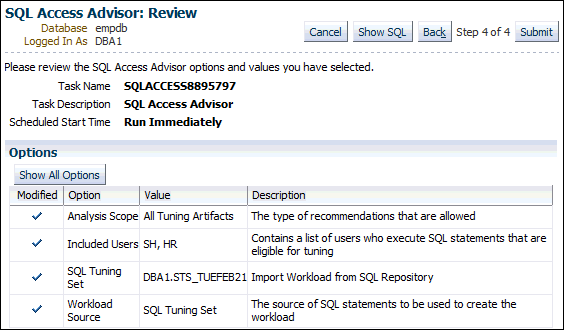
The SQL Access Advisor: Review page appears.
Under Options is a list of modified options for the SQL Access Advisor task. To display both modified and unmodified options, click Show All Options. To view the SQL text for the task, click Show SQL.
-
Click Submit.
The Advisor Central page appears. A message informs you that the task was created successfully.
