Graph Visualization Settings
You can click the Settings gear icon to open the Graph Visualization settings window.
The Visualization settings window comprises the General, Graph Exploration, and Styles tab.
Configuring General Settings
You can add vertex and edge captions, set the graph layout and page size in the General of the Graph Visualization settings:
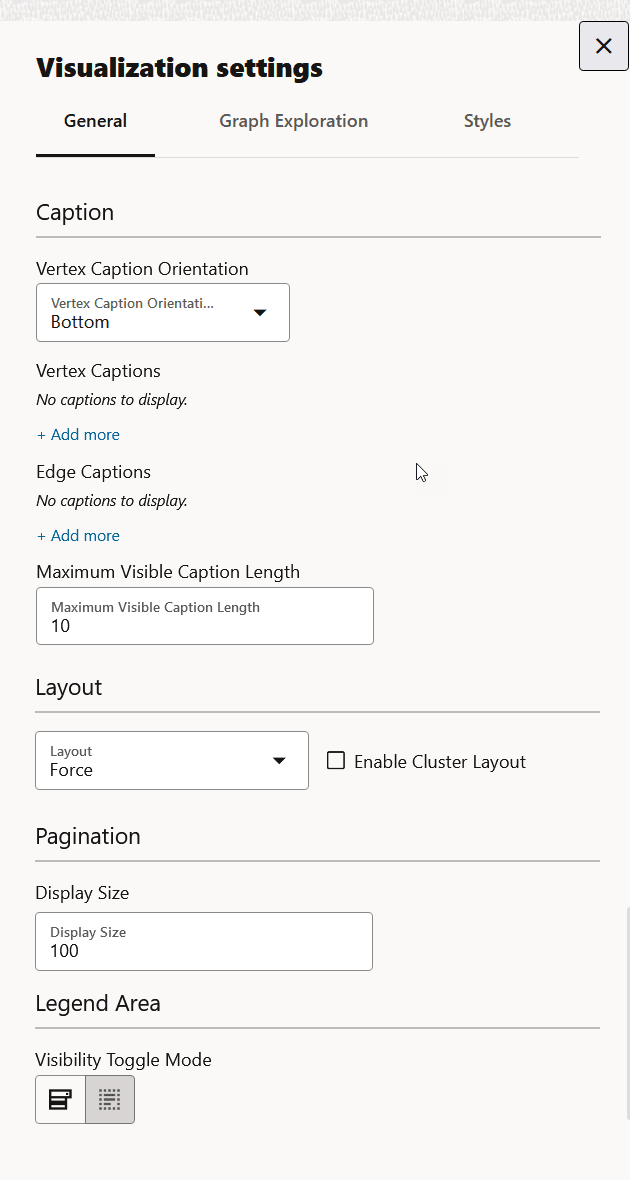
Description of the illustration general_tab.png
-
Vertex Caption Orientation: Determines where the selected vertex property will be displayed.
-
Vertex Captions: Determines the property to be displayed for a vertex.
Click + Add more to add a vertex caption and select the required vertex Label and vertex Property.
Caution: Adding Vertex Captions in the General tab will not be supported in future Graph Server and Client Releases. It is recommended that you add a vertex caption by directly editing the style of the vertex element in the legend panel in your graph visualization.
-
Edge Captions: Determines the property to be displayed for an edge.
Click + Add more to add an edge caption and select the required edge Label and edge Property.
Caution: Adding Edge Captions in the General tab will not be supported in future Graph Server and Client Releases. It is recommended that you add an edge caption by editing the style of an edge element in the legend panel in your graph visualization.
-
Maximum Visible Caption Length: Maximum caption length before truncating.
-
Layout: Computes the position of the nodes and determines the visual structure of the graph.
Supported layouts are: Circle, Concentric, Force (default), Grid, Hierarchical, Preset, Radial, Random, and Geographical.
The Force layout also supports a clustering option, which allows you to visualize a graph with clustered vertices. See Enabling Cluster Option in Graph Visualization for more information.
-
Display Size: Determines the number of graph elements to be visualized on a page from the result set.
-
Visibility Toggle Mode: Enables you to customize the visibility toggle behavior of the legend items through settings:
-
Enable hide when any unchecked: Vertex and edge elements will be hidden when one of the legend items that affect them has its visibility turned off.
-
Enable hide when all unchecked: Vertex and edge elements will only be hidden when all the legend items that affect them have their visibility turned off.
-
Configuring Graph Exploration Settings
You can enable and configure Network Evolution in the Graph Exploration tab of the Graph Visualization settings. See Using Network Evolution in Graph Visualization for more information.
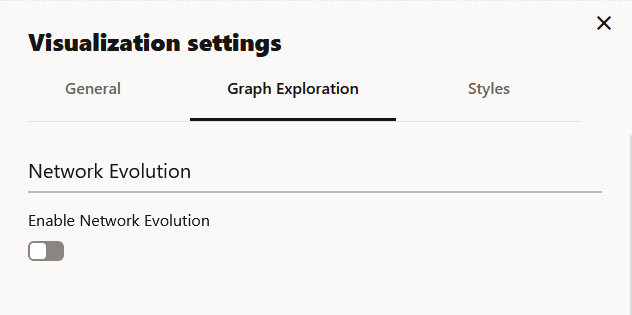
Description of the illustration graph_exploration_tab.png
Configuring Vertex and Edge Styles
You can configure and manage vertex and edge styles to customize the appearance of vertices and edges in the graph. The Styles tab of the Graph Visualization settings displays both the default and custom vertex and edge styles.
You can perform the following actions in this tab:
-
Add a new custom vertex style.
-
Add a new custom edge style.
-
Edit the default styling of a vertex or an edge element.
-
Edit or delete the custom styling of a vertex or an edge element.
-
Restore the default style settings.
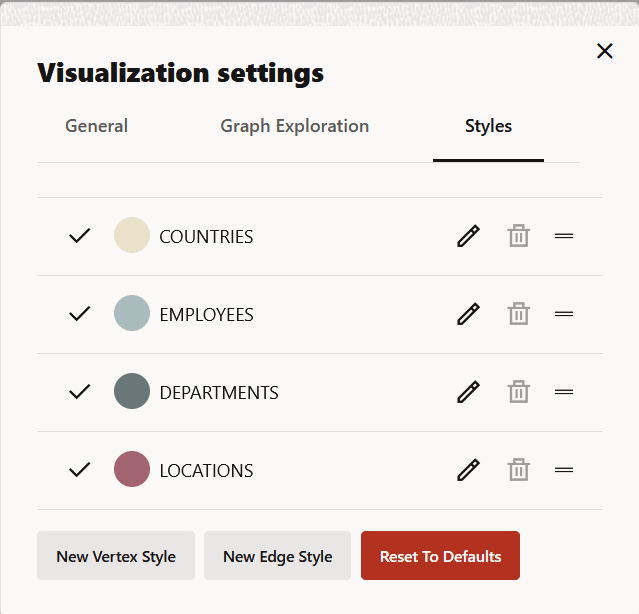
Description of the illustration styles_tab.png
To add a new vertex or edge style, click New vertex style or New edge style as required. The following shows the screenshot for configuring a new vertex style.
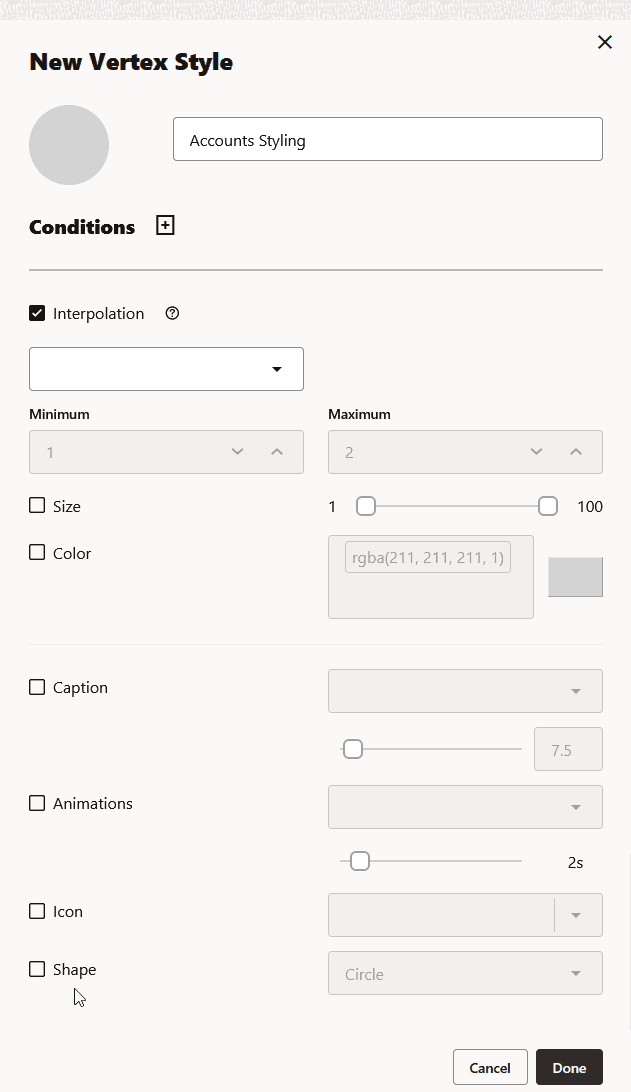
Description of the illustration create_vertex_style.png
You can configure the following values as appropriate:
-
Name: Name of the style
-
Conditions: Click + to add a condition for an element (vertex or edge) and provide the following values:
-
Property of the vertex or edge element.
-
Operator to be applied. The following operators are supported:
-
=(equal to) -
<(less than) -
<=(less than or equal to) -
>(greater than) -
>=(greater than or equal to) -
!=(not equal to) -
~(filter is a regular expression) -
CONTAINS(applies for labels only) -
CONTAINS_REGEX(applies for labels only)
Also, note the changes in the behavior of the following operator groups:
-
Equality operators (
=,!=):-
When applied on a property that holds a string array value and a condition that holds a simple string, text matching will be performed based on equality instead of contains.
CONTAINSoperator can be used for checking if the simple string is a substring of the property string value. -
When applied on a property that holds a number value and a condition that holds a non-numeric string, text matching will yield an empty result.
-
When applied on a property that holds a boolean value and a condition that holds a non-boolean string, text matching will yield an empty result.
-
-
Comparison operators (
>,>=,<,<=): When applied on a property that holds a string array value and a condition that holds a simple string, text comparison will yield an empty result. -
Regex operator (
~):-
When applied on a property that holds a string array value and a condition that holds a simple string, text matching will yield an empty result. Instead, you can use the
CONTAINS_REGEXoperator. -
When applied on a property that holds a number value and a condition that holds a simple string, text matching will yield an empty result.
-
When applied on a property that holds a boolean value and a condition that holds a simple string, text matching will yield an empty result.
-
-
-
Value that needs to be fulfilled for the property and the operator
You can add as many conditions as required. For all elements that meet the conditions, you can configure any of the following styling highlights:
-
Interpolation: Configure interpolation based on the size or color of the vertices or edges. Interpolation will be applied proportionally, between the Minimum and Maximum values. The following figure shows linear color interpolation based on the
AMOUNTproperty between the minimum (4000) and maximum (10000) values.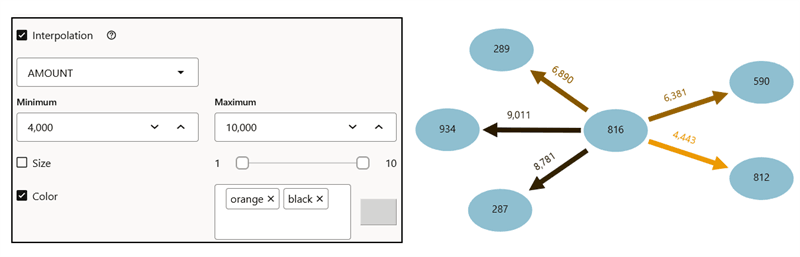
-
Size: Size of the vertex or edge.
-
Color: Color of the vertex or edge.
-
Caption: Caption for the vertex or edge.
-
Animations: Animation (Pulsating or Flashing) and duration of the animation cycle.
-
Icon: Image for the vertex (does not apply for edges).
-
Shape: Shape of the vertex (does not apply for edges). Supported values are Circle, Ellipse Square, Rectangle, Triangle, Diamond, Pentagon, Hexagon, and Octagon.
-
-
Enabling Cluster Option in Graph Visualization
You can enable the cluster option with Force layout to group vertices by labels or by any specific vertex property in your graph visualization. -
Importing and Exporting Graph Visualization Settings
You can import and export the graph visualization settings as a JSON file.
Related Topics
Enabling Cluster Option in Graph Visualization
You can enable the cluster option with Force layout to group vertices by labels or by any specific vertex property in your graph visualization.
This is very useful when you are visualizing a graph with a lot of interconnected vertices.
Perform the following steps to apply clustering of vertices in your graph visualization:
-
Click the Settings gear icon to open the graph Visualization settings dialog.
-
Click the General tab.
-
Select Force Layout in the Layout section.
-
Click the Enable Cluster Layout checkbox.
-
Select the Cluster By option.
You can choose to cluster the vertices by labels (default) or by any specific vertex property.
If you choose to cluster by a vertex property, then note that the clusters are created around property values that are identical. For instance, when querying a graph after running a community detection algorithm, you can use the vertex property containing the community ID value as a Cluster Byoption. This will create clusters that contain vertices with the same community ID.
-
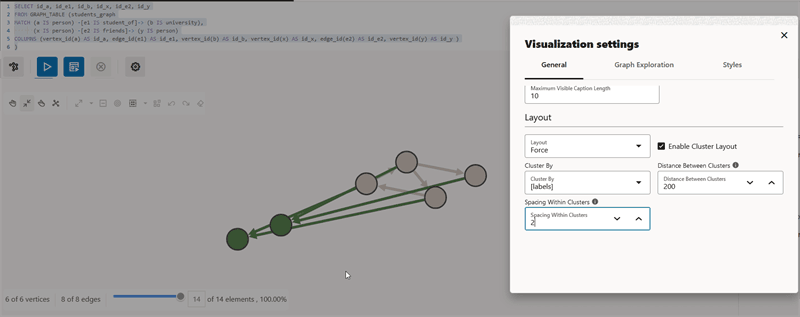
Optionally, adjust Distance Between Clusters to set the distance between the clusters.
-
Optionally, adjust Spacing to set the distance between vertices inside clusters.
-
Close the Visualization settings dialog.
The vertices in the graph are clustered together based on the selected clustering option. For example, the following figure shows clustering of vertices based on labels:
Importing and Exporting Graph Visualization Settings
You can import and export the graph visualization settings as a JSON file.
The options to import and export the settings are available on the right of the graph visualization panel:
Description of the illustration import_and_export_settings.png
- To import the graph visualization settings, perform the following steps:
-
Click
 Import settings.
The Import settings dialog opens.
-
Choose the JSON file to be imported from your local system either by selecting the file or through drag and drop action.
Ensure that the settings in the JSON file to be imported matches the graph used in the visualization query. Also, the file must not be larger than five MB.
-
Click Import to import the file.
-
-
To export the graph visualization settings, click
 Export settings.
 - The settings get exported as a JSON file in your local system.