9.7.7.3 Task 3: Create Full Database Snapshots Using the New Sparse Test Master

At this time you can create full snapshots against the original files of the standby database as described in Creating a Snapshot of a Full Database.

You must use the backup controlfile created in step 2 of Task 1: Prepare the Standby Database to Be Used as a Sparse Test Master to build the CREATE CONTROLFILE statement. To use the file, you can create a temporary database instance to mount the controlfile and run the 'backup controlfile to trace' command.

  1. Create a small PFILE file for the instance to use.

    At a minimum, the PFILE file should contain the following parameters:

    control_files='/home/oracle/snap_tm/control_tm.ctl'  # This should be the control file name created above
    db_name=primary             # This should be the db_name used in the Data Guard configuration
    db_unique_name=temp         # This should be a unique name for a database instance on this host
    sga_target=5g               # Provide enough memory to start the instance
    
  2. Set your environment to point to a unique ORACLE_SID.
    $ export ORACLE_SID=temp
  3. Using SQL*Plus, start the instance in mount mode using the PFILE created in Step 1.
    SQL> startup mount pfile='/home/oracle/snap_tm/pfile.ora'
  4. Build the create controlfile statement and the rename files script.
    Use steps 1 and 2 in Creating a Snapshot of a Full Database to build the CREATE CONTROLFILE statement and the rename files script. The rename files script created in step 4 of Task 1: Prepare the Standby Database to Be Used as a Sparse Test Master can be used, but you must modify the directory structure of the sparse files to be created.

Figure 9-16 Configuration After Creating Snapshots
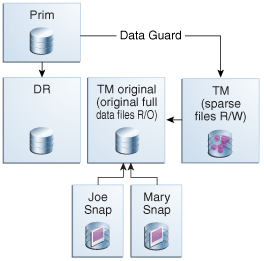
Description of Figure 9-16 follows
Description of "Figure 9-16 Configuration After Creating Snapshots"