1 Overview
This document provides concise information to help you prepare and advance through the installation and initial configuration of Oracle Private Cloud Appliance. For comprehensive background information and complete coverage of the procedures described in this document, please refer to the Oracle Private Cloud Appliance Installation Guide.
Document Scope
As an engineered system, Oracle Private Cloud Appliance is built to be an optimized combination of specific software and hardware components. New versions of software components will be supported on existing hardware configurations, and support for new hardware components will be added as required.
The product documentation follows the release scheme of the appliance software, which may differ from the release scheme of the hardware components. The table below indicates to which hardware and software this Oracle Private Cloud Appliance Quick Start Guide applies.
| Component | Versions Covered in This Document |
|---|---|
|
Appliance Software |
Release 3.0.2 |
|
Base Rack |
Oracle Private Cloud Appliance X9-2 |
|
Compute Nodes |
Oracle Server X9-2 architecture |
Note:
Verify that your system configuration corresponds with the details presented in the table. If it does not, return to the quick start home page and select the guide that applies to your system.
Appliance Components
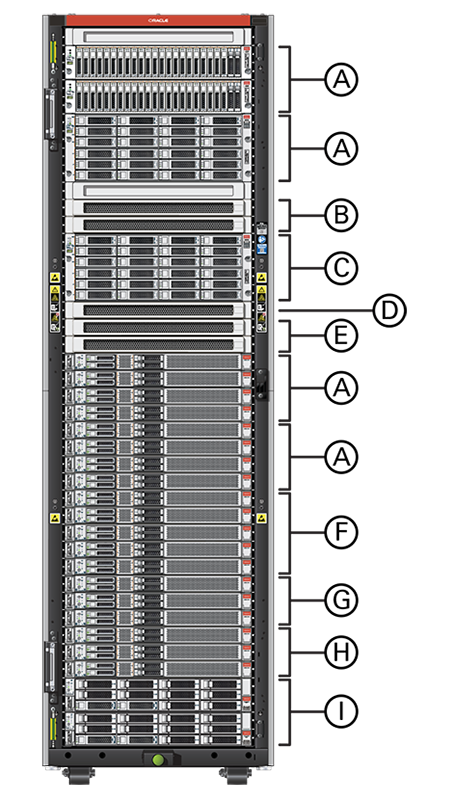
Oracle Private Cloud Appliance consists of an Oracle Rack Cabinet 1242 rack, populated with the hardware components identified in the image and table below. A full rack configuration is shown, however you can customize your system to include different storage or compute capacity as needed.
Oracle Private Cloud Appliance supports flex bays, which are dedicated 4-rack-unit sections within the rack that can be used for flexible expansion of your system; adding either storage or compute resources.

Figure Legend
| Callout | Quantity | Description |
|---|---|---|
|
A |
1 - 4 |
flex bay can accommodate 1-4 compute nodes, or 1-2 storage enclosures |
|
B |
2 |
leaf switch |
|
C |
1 |
Oracle Storage Drive Enclosure DE3-24C disk shelf |
|
D |
1 |
management switch |
|
E |
2 |
spine switch |
|
F |
1 - 5 |
can accommodate 1 - 5 compute nodes |
|
G |
3 |
compute nodes 3 required for minimum configuration |
|
H |
3 |
management nodes |
|
I |
2 |
storage controllers |
What Is In This Guide?
The following table lists the procedures you need to complete to install and configure Oracle Private Cloud Appliance at your site.
| Step | Description | References |
|---|---|---|
|
1 |
Review the product notes for any late-breaking information about Oracle Private Cloud Appliance. From the documentation home page you can access the release notes for the software version installed on your system. |
|
|
2 |
Review important safety information. |
Before performing the installation, refer to the following documents:
|
|
3 |
Complete the site preparation procedures. Verify all installation requirements. Fill out the initial installation checklist in advance. Make sure that the data center environment is ready for the installation of the appliance. |
|
|
4 |
Install the appliance rack. When the appliance is delivered to your installation site, unpack the system, transport it to the allocated space in your data center, and make sure it is ready to be powered on for the first time. |
|
|
5 |
Power on the appliance. Connect the appliance to the data center network according to the design you recorded in your installation preparations. Provide power to the appliance, switch on the necessary components in the correct order, and monitor the hardware initialization process. |
|
|
6 |
Perform the initial appliance configuration procedure. Make sure you have your filled-out initial installation checklist available before you begin. Using the configuration information you collected in the checklist, work through the data screens of the initial configuration wizard and enter the required parameters. |
|
|
7 |
Proceed with other administration tasks. |